Content Creation Best Practices: A Step-By-Step Workflow

Most businesses know they should be publishing content consistently. Few actually do it well. The gap between "we need content" and "we have content that ranks" is where most teams stall out, buried under keyword spreadsheets, half-finished drafts, and publishing schedules that fell apart two weeks in. That's exactly why nailing your content creation best practices matters more than simply increasing output. A repeatable workflow beats raw effort every single time.
This guide breaks down the entire content creation process into clear, actionable steps, from identifying the right topics and structuring your writing, to optimizing for search engines and actually hitting "publish" on a consistent basis. Whether you're a solo founder writing your own blog posts or a small marketing team trying to scale, you'll walk away with a framework you can use immediately to produce content that earns traffic, not just fills a content calendar. We built RankYak to automate most of this workflow, so we've spent a lot of time studying what separates content that ranks from content that doesn't.
Let's get into the step-by-step process.
What to set up before you start
Before you write a single word, you need a solid foundation. Most content teams skip this setup phase and end up with a chaotic mix of inconsistent tone, duplicate topics, and no clear owner for anything. Spending a few hours upfront on the right infrastructure saves you dozens of hours later and is one of the most overlooked content creation best practices you can adopt.
Define your brand voice and style guide
Your brand voice is the consistent personality behind everything you publish. Without a documented style guide, every writer on your team (or every AI draft you edit) will sound slightly different, which erodes reader trust over time. A good style guide doesn't need to be a 40-page document. It needs to answer the questions writers ask most often when they sit down to write.

A one-page style guide you actually use beats a 20-page document living in a forgotten folder.
Here's a simple template you can copy and fill in:
| Element | Your Answer |
|---|---|
| Tone | e.g., direct, professional, conversational |
| Person | e.g., second person: "you/your" |
| Vocabulary to use | e.g., "customers," not "users" |
| Vocabulary to avoid | e.g., no jargon like "leverage" or "synergy" |
| Sentence length | e.g., aim for under 20 words per sentence |
| Formatting preferences | e.g., bold key terms, short paragraphs |
| Audience reading level | e.g., general business audience |
Fill this out once, share it with anyone who creates content for you, and update it when your brand evolves.
Audit your existing content and channels
Before you produce new content, take stock of what you already have. A quick content audit tells you which pieces perform, which pull in zero traffic, and which topics you've already covered so you avoid keyword cannibalization. Start by pulling your top 20 URLs by organic traffic from Google Search Console and noting what those pages have in common.
Sort everything you find into three categories:
- Keep and optimize: Pages ranking on page two or three that need a refresh and better internal linking.
- Consolidate: Multiple thin posts covering the same topic that should be merged into one comprehensive piece.
- Cut or redirect: Pages with no traffic, no backlinks, and no strategic value.
This audit takes about two hours and immediately shows you where your biggest content opportunities are hiding.
Set up your publishing and tracking stack
You need two things working before you publish anything: a CMS you can publish from consistently and a way to measure what's actually working. Your CMS might be WordPress, Webflow, or Shopify. Your analytics layer should include Google Search Console (free and essential) and basic traffic tracking through Google Analytics 4.
Connect Google Search Console to your domain by verifying ownership through a DNS record or HTML tag. This gives you keyword-level visibility into what queries already bring people to your site, which feeds directly into the research steps covered later in this guide.
Clarify who owns what
Content creation breaks down fast when nobody knows who is responsible for each step. Before you start executing, write one name next to each role: who researches topics, who writes drafts, who edits, who publishes, and who reviews results. Even if that's all the same person, writing it down as a defined process keeps you consistent when things get busy and prevents tasks from quietly falling through the cracks.
Step 1. Set goals, guardrails, and success metrics
Most content fails because it was created without a clear purpose. Before you pick topics or open a document, you need to know what you want this content to do and how you'll measure whether it worked. Skipping this step means you'll spend months publishing without knowing if any of it is moving the needle, which is one of the most common mistakes teams make when trying to apply content creation best practices at scale.
Define your content goal
Every piece of content should serve one primary goal. Not three goals, not "both traffic and conversions." One primary goal per piece keeps your writing focused and makes measurement straightforward. Common goals include driving organic search traffic, building an email list, supporting sales conversations, or reducing the volume of customer support questions your team handles.
Use this template before writing each piece:
| Element | Your Answer |
|---|---|
| Primary goal | e.g., rank for a target keyword |
| Target audience | e.g., small business owners new to SEO |
| Desired action | e.g., sign up for a free trial |
| Content type | e.g., how-to guide |
| Guardrail | e.g., don't make unsupported claims about results |
Filling this out takes two minutes and prevents your content from drifting off-topic halfway through a draft. The "guardrail" row matters more than most people expect. Guardrails define what your content should not do, whether that's going off-brand, overpromising outcomes, or covering territory outside your actual expertise.
Pick the right success metrics
Your metrics should match your goal directly. Traffic data without conversion data tells you half the story. Conversion data without traffic data tells you the other half. Link both together so you can see which content actually drives business results, not just pageviews.
Track at least one engagement metric and one business metric per piece of content from the day you publish it.
Here's a simple framework for assigning metrics before you hit publish:
- Awareness goal: Impressions and clicks from Google Search Console
- Engagement goal: Time on page and scroll depth from Google Analytics 4
- Lead generation goal: Form submissions or email signups tied to the specific piece
- Revenue goal: Assisted conversions tracked through your analytics platform
Set a 30-day and 90-day review date for each piece at the time of publishing. This habit forces you to actually check the data, which is the only way to know what's working and improve your process over time.
Step 2. Research your audience, intent, and topics
Good content starts with knowing who you're writing for and why they're searching. Skipping audience research is one of the fastest ways to produce content that gets ignored, because you end up writing what you think people want instead of what they actually need. This step shows you how to gather real signals about your audience and turn them into a focused topic list that feeds the rest of your content creation best practices workflow.
Understand search intent before picking topics
Search intent is the actual goal behind a query, not just the words someone typed. Google organizes intent into four categories: informational (they want to learn), navigational (they want to find a specific site), commercial (they're comparing options), and transactional (they're ready to buy). Matching your content type to the right intent is what separates content that ranks from content that sits on page five.
Pick the wrong intent and you'll write the right content for the wrong moment in the buyer's journey.
To check intent quickly, search your target keyword in Google and study the top five results. If they're all listicles, write a listicle. If they're all product pages, a how-to guide won't rank there. The SERP gives you the clearest available signal about what Google thinks searchers actually want.
Find real audience questions to guide your topics
Your audience is already telling you what they want to know. You just need to look in the right places. Google's "People also ask" boxes and the autocomplete suggestions in the search bar show you the exact phrasing your audience uses, which is far more reliable than guessing from inside your own head. These are free signals you can collect in under 15 minutes before writing anything.
Use this template to document your research before each piece:
| Research Source | What You Found | Keyword or Question to Target |
|---|---|---|
| Google autocomplete | e.g., "how to write content fast" | how to create content quickly |
| People also ask | e.g., "what is a content calendar" | content calendar for beginners |
| Google Search Console | e.g., queries ranking on page 2 | existing opportunities to optimize |
Fill in one row per source and keep this table attached to your draft so your writing stays anchored to real audience needs throughout the entire creation process, not just at the start.
Step 3. Build a repeatable content plan and calendar
Without a documented plan, content creation becomes reactive, and reactive content rarely builds compounding organic traffic. A repeatable content plan turns your research from Step 2 into a scheduled sequence of topics that map directly to your goals. Applying this level of structure is one of the most underrated content creation best practices because it removes the daily decision of "what should I write today" and replaces it with a system that runs on its own.
Map your topics to a publishing cadence
Your publishing cadence is the number of pieces you commit to producing each week or month based on your actual capacity, not an aspirational number you'll abandon by week three. Start conservative. One high-quality piece per week beats four rushed ones that cover duplicate topics and miss search intent entirely. Once you have your list of researched topics from Step 2, group them by content type and priority so you publish your highest-impact pieces first.
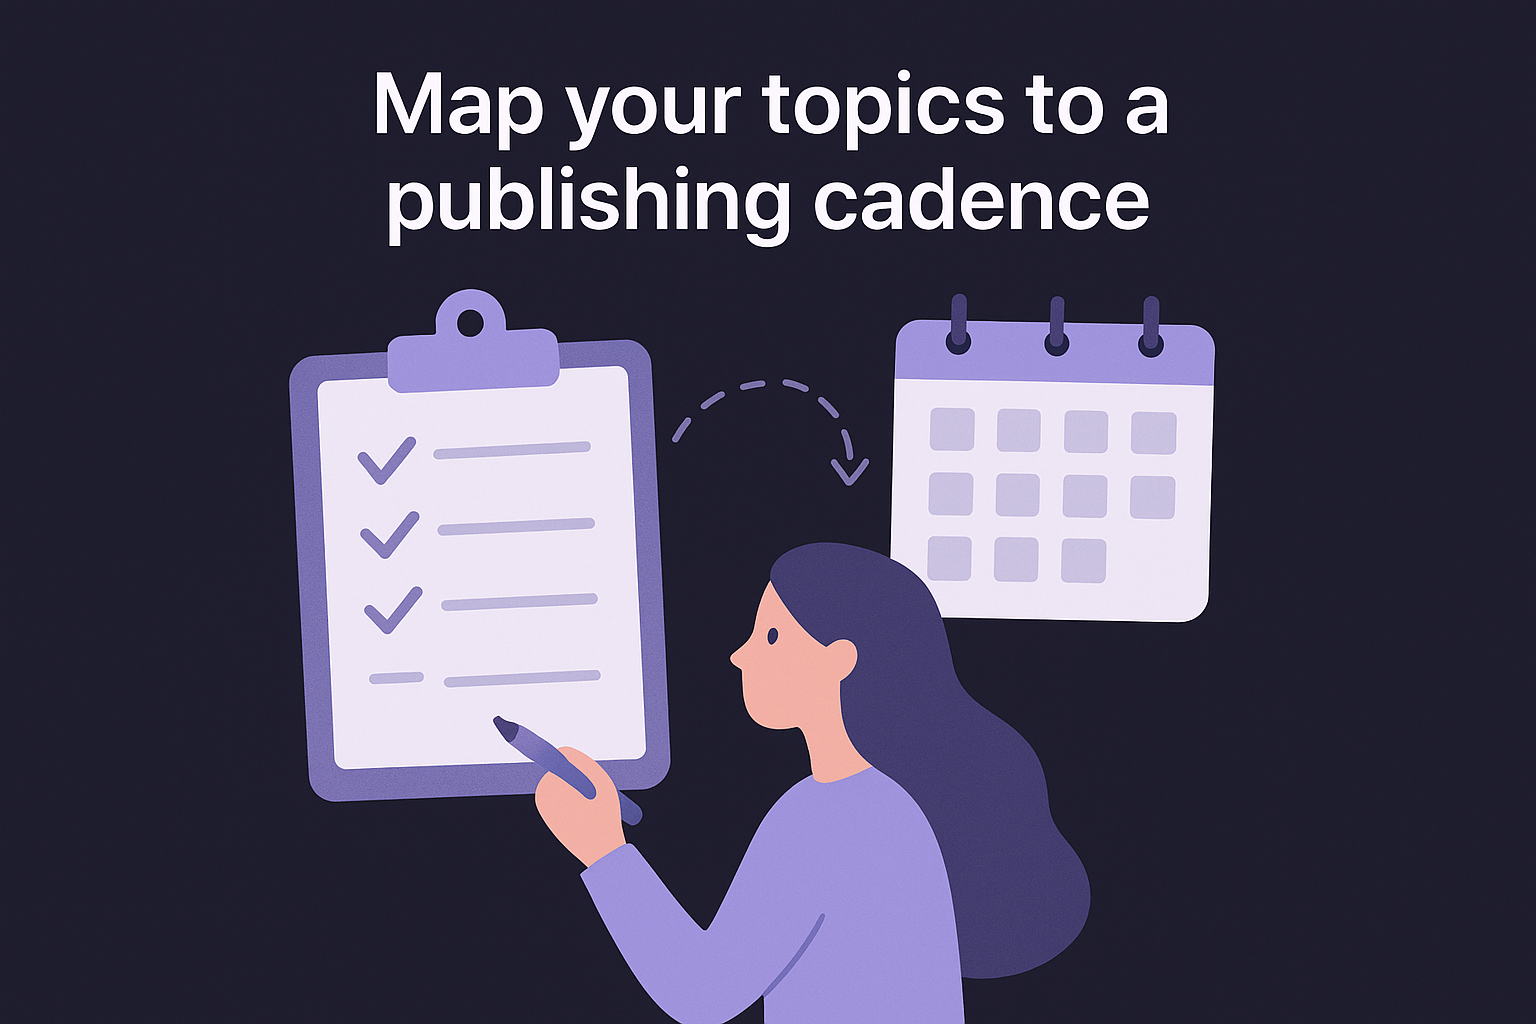
Publish less than you think you can handle, and stay consistent. Consistency beats volume every time.
Use this template to map your topics before you build your calendar:
| Topic | Target Keyword | Content Type | Priority | Estimated Publish Date |
|---|---|---|---|---|
| How to build backlinks | backlink building tips | How-to guide | High | Week 1 |
| Content audit walkthrough | content audit process | Step-by-step guide | High | Week 2 |
| Best SEO tools for SMBs | SEO tools for small business | Comparison post | Medium | Week 3 |
| Internal linking strategy | internal linking SEO | How-to guide | Medium | Week 4 |
Fill in one row per topic, assign a priority based on search volume and business relevance, and sort by priority before you schedule anything. This single table gives you a clear view of your next four weeks of output.
Use a simple content calendar you'll actually maintain
Your content calendar does not need to be a complicated project management system. A shared spreadsheet with clear columns works better than a tool your team never opens. Track the topic, writer, draft due date, edit due date, publish date, and URL once it's live. That's six columns and everything you need.
Add a status column with values like "In progress," "In review," "Scheduled," and "Live" so anyone on your team can check the state of any piece in under ten seconds without sending a message to ask.
Step 4. Create content fast without sacrificing quality
Speed and quality feel like opposites, but they're not. The writers who produce the most reliable, high-quality content consistently are almost never the fastest typists. They're the ones with the tightest process, which means less time staring at blank pages and more time actually writing. Applying a structured approach to creation is one of the most practical content creation best practices you can build into your daily workflow.
Build a detailed outline before you write a single sentence
A strong outline is the fastest writing tool you have. When you sit down to draft with a blank page, you spend cognitive energy deciding what comes next. A pre-built outline removes that decision entirely and lets you focus purely on writing. Spend 10 minutes on your outline before drafting and you'll cut your total writing time nearly in half.
Your outline is your contract with the reader: it tells them what they'll learn and holds you accountable to delivering it.
Use this template for every piece you write:
| Section | Purpose | Target Word Count |
|---|---|---|
| Introduction | Hook and state the problem | 100-150 words |
| H2 Section 1 | Cover the first main point | 300-400 words |
| H2 Section 2 | Cover the second main point | 300-400 words |
| H2 Section 3 | Cover the third main point | 300-400 words |
| Conclusion | Summarize and call to action | 100-150 words |
Fill in the "Purpose" column with one sentence that describes exactly what the reader should understand after reading that section. This keeps each section focused and prevents your draft from expanding into territory that doesn't serve your reader. The target word count column also stops you from over-writing sections that don't need depth and under-writing sections that do.
Separate drafting from editing
Writing and editing at the same time is one of the biggest speed killers in content creation. When you stop mid-sentence to fix a word, you interrupt the flow that produces your best first drafts. Draft the full piece first, then go back and edit. These are two different mental modes that work better when you keep them apart.
Set a 45-minute timer for your drafting session, then take a 10-minute break before you switch to editing. During the draft phase, skip the typos, ignore clunky sentences, and don't restructure paragraphs. Write the full draft from outline to conclusion in one sitting whenever possible, then edit with fresh eyes. This single habit will increase both your output and the consistency of your writing quality.
Step 5. Optimize for SEO and visibility in AI answers
Writing great content is only half the job. The other half is making sure search engines and AI platforms can read, understand, and surface your work when your audience searches for it. This step covers the specific on-page actions that move your content from "published" to "ranking," and it's one of the most actionable areas where content creation best practices directly impact your organic traffic over time.
Structure your on-page elements before you publish
Search engines use your on-page structure to understand what your content covers. Your title tag, meta description, H1, and subheadings all send signals about relevance, and getting them right takes under 15 minutes per piece. Use your target keyword in the title tag, the H1, and at least one H2 subheading. Keep your meta description under 160 characters and write it as a direct answer to the searcher's question, not a summary of what your article covers.
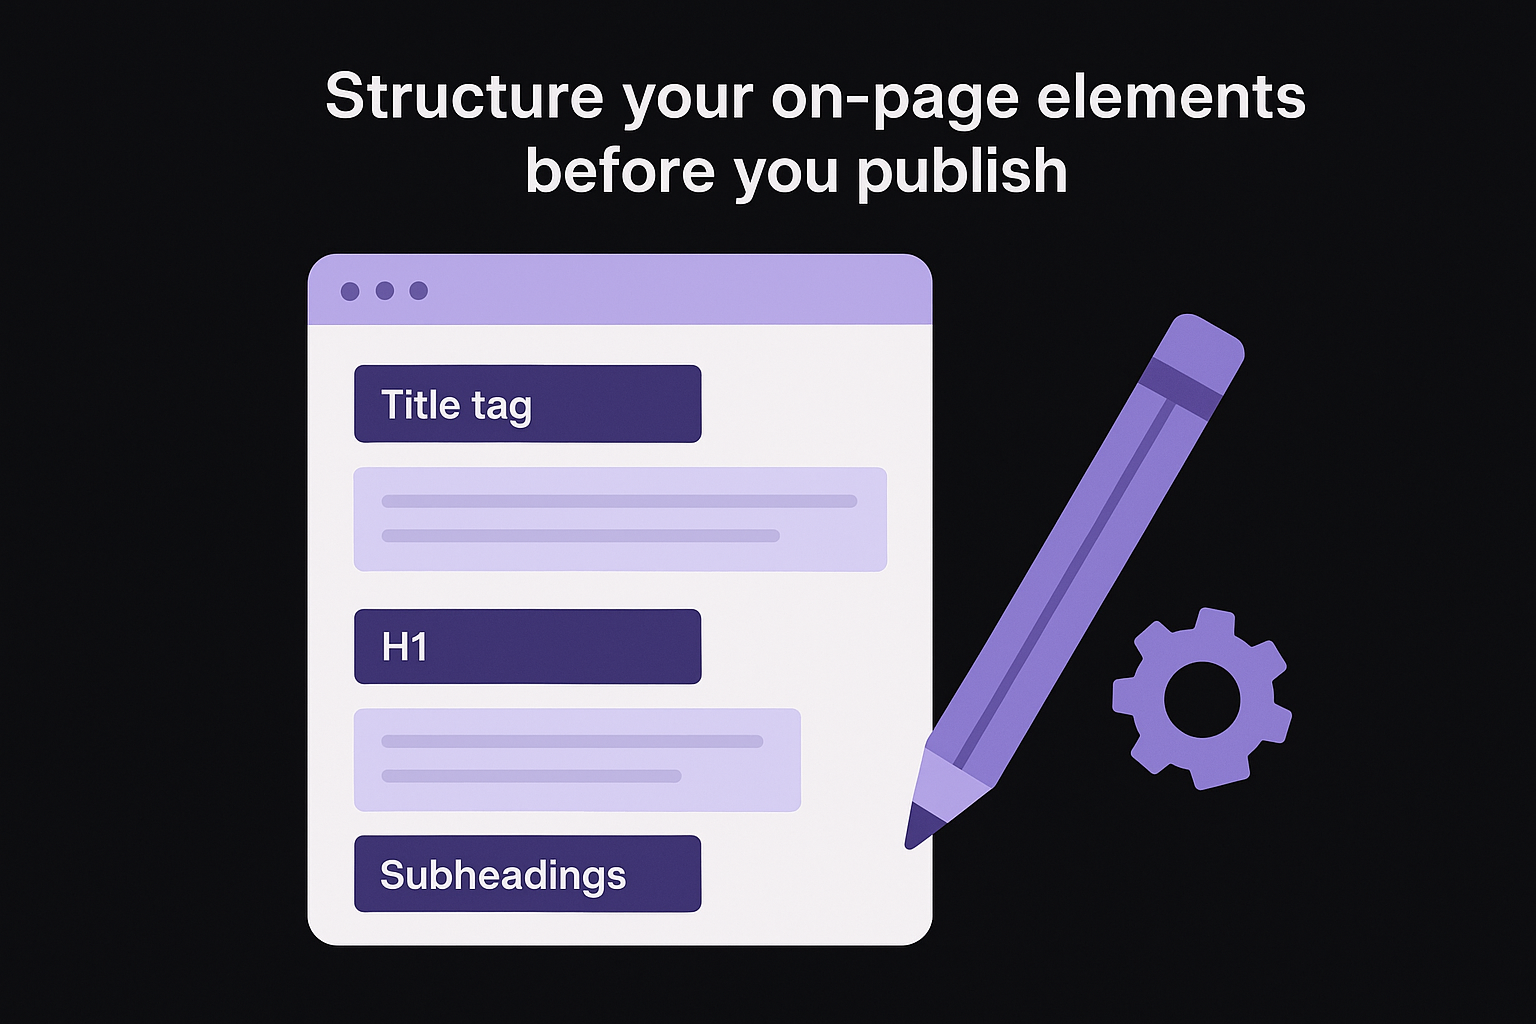
Treat your title tag and meta description as ad copy: they decide whether someone clicks or scrolls past.
Use this template before you publish each piece:
| On-Page Element | What to Include | Example |
|---|---|---|
| Title tag | Target keyword near the start | "Content Creation Best Practices: A Step-By-Step Workflow" |
| Meta description | Direct answer, under 160 characters | "Learn a repeatable workflow for planning, writing, and optimizing content that ranks." |
| H1 | Matches title tag closely | Same as title tag |
| First 100 words | State the topic and target keyword clearly | Include the keyword naturally in sentence two or three |
| Image alt text | Describe the image with relevant context | "content calendar spreadsheet template" |
Optimize for AI answer visibility
AI platforms like ChatGPT, Perplexity, and Google's AI Overviews pull answers from content that is clear, direct, and structured around specific questions. To appear in these answers, write a concise definition or direct answer in the first two to three sentences of each major section. AI systems favor content that answers the question immediately, before providing supporting detail, so lead with your conclusion and then explain it.
Add an FAQ section at the end of your piece with three to five questions your audience actually asks, each followed by a two to three sentence answer. This format signals to both search engines and AI platforms that your content covers the topic with enough depth and precision to be a reliable source.
Step 6. Publish, distribute, measure, and refresh
Publishing is not the finish line. It's the starting point for everything that determines whether a piece of content actually earns traffic. The final stage of any solid content creation best practices workflow covers four actions that most teams either rush through or skip entirely: publishing with the right settings, distributing to amplify reach, measuring against the metrics you set in Step 1, and refreshing pieces that start to slip in rankings over time.
Distribute your content across the right channels
After you hit publish, actively push the content to every channel where your audience already spends time. Do not wait for Google to find it on its own. Submit your updated sitemap to Google Search Console immediately after publishing so Google crawls the new URL faster. Then share the piece through your email list, any relevant communities you participate in, and your social profiles.
Distribution determines how quickly your content builds links and signals, both of which accelerate ranking.
Use this checklist for every piece you publish:
- Submit the URL for indexing in Google Search Console
- Send a dedicated email to your list if the piece is high-priority
- Share it in two to three relevant online communities where it genuinely helps members
- Add internal links from three to five existing pages on your site that cover related topics
Measure results and refresh underperforming content
Check the 30-day and 90-day review dates you set in Step 1. Pull the data from Google Search Console and your analytics platform, then compare against your target metrics. If a piece is not hitting your benchmarks, diagnose before you rewrite. Use this quick-reference table to match the symptom to the fix:
| Symptom | Likely Cause | Action to Take |
|---|---|---|
| Impressions but low clicks | Title tag or meta description is weak | Rewrite both to match intent more clearly |
| Low impressions overall | Page is not indexed or has no authority | Check indexing status; build internal links |
| Good traffic but no conversions | Call to action is buried or unclear | Move the CTA higher and make it specific |
| Rankings dropping after 6 months | Content is outdated or thinner than competitors | Add new data, examples, and expand thin sections |
Refreshing content on a 6-to-12 month cycle is one of the highest-ROI activities in SEO. Update statistics, add new examples, expand sections where competitors have outwritten you, and republish with a new date only when the content has genuinely changed.
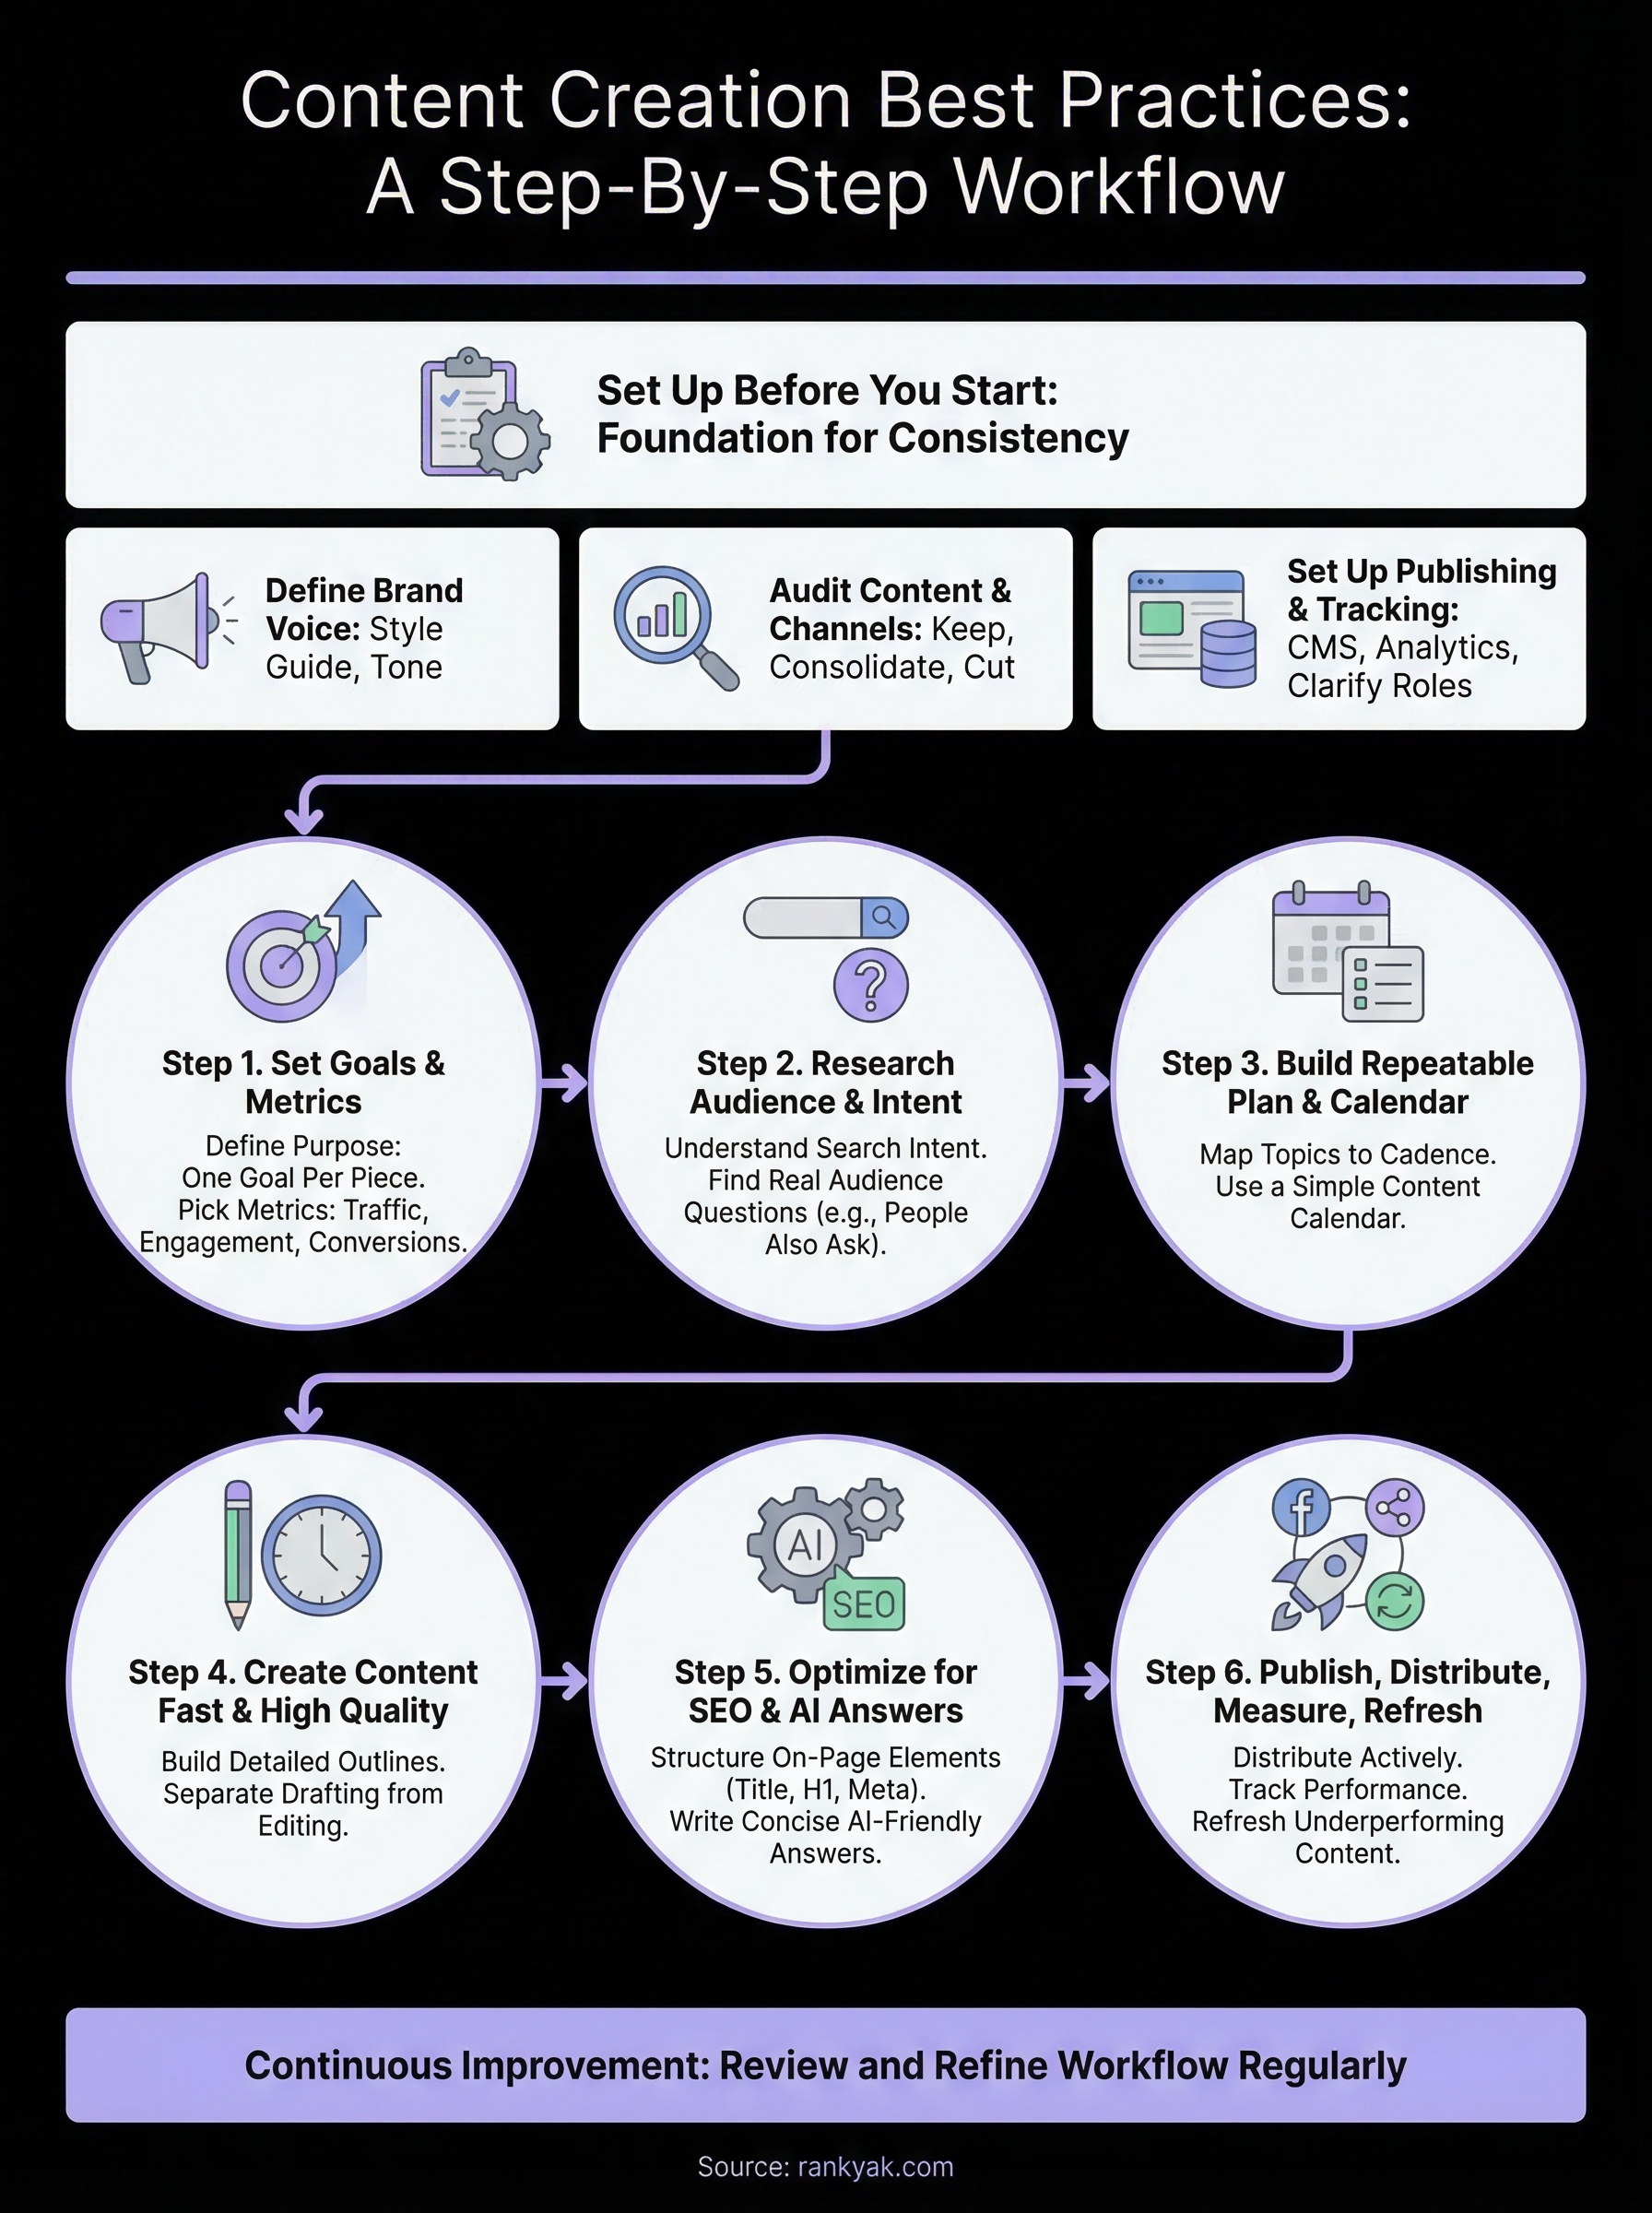
Keep improving your workflow
The six steps in this guide give you a solid foundation, but the real work is treating your workflow as a living system that you review and refine on a regular schedule. Every month, pull your data and ask two questions: which steps are producing the strongest results, and where is the process breaking down? Honest answers to those two questions will tell you exactly where to focus your energy, whether that means tightening your outlines, refreshing older content more aggressively, or improving how you distribute after you publish.
Applying these content creation best practices consistently is what separates teams that grow organic traffic month over month from those that plateau after the first few pieces. If you want to remove the manual parts of this workflow entirely, RankYak automates keyword research, daily article creation, and publishing directly to your CMS so you can focus on strategy while the system handles execution.

Get Google and ChatGPT traffic on autopilot.
Start today and generate your first article within 15 minutes.

SEO revenue calculator
How much revenue is your website leaving on the table?
Take a quick quiz and see exactly how much organic revenue you're missing out on, along with personalized tips to fix it.
-
4 questions, under 1 minute
-
See traffic and revenue potential
-
No email required
Free · takes 1 minute · no signup needed
Question 1 of 4
Question 2 of 4
Question 3 of 4
Question 4 of 4
Your SEO growth potential
Extra visitors / month
after 6-12 months of consistent publishing
Revenue potential / year
at your niche's avg. conversion rate
Articles needed (12 mo)
to reach this traffic level
ROI with RankYak
at $99/mo ($1,188/year)
To hit that number, you'd need to:
- Build a topical authority strategy for your niche
- Research keywords & map out a full topical cluster
- Write, edit & publish an article every single day
- Build backlinks to the articles you publish
RankYak handles all of this automatically, every day.
* Estimates based on industry averages. Results vary by niche, competition, and domain authority. Most SEO results become visible after 3-6 months of consistent publishing.