Stages Of Content Creation: A Step-By-Step Framework For SEO

Most content fails not because it's poorly written, but because the process behind it was incomplete. A blog post without keyword research is a guess. An article without a distribution plan is a diary entry. Understanding the stages of content creation gives you a repeatable system, one that turns raw ideas into pages that actually rank and drive traffic.
The problem is that many businesses treat content creation as a single step: write something and hit publish. But SEO-driven content requires a chain of deliberate actions, from identifying what your audience is searching for, to structuring articles that satisfy search intent, to getting those articles indexed and linked. Skip a stage, and the whole chain breaks. That's why teams burn hours producing content that sits on page five of Google, generating nothing but frustration and wasted budget.
This article maps out each stage of the content creation process in order, explaining what happens at every step and why it matters for SEO performance. You'll get a clear framework you can apply whether you're a solo founder, a marketing team of three, or an agency managing dozens of clients. And if you'd rather not run every stage manually, RankYak automates the full pipeline, from keyword discovery and content planning to writing, optimizing, and publishing, so your site grows on autopilot. But first, let's break down exactly what each stage involves and how to get it right.
Why stages of content creation matter for SEO
Google doesn't rank content in a vacuum. Every ranking decision Google's systems make is based on signals you build, or fail to build, into your content before and after it goes live. When you skip stages, you strip away the signals that tell Google your content is relevant, trustworthy, and worth surfacing to searchers. The stages of content creation aren't bureaucratic busywork. They are the operational backbone of any SEO strategy that actually moves rankings and generates consistent organic traffic over time.
Google rewards content that follows a clear process
Google's helpful content guidelines make it clear that the search engine prioritizes content demonstrating experience, expertise, authoritativeness, and trustworthiness, collectively known as E-E-A-T. These qualities don't appear by accident. They result from specific decisions made at specific stages: choosing the right topic, building a thorough outline, citing credible sources, editing for accuracy, and keeping content updated over time. When you follow a structured process, you naturally build these signals into your content at every turn.
A structured content process doesn't just make writing easier. It directly determines whether Google sees your page as a reliable answer or just another generic article competing for scraps of attention.
Content that skips research tends to miss real search intent, targeting a keyword that sounds right but answers the wrong question entirely. Content that skips editing tends to carry factual errors or vague claims that erode reader trust. Each stage in the process acts as a quality checkpoint that protects the output you eventually publish.
Skipping stages creates compounding problems
When you drop a stage, the damage doesn't stay contained to that one step. Missing keyword research means your article might cover a topic nobody searches for in the way you've framed it. Missing the optimization stage means even a well-written article fails to signal its relevance to Google's crawlers. Each skipped stage multiplies the probability that your content lands on page three and stays there, invisible to the audience you were trying to reach.
Think of it like building a house without completing foundation inspections. The structure might look fine from the outside, but the underlying weakness eventually surfaces. In content, that weakness shows up as low impressions, poor click-through rates, and high bounce rates. These signals tell Google your page isn't satisfying users, and rankings fall as a result.
A defined process makes scaling possible
One underrated benefit of working through structured stages is repeatability. Once you know exactly what needs to happen at each step, you can delegate tasks, build checklists, train contributors, or automate parts of the workflow without sacrificing quality. Without a defined process, every new piece of content starts from scratch, and consistency becomes impossible to maintain as your output grows.
Scaling content production is something most growing businesses eventually need to tackle. Doing it without a framework means scaling inconsistency rather than results. A documented process turns content creation from a creative guessing game into a predictable, manageable system that produces output you can rely on to perform month after month.
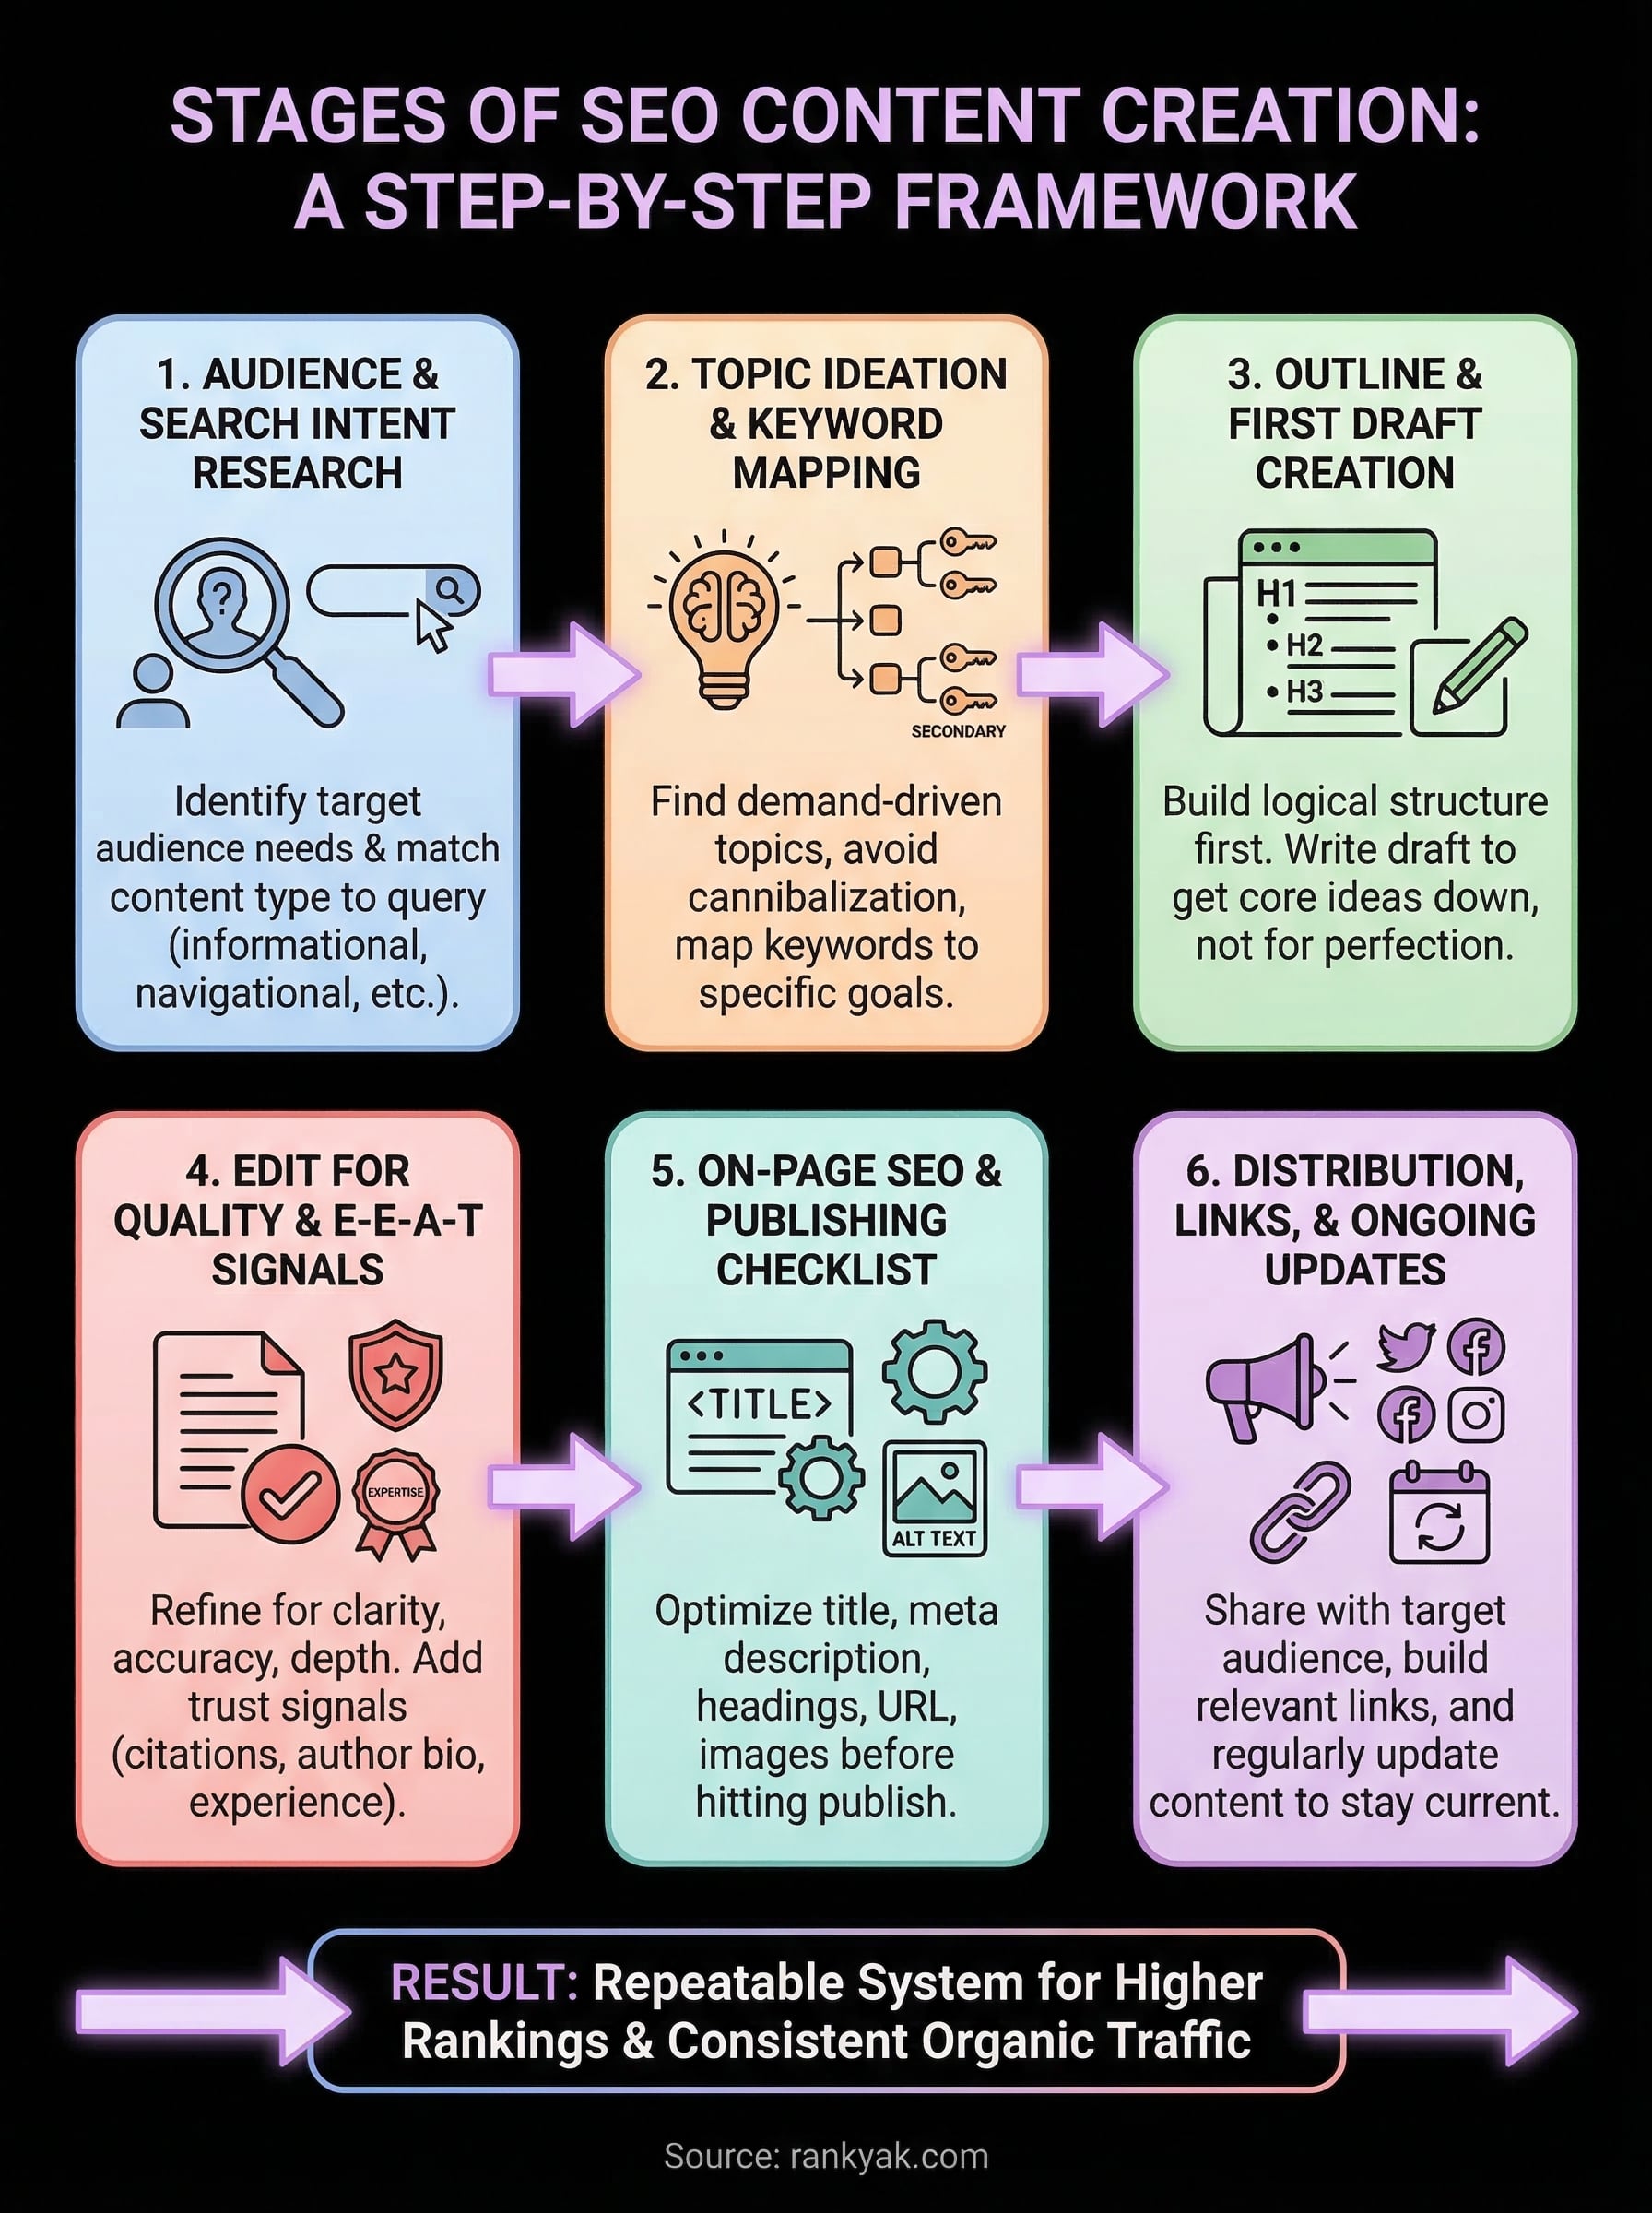
Stage 1: Audience and search intent research
Before you write a single word, you need to understand who you're writing for and what they actually want to find. This first stage in the stages of content creation is where most teams rush or skip entirely, which is exactly why their content misses the mark. Getting this stage right means every subsequent step builds on a solid foundation of real user needs rather than guesswork.
Know who you're writing for
Your audience defines every choice you make in content, from the vocabulary you use to the depth of explanation you provide. A B2B software buyer researching an enterprise solution needs entirely different information than a solo freelancer Googling the same keyword. Start by identifying the specific person most likely to search for your target term: their experience level, their pain points, and what outcome they need from the content they read. This clarity prevents you from writing a beginner's guide when your audience needs advanced tactics, or overcomplicating an answer that needed to stay simple.
Spending time here also tells you what language to use. Experienced practitioners use different terminology than beginners, and choosing the wrong register instantly signals to readers that the content wasn't written with them in mind. That mismatch kills trust before the second paragraph.
Match your content to search intent
Search intent is the underlying reason behind a query. Google's search documentation explains that matching content to search intent is a core factor in how its systems evaluate relevance. There are four main intent types: informational (learning something), navigational (finding a specific page), commercial (comparing options), and transactional (ready to act). Before you build any outline, identify which intent category your keyword targets and verify it by reviewing what already ranks on the first page.
If you write a long-form guide when Google is surfacing quick comparison tables, you're fighting the algorithm instead of working with it.
Look at the top three to five results for your keyword. Notice whether Google is surfacing listicles, step-by-step tutorials, product pages, or definition articles. The format and angle of those results reveal exactly what type of content Google believes satisfies that query. Matching that format signals that your content is built for the same audience already clicking those results, which is a strong relevance indicator from the moment Google crawls your page.
Stage 2: Topic ideation and keyword mapping
Once you understand your audience and their intent, the next step in the stages of content creation is identifying specific topics and matching each one to the right keyword. Topic ideation isn't about brainstorming random titles. It's about finding gaps between what your audience needs and what already exists, then building content that fills those gaps better than anything currently ranking.
Generate topic ideas from real demand
The most reliable topics come from real search behavior, not internal guesswork. Start by looking at what your audience is actively searching for using keyword tools, search autocomplete suggestions, and the "People also ask" sections in Google results. These sources surface questions and angles your audience types into search bars every day, giving you direct insight into what content has built-in demand before you write a single sentence.
Picking a topic because it feels interesting is not a content strategy. Picking a topic because data shows people search for it consistently is.
You can also mine existing sources for ideation signals. Look at comment sections, forums, and product reviews in your niche to find recurring questions or frustrations. These raw inputs often reveal subtopics and angles that keyword tools miss entirely, and they tell you exactly what language your audience uses when describing their own problems, which helps you write in a voice that resonates.
Map keywords to specific content goals
Keyword mapping means assigning one primary keyword and a small cluster of related terms to each piece of content before you start writing. This prevents keyword cannibalization, where multiple pages on your site compete against each other for the same query and split your ranking potential across articles instead of concentrating it on a single, authoritative page.
Each piece should target a primary keyword with a clear intent match, supported by two to five related secondary keywords that reinforce the topic. A simple mapping structure keeps this organized:
| Content piece | Primary keyword | Secondary keywords | Intent type |
|---|---|---|---|
| Blog post | content creation process | content workflow, content planning steps | Informational |
| Landing page | SEO content writing service | content writing for SEO, hire SEO writer | Commercial |
Mapping this way before writing ensures your outline and headings naturally incorporate the right terms from the start, rather than forcing keywords into finished copy after the fact, which almost always reads as awkward and mechanical.
Stage 3: Outline and first draft creation
The outline and first draft are where your research from earlier stages of content creation transforms into actual written content. This stage determines how your article is structured and whether readers, and Google, can follow your logic from the opening paragraph to the final conclusion. Skipping a proper outline almost always produces rambling drafts that need heavy restructuring later, which doubles your editing workload and wastes the time you spent on research.
Build your outline before you write a word
An outline is not a formality. It is a navigation map for both you and your readers, defining exactly which points you'll cover, in what order, and at what depth. Start by reviewing the top-ranking pages for your target keyword and identifying which headings and subtopics they consistently cover. This tells you the minimum coverage threshold your article needs to compete, without simply copying what's already out there.
Your outline should answer the reader's core question in a clear sequence, so they never have to guess where the article is going or backtrack to find information they missed.
Once you know what to cover, arrange your headings so each section builds on the one before it. A reader who finishes your introduction should naturally want what your first H2 promises, and a reader reaching your final section should feel the full topic has been addressed. Logical flow between sections reduces bounce rate because readers don't abandon the page searching for missing context that should have been there all along.
Write the draft with structure, not perfection
Your first draft has one job: get the core ideas on the page in the structure your outline defines. Trying to perfect sentences while drafting is the fastest way to slow your production and lose the thread of your argument. Write paragraph by paragraph, following your outline, and resist the urge to edit as you go. You will handle that in the next stage.
Focus on answering the specific question each heading promises to address, then move forward to the next section. Keep your target reader in mind throughout: if a paragraph would confuse someone newer to the topic, flag it for revision rather than stopping mid-draft to fix it. This keeps your writing momentum intact and produces a complete, workable first draft faster than any other approach.
Stage 4: Edit for quality and E-E-A-T signals
Editing is where your draft becomes a page worth publishing. In the stages of content creation, this stage often gets rushed because it feels less creative than writing, but sloppy editing is the fastest way to undermine every hour you spent on research and drafting. A thorough edit doesn't just fix typos. It strengthens the logic, tightens the language, and builds the trust signals that Google's quality systems are specifically designed to detect.
Review for clarity, accuracy, and depth
Your first pass through the draft should focus on whether each section actually delivers what its heading promises. Read each paragraph with one question in mind: does this give the reader something concrete and useful, or does it repeat the heading without adding substance? Cut any paragraph that circles the same point twice without advancing the reader's understanding. Repetition doesn't signal thoroughness to Google. It signals padding, which quality raters are trained to flag.
Editing for depth means asking whether a knowledgeable reader would find your content genuinely useful, or whether they'd walk away feeling like they already knew everything you said.
Your second pass should verify factual accuracy across every claim you make. Check that statistics come from credible, up-to-date sources. Confirm that any advice you give reflects how things actually work, not how you assume they work. One easily verifiable factual error can destroy reader trust in the entire article, and Google's quality rater guidelines explicitly flag content with factual mistakes as a sign of low quality.
Build visible E-E-A-T signals into the content
E-E-A-T stands for experience, expertise, authoritativeness, and trustworthiness. These signals don't appear automatically in a first draft. You need to actively edit them in. Look for places to add first-hand observations, concrete examples, or citations that back up your key points. These additions show both readers and Google that the content comes from someone who genuinely understands the topic rather than someone who assembled it from surface-level sources.
Also review your author attribution and sourcing. Adding a byline with a brief author bio, linking to credible external sources where appropriate, and including an "About" page on your site are all structural choices that strengthen the trust layer around your content. Readers and search engines both look for these signals to decide whether your page deserves their attention.
Stage 5: On-page SEO and publishing checklist
On-page SEO is the stage in the stages of content creation where your finished draft gets configured to communicate directly with search engines. At this point your content is written and edited, but it isn't yet optimized for how Google crawls and indexes pages. Skipping this stage means leaving ranking signals on the table that take minimal time to set up but make a measurable difference in how quickly and how high your page appears in search results.
Optimize your on-page elements before you hit publish
Your primary keyword needs to appear in specific locations across the page for Google to confirm what your content is about. At a minimum, include your target keyword in the title tag, the H1 heading, the first paragraph of the article, at least one H2 subheading, and the meta description. These placements aren't about stuffing a keyword repeatedly into your copy. They are clear relevance signals that help Google match your page to the exact query you're targeting.
Getting these elements right before publishing is far easier than going back to fix them after your page has already been indexed with the wrong signals.
Beyond the keyword placements, every image on the page needs a descriptive alt text that tells Google what the image shows. Your URL slug should be short, readable, and contain your primary keyword, not a string of numbers or session IDs. Internal links to and from related pages on your site help Google understand your site's topic structure and distribute authority across your content.
Run a pre-publish checklist to catch missed elements
Before you publish, run a structured check against a short list of non-negotiables. This takes five minutes and prevents basic errors from going live on a page that might otherwise rank well.
Here are the core items to verify before every publish:
- Title tag contains the primary keyword and stays under 60 characters
- Meta description summarizes the page accurately in under 155 characters
- H1 matches or closely reflects the target keyword
- Images all have descriptive alt text applied
- Internal links point to at least two related pages on your site
- URL slug is clean, short, and keyword-relevant
- Mobile rendering looks correct in preview before submission
Running this checklist consistently means every page you publish starts with the same baseline of on-page optimization rather than hoping you remembered everything.
Stage 6: Distribution, links, and ongoing updates
Publishing is not the final step in the stages of content creation. A page sitting on your site with no external signals pointing to it is invisible to Google, regardless of how well you optimized it. Distribution and link building turn a published page into one that accumulates authority over time, while regular updates keep it relevant long after its original publish date.
Get your content in front of the right audiences
Distribution starts by identifying where your target audience already spends time and placing your content in front of them directly. Share new articles through your email list, relevant online communities, and social channels where your audience is active. Each share creates a potential pathway for other publishers and site owners to discover your content and link back to it organically, which is one of the most sustainable ways to build inbound links without running outreach campaigns.
Distribution is not about blasting your article everywhere. It is about putting it in front of people who have a specific reason to read it, share it, or link to it.
Repurposing key sections of your article into shorter formats like email newsletters or community discussion posts that link back to the full piece extends its reach without producing entirely new content. This approach drives a steady stream of referral traffic back to the original page and gives each article a longer window of opportunity to attract links.
Build links and keep your content current
Link building signals to Google that other sites consider your content a reliable reference. Reach out to relevant sites that currently cite similar articles and let them know your piece covers the topic in greater depth. Focus on sites with genuine topical relevance to your niche rather than chasing volume, since a handful of authoritative, relevant links outperform dozens of weak ones with no topical connection.
Keeping content updated is equally important. Google's systems favor pages that remain accurate and current, and a post with outdated statistics or broken references loses trust with both readers and crawlers. Set a calendar reminder to revisit your highest-traffic pages every six to twelve months. Check for outdated data, update examples that no longer apply, and refresh internal links to point to newer related content you have published since the original article went live.
Next steps
The stages of content creation outlined in this article give you a clear, repeatable system for producing content that builds real SEO value rather than sitting unnoticed on page three. Each stage connects to the next, so the quality of your final output depends on how thoroughly you work through every step, from audience research to ongoing updates.
Running this process manually across multiple pieces every week takes significant time and resources. Most businesses hit a point where the volume of content they need to publish outpaces what their team can realistically produce at a consistent quality level. That is exactly the problem RankYak was built to solve. The platform automates the full pipeline, covering keyword discovery, content planning, article creation, on-page optimization, and publishing, so your site grows without you managing every step yourself. If you want to stop running content on guesswork and start scaling it on a system, try RankYak free for 3 days and see what consistent, automated content production looks like in practice.

Get Google and ChatGPT traffic on autopilot.
Start today and generate your first article within 15 minutes.

SEO revenue calculator
How much revenue is your website leaving on the table?
Take a quick quiz and see exactly how much organic revenue you're missing out on, along with personalized tips to fix it.
-
4 questions, under 1 minute
-
See traffic and revenue potential
-
No email required
Free · takes 1 minute · no signup needed
Question 1 of 4
Question 2 of 4
Question 3 of 4
Question 4 of 4
Your SEO growth potential
Extra visitors / month
after 6-12 months of consistent publishing
Revenue potential / year
at your niche's avg. conversion rate
Articles needed (12 mo)
to reach this traffic level
ROI with RankYak
at $99/mo ($1,188/year)
To hit that number, you'd need to:
- Build a topical authority strategy for your niche
- Research keywords & map out a full topical cluster
- Write, edit & publish an article every single day
- Build backlinks to the articles you publish
RankYak handles all of this automatically, every day.
* Estimates based on industry averages. Results vary by niche, competition, and domain authority. Most SEO results become visible after 3-6 months of consistent publishing.