Automated Content Generation: What It Is and How to Use It

Most businesses know they need a steady stream of content to rank on Google. Fewer have the time, budget, or team to actually make it happen. That gap between "we should be publishing more" and "we physically can't" is exactly where automated content generation steps in. It refers to the use of AI and software tools to produce written content at scale, from blog posts and product descriptions to full SEO articles, without requiring a human to write every word from scratch.
The technology has matured fast. What used to mean spammy, unreadable filler text now means structured, optimized articles that can genuinely compete in search results. But there's a catch: not all automation is created equal. The difference between content that ranks and content that gets ignored comes down to how the automation is built, whether it accounts for search intent, keyword strategy, E-E-A-T signals, and your brand's voice.
That's the problem we built RankYak to solve. As an all-in-one SEO automation platform, RankYak handles keyword discovery, content creation, and publishing on autopilot, producing one fully optimized article per day without you lifting a finger. This article breaks down what automated content generation actually is, how it works under the hood, how to implement it into your workflow, and what to look for when choosing the right tool for your business.
What automated content generation is
Automated content generation is the process of using software and AI models to produce written content with minimal human input. At its core, the technology takes structured inputs like a target keyword, a topic brief, or a site-level niche, then applies language models to generate readable, organized text. The output can range from short product descriptions to full-length SEO articles, depending on how the system is built and what you feed into it. Understanding what's happening under the hood helps you make better decisions about where to use it and how much to trust the output.
How the technology works
Modern automated content generation systems rely on large language models (LLMs) to predict and produce coherent text. But the raw language model is only one part of the equation. The more capable platforms layer additional logic on top of the model, including keyword research, competitor analysis, search intent matching, and structural templates, before a single sentence gets written. That layered approach is what separates a useful content pipeline from a tool that just strings words together.
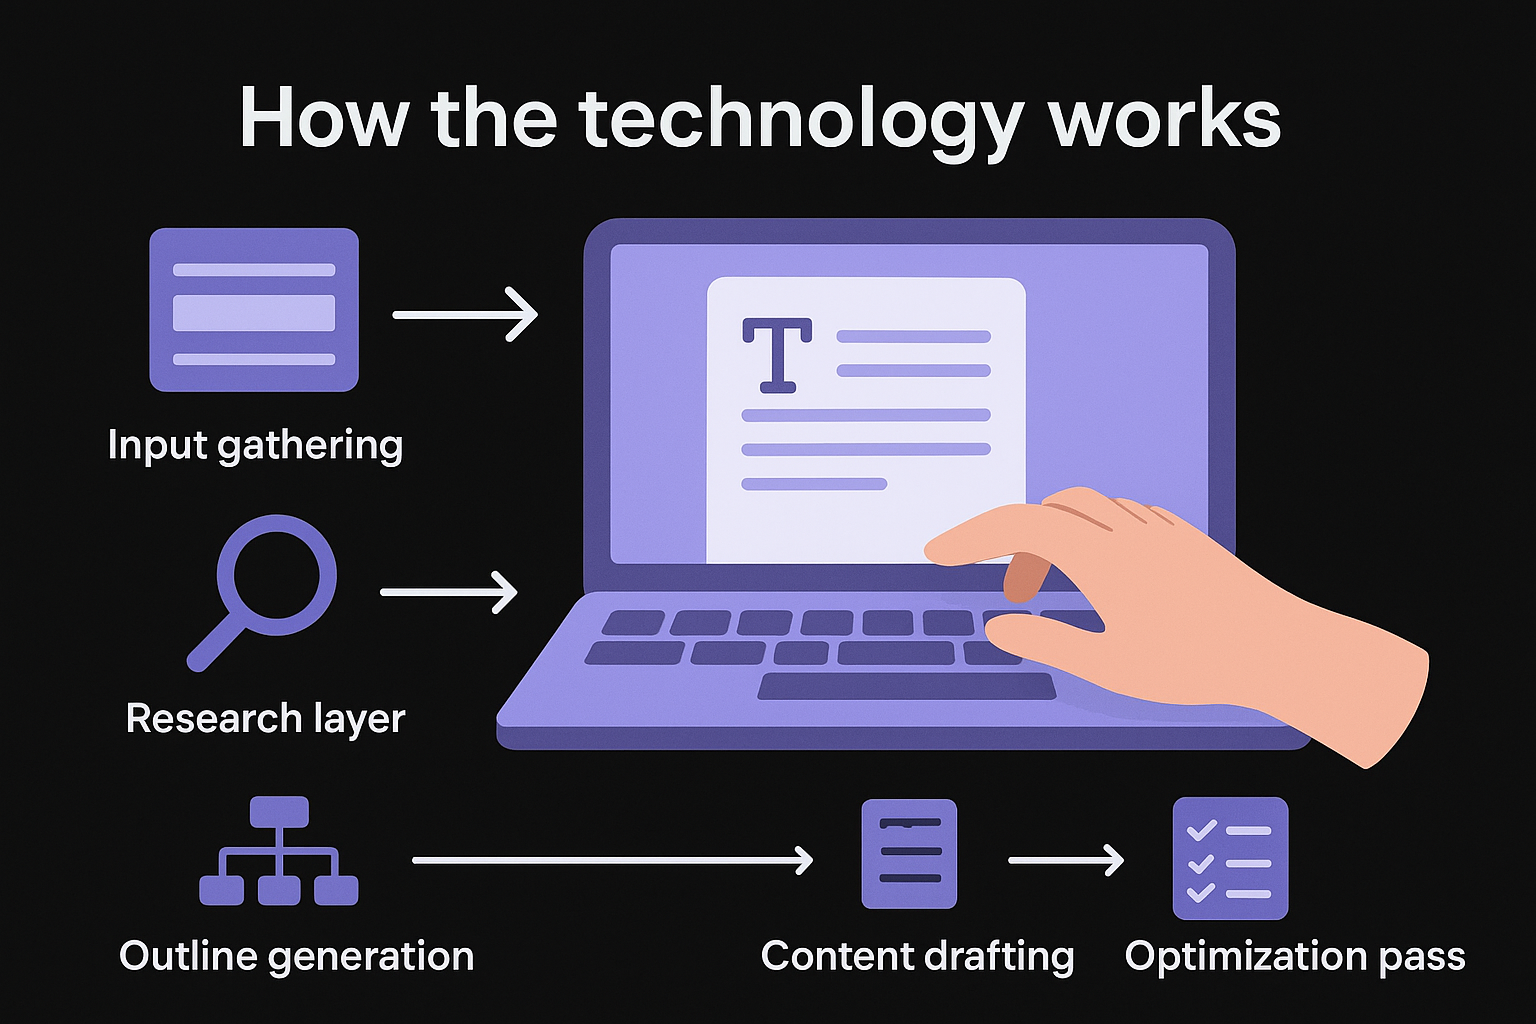
Here is a simplified breakdown of how a well-built automated system typically operates:
- Input gathering: The system collects a seed keyword, your website context, and any brand voice guidelines you have defined.
- Research layer: It pulls search intent data, analyzes what is currently ranking, and identifies related keywords worth covering.
- Outline generation: The system structures the article with headings and content blocks based on what the topic requires.
- Content drafting: The LLM fills in each section using the research and structure as a guide.
- Optimization pass: The system checks for keyword placement, readability, and formatting before producing the final draft.
The key distinction between a basic AI writing tool and a full automated pipeline is that the latter handles the research and strategy, not just the writing, and that is where most of the ranking value lives.
What it can and cannot replace
Automated content generation handles the repetitive, research-heavy, and time-intensive parts of content production remarkably well. It can identify what questions your audience is asking, structure an article that matches search intent, and produce a polished draft in minutes rather than days. For businesses that need to publish consistently across dozens of topics, that compression of effort is a genuine competitive advantage.
What automation still needs from you is direction and oversight. The better platforms reduce how much oversight is necessary, but you still benefit from defining your niche, reviewing high-stakes content (anything touching health, finance, or legal decisions), and making sure the output reflects your brand accurately. Automation compresses the labor, but it does not eliminate the need for judgment at the strategic level.
Your role shifts from writer to strategist and editor. Instead of spending hours producing drafts, you focus on decisions that require human thinking: which topics to target, what tone fits your audience, and how your content supports your broader business goals. That is a more valuable use of your time, and it is exactly the shift that well-implemented automation makes possible.
Why it matters for SEO and growth
SEO rewards consistency. Google's ranking systems favor websites that cover topics thoroughly, publish regularly, and demonstrate authority over time, and that combination is almost impossible to maintain manually when you're running a business at the same time. Automated content generation closes the gap by making daily, optimized publishing achievable without a full content team behind it.
Consistent publishing builds search authority
Search engines treat a regularly updated site differently than one that publishes in bursts and then goes quiet for weeks. When your site produces well-structured content on a consistent schedule, Google's crawlers index it more frequently, which shortens the time between publishing and ranking. That momentum compounds: each new article reinforces the topical authority your previous articles established, and the signal you send to search engines grows stronger with every post.
Topical authority is one of the most durable ranking advantages you can build, and consistent publishing is the fastest path to earning it.
Volume lets you capture more keyword opportunities
Most businesses chase a handful of high-volume keywords and miss the long-tail search queries that collectively drive the majority of organic traffic. Long-tail keywords are less competitive, more specific, and closer to buying intent, but targeting them requires producing a lot of content. Automation makes that volume realistic for a small team or a solo operator by handling research, drafting, and structure without adding proportional effort on your end.
The result is a broader content footprint. Instead of ranking for five terms, you can realistically target fifty or more. Each article pulls in a specific audience segment and creates an additional entry point into your site, and that surface area is what separates sites that plateau from sites that grow steadily month over month.
Faster publishing means faster return on investment
Manual content production typically means publishing once or twice a month. At that pace, building meaningful organic traffic takes years. Automation compresses weeks of writing work into minutes, so you start accumulating search rankings sooner and see a return on your content investment faster.
That speed advantage also lowers your cost per article significantly. Instead of paying for agency retainers or freelancer fees on every post, you shift to a repeatable, predictable content operation that scales without scaling your budget alongside it.
Where automation fits in your workflow
Automated content generation works best when you treat it as a production layer inside your existing workflow, not a replacement for your entire content strategy. Before you switch anything on, you need a clear picture of which tasks consume the most time and deliver the least unique value. For most businesses, that answer is consistent: research, drafting, and formatting eat up the bulk of the work while contributing little that requires your specific judgment. That is exactly where automation belongs.
The tasks automation handles best
Automation excels at high-volume, repeatable tasks that follow a consistent structure. Keyword research, article outlining, first-draft writing, internal link suggestions, and meta description generation all fit that description. These tasks follow predictable patterns, benefit from data inputs, and do not require creative opinions or business-specific decisions. When you hand these off to a well-built system, you free up your working hours for the parts of content strategy that actually demand a human behind them.

Consider which tasks in your current process look like this:
- Pulling keyword data and filtering by difficulty or volume
- Writing article introductions and section summaries
- Formatting content with proper heading hierarchies
- Generating featured image prompts or alt text
- Publishing and scheduling posts across platforms
Handing off these tasks to automation is not cutting corners; it is applying your time where it generates the most value for your business.
Where your judgment still drives results
The strategic layer of your content operation still needs your direct input. Deciding which topic clusters to pursue, how to position your brand against competitors, and which content pieces to promote after publishing are all decisions that require business context and audience understanding that no tool can fully replicate on its own.
Your role shifts from execution to direction. You set the goals, define the niche, and review output for accuracy, particularly on topics where factual precision and credibility matter most to your audience. Some content categories, such as financial guidance or health-related information, warrant a closer editorial review before anything goes live. The more clearly you define those parameters upfront, the more reliably your automated system delivers content that fits your standards without constant correction on the back end.
How to set up a repeatable workflow
A repeatable workflow turns automated content generation from a one-time experiment into a reliable growth engine. The goal is to define each step once, then let the system execute it on a consistent schedule. You do not want to make the same decisions every time a new article needs to go live; you want a clear process that handles the routine so you can focus on anything requiring genuine judgment.
Define your inputs before anything runs
The most common reason automated workflows break down is that the inputs are vague. Before you configure any tool, nail down three core inputs: your primary topic cluster, your target audience, and the tone your brand uses consistently. These inputs shape every piece of content the system produces. When they are well-defined and consistent, the output is tighter, requires far less cleanup, and aligns with what your audience actually expects.
The quality of your automated output is directly proportional to the quality of the inputs you define upfront.
Build a review step into the schedule
Automation handles production, but your editorial review catches anything that does not fit your standards before it goes live. Set aside a fixed block of time each week, ideally no more than 30 minutes, to scan the articles your system has queued. You are not rewriting at this stage; you are checking for factual accuracy, brand alignment, and anything sensitive that warrants closer attention. Keeping this step lightweight is what makes the workflow sustainable over the long term.
A simple review checklist helps here:
- Does the article match the intended search intent?
- Are the facts verifiable and accurate for your industry?
- Does the tone match how your brand speaks to customers?
- Are internal links pointing to relevant, live pages?
Set a publishing cadence and hold it
Consistency matters more than volume. Committing to a realistic schedule, whether that is daily, five times a week, or three times a week, signals to search engines that your site is active and worth crawling regularly. Start with what your workflow can sustain without gaps, then increase cadence as the process becomes more predictable. Publishing in sporadic bursts does not produce the same ranking benefit as steady, reliable output maintained over time.
Tools to automate content end to end
Picking the right tool matters as much as deciding to automate in the first place. The market for AI writing software has expanded quickly, and the options range from simple text generators to fully integrated platforms that handle every step from keyword research to publishing. Knowing what category each tool falls into helps you avoid paying for capability you already have or missing the one piece that completes your workflow.
What separates full-pipeline tools from point solutions
Most tools available today address one or two steps in the content process. A standalone AI writer produces drafts but leaves keyword research, publishing, and performance tracking to separate apps. A keyword research tool identifies opportunities but does not write the content. Stitching these together yourself is possible, but it creates friction, handoff delays, and inconsistency in how each step gets executed.

A full-pipeline tool reduces the number of decisions you make daily by handling the entire sequence inside a single system, not across three or four disconnected apps.
Full-pipeline platforms connect research, writing, optimization, and publishing in one continuous flow. You define your niche once, and the system handles everything downstream, finding keywords, drafting articles, and pushing them live to your CMS on a set schedule. That end-to-end approach is what makes automated content generation genuinely scalable for a small team or a solo operator without adding proportional effort on your part.
How RankYak handles the full workflow
RankYak is built specifically for this end-to-end use case. It starts by identifying high-potential keywords based on your website and niche, builds a daily content plan around those keywords, writes fully structured SEO articles up to 5,000 words, and publishes them directly to platforms like WordPress, Shopify, and Webflow without requiring you to log in and do it manually.
The platform incorporates competitor research, search intent analysis, internal linking, and brand voice adaptation into every article it produces. That means the output is not generic AI text; it is content calibrated to rank for your specific topic cluster and audience. One subscription at $99 per month covers all features, and a 3-day free trial lets you test the full system before committing.
Quality and SEO safeguards that keep it helpful
Automated content generation delivers long-term value only when the system behind it applies real quality controls at every step. Publishing high volumes of thin or inaccurate content will hurt your rankings rather than build them. The safeguards you build into your workflow are what keep your site aligned with Google's helpful content standards, which reward content that demonstrates experience, expertise, authoritativeness, and trustworthiness above all else.
Check every article against search intent
The most common quality failure in automated content is a mismatch between the article and the actual search intent behind the target keyword. A keyword like "best project management tools" signals that the reader wants a comparison, not a definition. When your system generates an article that answers the wrong question, it produces high bounce rates and low engagement, both of which push your ranking down over time.
Matching content structure to search intent is one of the most direct levers you control for improving how your pages rank.
Make sure your platform identifies intent type before structuring any article. The four main intent categories to account for are:
- Informational: The reader wants to understand a topic or concept
- Navigational: The reader is looking for a specific site or resource
- Commercial: The reader is comparing options before making a decision
- Transactional: The reader is ready to take action or make a purchase
Require citations and protect factual accuracy
Content that makes claims without backing them up fails the trust test that both readers and search engines apply. Your automated workflow should flag any factual assertions that need a source and either pull from reliable references or prompt you to add them during review. This matters especially for topics touching financial, health, or legal subject matter, where unverifiable claims can damage your credibility fast.
Keeping content comprehensive rather than padded is equally important. Word count alone does not determine quality, and repeating the same points in different phrasing actively lowers your content's value. Your system should aim for complete coverage of the topic, addressing every reasonable question a reader would have without circling back unnecessarily. Comprehensive content earns longer dwell time, more backlinks, and stronger topical authority signals than padded content ever will.
Key takeaways and next steps
Automated content generation works when the system behind it handles more than just writing. The tools that actually move your rankings handle research, structure, intent matching, and publishing as a connected sequence, not as isolated steps you stitch together manually. Volume matters, but quality controls and strategic inputs determine whether that volume translates into traffic or gets ignored by search engines.
Audit which parts of your current content process consume the most time without requiring your specific judgment. Those tasks belong in an automated pipeline. The parts that demand your business context and audience understanding stay with you, and that division is what makes automation sustainable and effective at scale over the long term.
If you want a system that handles the entire workflow from keyword discovery to daily publishing without manual effort, start your free trial with RankYak and see how much faster your content operation can move.

Get Google and ChatGPT traffic on autopilot.
Start today and generate your first article within 15 minutes.

SEO revenue calculator
How much revenue is your website leaving on the table?
Take a quick quiz and see exactly how much organic revenue you're missing out on, along with personalized tips to fix it.
-
4 questions, under 1 minute
-
See traffic and revenue potential
-
No email required
Free · takes 1 minute · no signup needed
Question 1 of 4
Question 2 of 4
Question 3 of 4
Question 4 of 4
Your SEO growth potential
Extra visitors / month
after 6-12 months of consistent publishing
Revenue potential / year
at your niche's avg. conversion rate
Articles needed (12 mo)
to reach this traffic level
ROI with RankYak
at $99/mo ($1,188/year)
To hit that number, you'd need to:
- Build a topical authority strategy for your niche
- Research keywords & map out a full topical cluster
- Write, edit & publish an article every single day
- Build backlinks to the articles you publish
RankYak handles all of this automatically, every day.
* Estimates based on industry averages. Results vary by niche, competition, and domain authority. Most SEO results become visible after 3-6 months of consistent publishing.