Content Editing Process: A Step-by-Step Checklist That Works

You hit publish, wait a few weeks, and… nothing. No traffic. No rankings. The article you spent hours writing sits buried on page four of Google. More often than not, the problem isn't the topic or the keyword, it's what happened (or didn't happen) between the first draft and the final version. A solid content editing process is the difference between content that ranks and content that collects dust.
Editing isn't just about catching typos. It's about tightening structure, sharpening clarity, and aligning every paragraph with search intent, the stuff that actually moves the needle on organic performance. Yet most teams either skip editing entirely or approach it without a repeatable system.
This guide breaks down a step-by-step editing checklist you can apply to every piece of content you produce, whether you're writing articles yourself, managing a team, or using a platform like RankYak to generate SEO-optimized articles on autopilot. Even automated content benefits from a clear editing framework to make sure nothing slips through before it goes live.
Let's get into the process.
What the content editing process includes
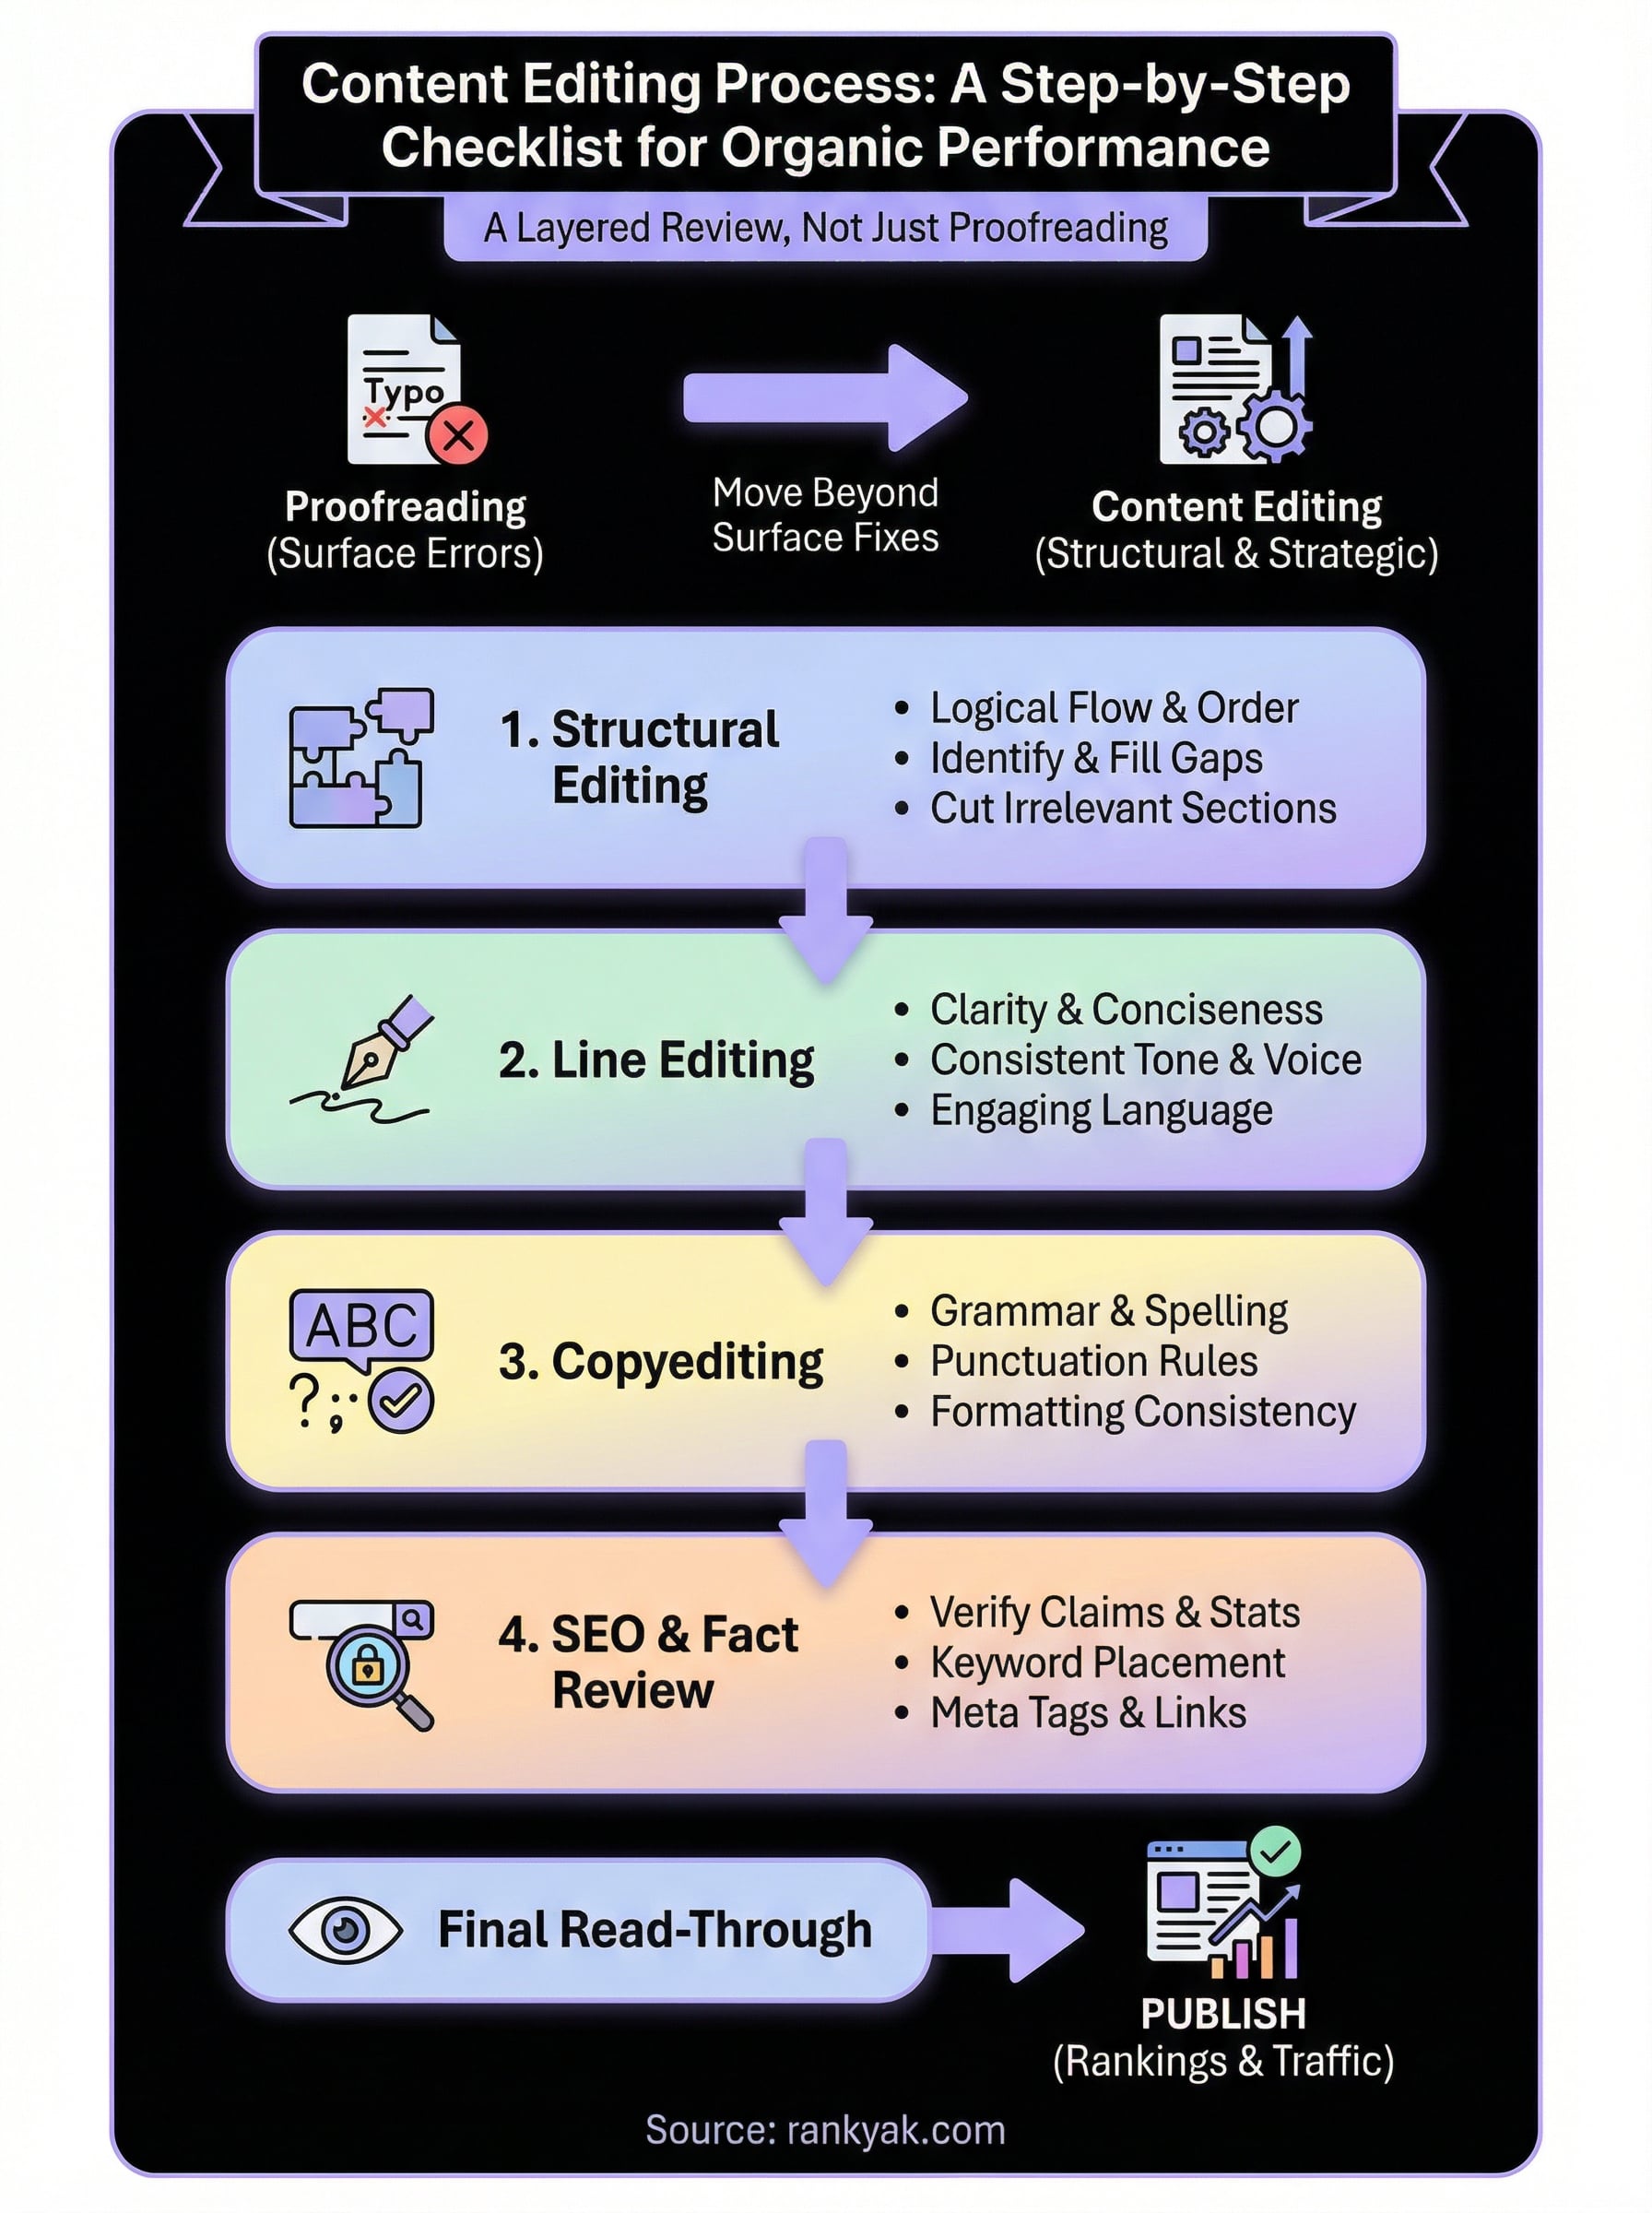
The content editing process is not a single pass through a document. It's a layered review that moves from big-picture structure down to individual word choices and technical details. Most people treat editing as proofreading, but those are two very different activities. Proofreading catches surface errors; editing improves the entire piece from concept to final sentence. If you're only running a spell-check before hitting publish, you're skipping the work that actually determines whether your content performs.
Trying to fix grammar before you've confirmed the structure is solid is like painting walls before the framing is done.
The main editing layers
Every effective content editing process moves through four distinct layers. Skipping one of them means you're likely publishing content with a gap that will hurt either the reader experience or the search performance. These layers aren't arbitrary; they reflect the order in which problems should be solved. Here's how each one breaks down:
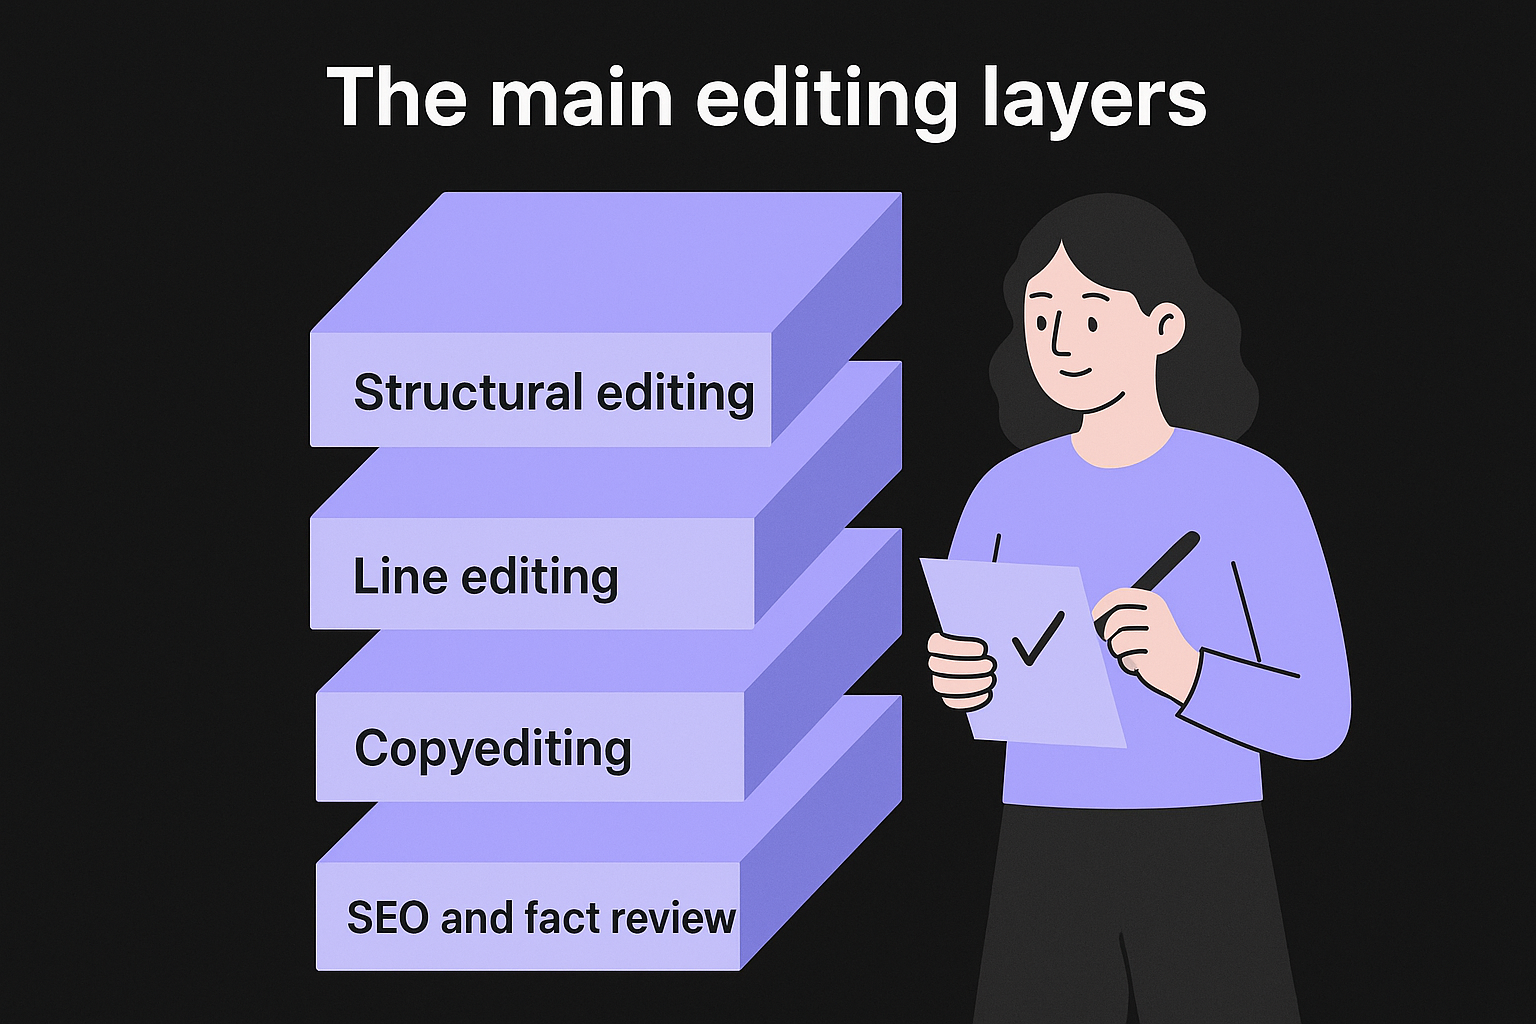
| Layer | What it covers |
|---|---|
| Structural editing | Does the content flow logically? Are sections in the right order? Is anything missing that the reader needs to achieve their goal? |
| Line editing | Are sentences clear and direct? Does the tone stay consistent throughout? Is the writing engaging or flat and generic? |
| Copyediting | Grammar, punctuation, spelling, and consistency in terminology, formatting, and capitalization. |
| SEO and fact review | Are claims accurate and sourced? Are keywords placed naturally? Does the meta description reflect the article? |
Working through these layers in sequence saves you significant time. If you rewrite sentences during line editing only to cut entire sections later during structural review, you've wasted effort on content that won't survive. Sequence is the whole point.
What separates editing from proofreading
Proofreading is the final, narrow check you run after all editing is complete. It focuses on surface-level errors: a misspelled word, a missing comma, inconsistent capitalization across headings. Editing, by contrast, is structural and strategic. You're asking whether the content serves the reader's actual intent, whether the argument holds together, and whether every section earns its place in the piece.
Many writers conflate these two because they feel similar. Both involve reading carefully and making changes. But the mindset is fundamentally different. When you proofread, you're hunting for mistakes. When you edit, you're asking harder questions about whether the content is doing its job.
What good editing does for your rankings
Search engines reward content that fully answers a query, stays on topic, and keeps readers engaged long enough to signal value. A well-edited article lowers bounce rates because it doesn't make readers work hard to extract the information they came for. Tight structure and clear writing also help crawlers understand exactly what a page is about, which directly affects how it gets indexed and surfaced.
This is why editing matters even when you use automated tools to generate content. The draft might hit the right keywords and cover the right topics, but editing is what turns a draft into a piece that holds attention, builds trust, and earns authority over time. Skipping it is one of the most common reasons content underperforms despite a strong foundation.
Step 1. Set the brief and success criteria
Before you change a single sentence, you need to know what you're editing toward. The biggest mistake in any content editing process is jumping straight into rewrites without a clear target. The brief defines the purpose of the piece, what it covers, who it's written for, and what action the reader should take after finishing. Without that foundation, every editing decision becomes guesswork, and you end up making changes that feel productive but don't actually improve the content's performance.
Define what the content is supposed to do
Every piece of content exists to accomplish something specific. Before you edit, confirm the primary goal of the article: is it driving organic traffic, capturing leads, educating a new customer, or building topical authority? That goal should govern every choice you make. If a section doesn't serve the goal, it doesn't belong in the article, no matter how well-written it is.
Editing without a defined goal means you might improve sentences while leaving the whole piece pointed in the wrong direction.
Pull up the original brief and confirm these items before you start editing:
- Target reader: Who is the intended audience, and what do they already know going in?
- Search intent: What query is this article supposed to satisfy, informational, navigational, or transactional?
- Primary keyword: What term should the article clearly signal to search engines?
- Scope: What topics are in bounds, and what should stay out to keep the piece focused?
- Desired outcome: What should the reader do or understand after finishing the article?
Set measurable success criteria
Once you know the goal, define what a successful edit looks like. Success criteria give you a clear finish line so you don't over-edit or stop too early. For an SEO article, that might mean confirming the primary keyword appears in the introduction, all H2s are descriptive and on-topic, and the article fully answers the core query without sending readers elsewhere for basic information.
A simple criteria checklist for a standard SEO article looks like this:
| Criteria | Confirmed? |
|---|---|
| Primary keyword in first 100 words | Yes / No |
| Title matches search intent | Yes / No |
| All major subtopics covered | Yes / No |
| Clear call-to-action present | Yes / No |
| Article matches target audience knowledge level | Yes / No |
Run through this table before you touch the draft. A five-minute check at the start saves you from a full rewrite after you've already invested an hour in line edits.
Step 2. Fix structure and missing information
Once you've confirmed the brief, the next step in the content editing process is to review the overall structure before touching individual sentences. Structure problems compound: if the wrong sections appear in the wrong order, or if critical information is missing, no amount of sentence-level polishing will save the piece. You need to treat this step as a separate read-through, not a correction pass.
A disorganized article with perfect grammar still fails the reader.
Check the logical flow of sections
Read through the article once at full speed without making any edits, then ask yourself whether the content moves logically from one section to the next. Each section should build on what came before it, answering the reader's next natural question. If you find yourself confused or mentally jumping ahead, that's a reliable signal the order needs adjustment.
Run through this quick flow check before you restructure anything:
- Does the introduction establish the problem and promise a solution?
- Does each H2 address a distinct, non-overlapping part of the topic?
- Does each section transition naturally into the next without abrupt jumps?
- Does the conclusion connect back to the core promise made in the introduction?
Identify and fill content gaps
Missing information is one of the most common reasons content fails to rank. Search engines evaluate whether a piece fully satisfies the query, and if your article leaves obvious questions unanswered, readers bounce and look elsewhere. Compare your draft against the top-ranking results for your target keyword and note what topics they cover that yours skips.
A simple gap analysis looks like this:
| Question the reader might ask | Covered in draft? | Action needed |
|---|---|---|
| What is [topic]? | Yes / No | Add definition section |
| How does it work step by step? | Yes / No | Add explanation with example |
| What are common mistakes? | Yes / No | Add a pitfalls section |
| What should I do next? | Yes / No | Strengthen the CTA |
Cut what doesn't belong
Every draft contains at least one section that made sense during writing but doesn't serve the article's core purpose. Cutting is harder than adding, but it's often the edit that matters most. If a paragraph doesn't directly answer the target query, support the reader's goal, or move the piece forward, remove it entirely. A tighter, focused article consistently outperforms a bloated one in both rankings and reader retention.
Step 3. Tighten clarity, style, and voice
Structure is solid, information is complete, and now you move into the layer of the content editing process that most writers find hardest to be objective about: how the writing actually reads. Clarity, style, and voice work together to determine whether a reader stays with your article or gives up halfway through. A technically accurate piece with clunky sentences and inconsistent tone loses readers before they reach your call-to-action, which directly hurts engagement signals that affect rankings.
Simplify sentences and cut empty words
Long, tangled sentences are the most common clarity problem in first drafts. Each sentence should carry one idea, and if you find yourself using more than 25 words to express a single point, break it into two. Filler phrases like "it is important to note that" or "in order to" add length without adding meaning. Cut them every time you spot them. Your reader's attention is limited, and every unnecessary word is a tax on it.
If you have to read a sentence twice to understand it, rewrite it until you don't.
Run this quick clarity checklist on every paragraph before you move on:
- Replace passive constructions with active ones ("the report was written by the team" becomes "the team wrote the report")
- Remove phrases that delay the point: "basically," "essentially," "as a matter of fact"
- Break any sentence over 30 words into two shorter ones
- Replace vague nouns with specific ones ("a lot of users" becomes "73% of users")
Match tone to your target reader
Style and voice are not decoration. Your tone signals to readers whether this content was written specifically for them, and a mismatch between how you write and how your audience thinks causes disengagement faster than any structural problem. If your target reader is a small business owner with limited SEO experience, write at a level that respects their intelligence without assuming deep technical knowledge.
Read your draft out loud from start to finish. Where you stumble or rush through a sentence, that is a reliable signal the rhythm is off. Where the language suddenly shifts to formal or technical without reason, flag it and rewrite it to match the surrounding paragraphs. Consistent voice builds reader trust and keeps people moving forward through the article rather than abandoning it midway.
Step 4. Verify facts, SEO, and final checks
This is the last layer of the content editing process, and it's where most teams rush because the article feels nearly done. That feeling is exactly what causes preventable errors to slip through. Every fact, statistic, and on-page SEO element needs a manual review before you publish. A single outdated statistic or a missing meta description can undermine the credibility and search performance of an otherwise strong piece.
Confirm every claim is accurate
Your readers and search engines both reward accuracy. Any statistic older than two years should either be replaced with a current source or removed entirely. If you cite a specific number, link directly to the original research rather than a secondary summary. Google's helpful content guidelines explicitly flag trustworthiness as the most important E-E-A-T signal, so treating fact-checking as optional is a mistake you cannot afford.
One verifiable error can cost you the reader's trust for the rest of the article.
Run every claim through this fact-check template before you move to the SEO review:
| Claim type | Source confirmed? | Source URL added? | Source date |
|---|---|---|---|
| Statistic or data point | Yes / No | Yes / No | [Year] |
| Named tool or product feature | Yes / No | Yes / No | [Year] |
| Process or how-it-works claim | Yes / No | Yes / No | [Year] |
Run your SEO checklist
On-page SEO elements are easy to overlook when you're focused on content quality, but they directly affect how search engines read and index your page. Work through each item below before you consider the piece ready to publish:

- Primary keyword appears in the first 100 words and at least one H2
- Meta description is between 150 and 160 characters and includes the primary keyword
- Title tag matches search intent and stays under 60 characters
- Internal links point to relevant, topically related pages on your site
- Image alt text describes each image accurately and includes a keyword where it fits naturally
- URL slug is short, lowercase, and keyword-focused
Do a final read-through
Read the complete article one last time from the reader's perspective without stopping to make edits. This pass is not about catching errors, it's about confirming the piece delivers on every promise made in the introduction. If any section leaves a question unanswered or a point underdeveloped, flag it and fix it now rather than after the article is live and indexed.
Wrap-up and next steps
The content editing process outlined in this guide gives you a repeatable system to move every draft from rough to ready. Work through all four layers in sequence: set the brief, fix structure, sharpen clarity, then verify facts and SEO. Each layer builds on the last, so skipping steps will cost you more time in fixes later than it saves you now.
Producing content at scale means editing bottlenecks compound fast. Automating the research, structure, and SEO optimization before a draft ever reaches your editing queue gives you a cleaner starting point and cuts the time you spend catching fundamental problems. RankYak handles exactly that part of the process, generating fully optimized, publish-ready articles every day so your editing effort goes further on every piece.
Start your free 3-day trial and see how much less rework you need when the foundation is already solid.

Get Google and ChatGPT traffic on autopilot.
Start today and generate your first article within 15 minutes.

SEO revenue calculator
How much revenue is your website leaving on the table?
Take a quick quiz and see exactly how much organic revenue you're missing out on, along with personalized tips to fix it.
-
4 questions, under 1 minute
-
See traffic and revenue potential
-
No email required
Free · takes 1 minute · no signup needed
Question 1 of 4
Question 2 of 4
Question 3 of 4
Question 4 of 4
Your SEO growth potential
Extra visitors / month
after 6-12 months of consistent publishing
Revenue potential / year
at your niche's avg. conversion rate
Articles needed (12 mo)
to reach this traffic level
ROI with RankYak
at $99/mo ($1,188/year)
To hit that number, you'd need to:
- Build a topical authority strategy for your niche
- Research keywords & map out a full topical cluster
- Write, edit & publish an article every single day
- Build backlinks to the articles you publish
RankYak handles all of this automatically, every day.
* Estimates based on industry averages. Results vary by niche, competition, and domain authority. Most SEO results become visible after 3-6 months of consistent publishing.