How To Create A Content Calendar (Step-By-Step + Templates)

You're staring at a blank screen again. It's Monday morning and you need to post something on social media. You scramble through old photos, check what competitors posted, and rush out something mediocre. By Wednesday, you've forgotten to post entirely. This cycle repeats every week.
A content calendar fixes this chaos. It's a simple system that maps out what you'll publish, when you'll publish it, and where it goes. No more last-minute panic. No more inconsistent posting. Just a clear plan you follow every day.
This guide walks you through how to make a content calendar from scratch. You'll learn how to set goals, choose the right channels, and build a posting schedule that actually works. We'll cover template options, planning workflows, and tracking methods that show real results. Plus you'll get free templates you can start using immediately. Whether you're managing social media, blogs, or multiple platforms, you'll have a working calendar by the end of this article.
What is a content calendar
A content calendar is a centralized document that tracks what content you'll publish, when you'll publish it, and where it will go live. Think of it as your publishing roadmap that shows your entire content strategy in one place. You can build one in a simple spreadsheet, a project management tool, or dedicated calendar software.
Content calendars matter because they replace reactive, inconsistent posting with a strategic system. The benefits include better team alignment, fewer missed deadlines, consistent brand messaging, and the ability to plan content themes and topics ahead so you're never scrambling for ideas. Teams that use a content calendar also find it easier to repurpose content across platforms, spot gaps in their publishing schedule, and tie every post back to a business goal.
Core components of a content calendar
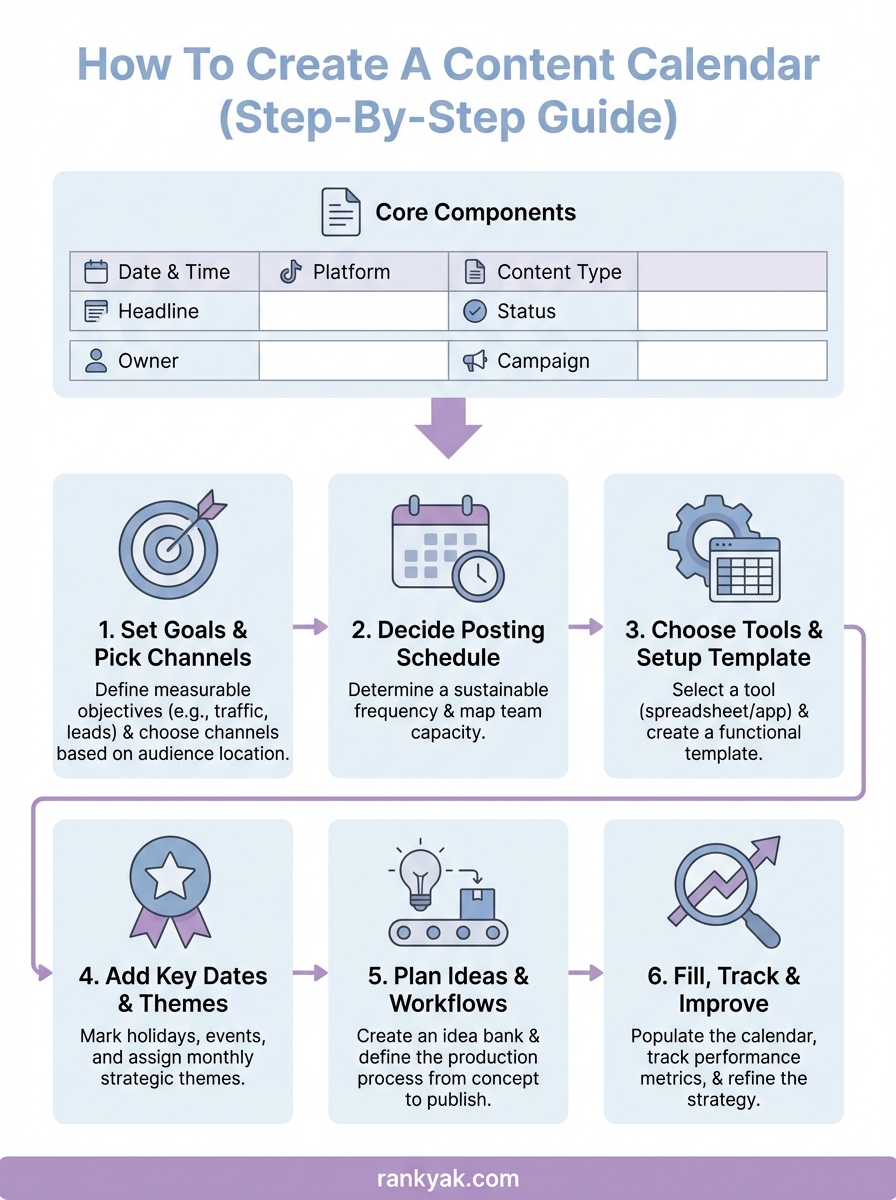
Every content calendar needs specific information fields to function properly. At minimum, you should track the publishing date and time, the platform or channel, the content type, and the current status. Most calendars also include the topic or headline, who's responsible for creating it, and any relevant campaign tags.
The format you choose depends on your needs. A basic spreadsheet works well for small teams managing one or two channels. You'll want columns for date, time, platform, content title, format (video, image, article), assigned team member, and status (draft, scheduled, published). Project management tools like Asana or Monday.com add workflow automation and approval processes. Social media platforms often have built-in calendars that schedule posts directly.
A content calendar transforms random posting into a strategic system.
Your calendar should show patterns at a glance. You'll see gaps in your posting schedule, spot overuse of certain content types, and identify weeks when you're publishing too much or too little. The visual layout helps you balance different topics, maintain consistent timing, and coordinate campaigns across multiple channels.
Step 1. Set goals and pick your channels
Before you add a single post to your calendar, you need clear objectives that guide every content decision. Start by asking what you want to accomplish with your content. Are you building brand awareness? Driving website traffic? Generating leads? Growing your email list? Your goals determine which platforms matter and what type of content you'll create. Write down two to three measurable goals with specific numbers attached, like "increase website traffic by 30% in six months" or "generate 50 qualified leads per month through content."
Define what success looks like
Your goals need specific metrics you can track. Choose metrics that directly connect to business outcomes, not vanity numbers. If you want brand awareness, track reach, impressions, and share rate. For engagement goals, monitor comments, replies, and time spent on page. Lead generation requires tracking form submissions, email signups, or demo requests. Match each goal to one primary metric that tells you whether your content calendar is working.
A content calendar without clear goals is just a publishing schedule.
When you build a content calendar that aligns with business objectives, you'll make better decisions about resource allocation. If your goal is lead generation, you'll prioritize platforms where your target customers spend time researching solutions.
Match channels to your audience
Pick platforms where your specific audience already exists. Skip the trap of trying to be everywhere at once. Research shows most businesses get better results from three focused channels than from spreading thin across seven. Look at your current analytics to see where traffic and engagement come from. Survey your customers about their platform preferences. Choose two to four primary channels based on audience behavior, not personal preference.
Different channels serve different purposes in your content strategy. LinkedIn works well for B2B thought leadership and professional networking. Instagram and TikTok reach younger demographics with visual content. Twitter drives real-time conversations and industry discussions. Your blog serves as the content hub that other channels point toward. Match your content types to platform strengths instead of forcing every format onto every channel. A technical whitepaper belongs on LinkedIn and your blog, not TikTok. Behind-the-scenes videos perform better on Instagram than LinkedIn.
Consider your team's capacity when selecting channels. Managing a YouTube channel requires video production skills and equipment. Twitter demands daily monitoring and quick responses. Start with platforms you can maintain consistently rather than launching everywhere and burning out in two months.
Step 2. Decide your posting schedule
Your posting frequency directly impacts your results, but more posts don't automatically mean better performance. You need a schedule you can maintain consistently over months, not a burst of daily posts that dies after three weeks. The best posting schedule balances audience expectations with your team's capacity to produce quality content.
Start with frequency, not volume
Choose a baseline posting frequency that your team can sustain without sacrificing quality. For most businesses, this means three to five posts per week on primary channels rather than multiple posts daily. Social platforms reward consistency more than volume. Publishing three high-quality posts every week beats posting daily for two weeks, then going silent for a month. Document your minimum viable frequency for each channel, like "LinkedIn: 3 posts per week, Tuesday/Thursday/Saturday at 9 AM" or "Instagram: 5 posts per week, weekdays at 1 PM."
Different content types require different production timelines. Blog articles might need a weekly schedule, while social media posts can happen daily. Video content often works better on a bi-weekly or monthly cadence because production takes longer. Match your posting frequency to the effort each format demands instead of forcing every channel onto the same schedule.
Map your capacity and resources
Calculate how many hours your team has available for content creation each week. If you have ten hours per week and each blog post takes three hours to research, write, and edit, you can realistically publish three posts per week maximum. Account for time spent on graphics, video editing, caption writing, and responding to comments. Build in buffer time for urgent requests, holidays, and team absences that will disrupt your schedule.
A posting schedule that ignores your team's capacity creates burnout, not results.
Start with a conservative schedule you know you can hit, then increase frequency after you've maintained consistency for a full month. Track the actual time each content type takes so your schedule reflects reality instead of optimistic estimates.
Set specific publishing times
Pick exact days and times for each post instead of vague windows like "sometime Tuesday afternoon." Specific scheduling creates accountability and makes workflow planning easier. Your designer knows they need graphics ready by Monday at 5 PM if posts publish Tuesday at 9 AM. Review analytics to identify when your audience is most active, but prioritize consistency over chasing peak hours. A regular schedule trains your audience to expect content at specific times.

Step 3. Choose tools and set up a template
The right tool makes your content calendar functional instead of frustrating. You don't need expensive software to create a content calendar that works. Your choice depends on team size, technical skill, and collaboration needs. A solo creator needs different features than a team managing five channels and multiple approval layers. Start simple and upgrade only when basic tools create actual bottlenecks in your workflow.
Pick a tool that matches your workflow
Spreadsheets offer the fastest path to a working calendar for most teams. Google Sheets works for free, allows real-time collaboration, and requires no learning curve. You can add color coding, drop-down menus, and filtering without touching code. Use spreadsheets if you're managing one to three channels with a small team that doesn't need complex approval processes.
Project management platforms like Asana, Monday, or Trello add automation and workflow features that spreadsheets can't match. You'll get task assignments, deadline reminders, approval workflows, and calendar views that update automatically. These tools cost money but save hours when you're coordinating multiple team members across different content types.
The best content calendar tool is the one your team will actually use every day.
Social media scheduling platforms like Buffer or Hootsuite include built-in calendars that connect directly to your publishing accounts. You'll schedule posts, preview how they look on each platform, and track basic analytics from one dashboard. Choose these tools if social media represents your primary content focus and you want to eliminate copy-pasting between planning documents and platform interfaces.
Build your template with essential fields
Your template needs core information fields that appear in every row or card. At minimum, include these columns:
| Field | Purpose | Example |
|---|---|---|
| Date | When content publishes | 2026-01-15 |
| Time | Exact publishing hour | 9:00 AM EST |
| Platform | Where it goes live | LinkedIn, Instagram, Blog |
| Content Type | Format of the asset | Video, Article, Image Post |
| Topic/Headline | What the content covers | How to automate SEO tasks |
| Status | Current production stage | Draft, Review, Scheduled, Published |
| Owner | Who's responsible | Sarah, Marketing Team |
| Campaign | Associated initiative | Q1 Product Launch |
Add custom fields that match your specific workflow requirements. You might need columns for target keywords, approved/rejected status, performance metrics, or links to assets. Keep your template clean by including only fields you'll actually fill in and reference regularly.
Once your template is ready, create and upload your weekly calendar by following this process: 1. Add all the details (date, time, platform, and topic) to the template. 2. Check that everything is complete, no missing owners, no blank status fields. 3. Upload or share the completed calendar with your team so everyone works from the same plan. Repeating this weekly rhythm keeps your calendar populated without marathon planning sessions.
Step 4. Add key dates, themes, and campaigns
Your content calendar gains structure when you add recurring dates and strategic themes that anchor your publishing schedule. These elements prevent your content from becoming random posts with no connection to business priorities or audience interests. Start by identifying the fixed dates that matter to your industry, then layer in themes that organize content into cohesive blocks. This foundation gives you a framework that guides daily content decisions without requiring constant brainstorming.
Mark major holidays and industry events
Add every relevant holiday, observance, and industry event to your calendar before you plan individual posts. Include major holidays like Thanksgiving and New Year's, niche observances like National Small Business Week, and industry conferences or trade shows your audience attends. Mark product launch dates, company anniversaries, and seasonal shifts that affect your business. These dates become content opportunities you plan around instead of scrambling to acknowledge at the last minute.
Create a master list of dates that repeat annually. You'll reference this list every year when building new calendars, which saves hours of research. Note which dates require advance preparation. A holiday campaign needs content ready two weeks early, while a conference requires pre-event promotion, live coverage, and post-event follow-up across multiple days.
Build monthly content themes
Assign one primary theme to each month that ties your content together around a specific topic or goal. January might focus on goal-setting and planning tools, while June highlights summer productivity tips. Themes create consistency that helps your audience understand what to expect and makes content creation easier because you're not jumping between unrelated topics daily. Planning content themes and topics ahead using a content calendar like this ensures every post serves a larger narrative rather than existing in isolation.
Monthly themes transform scattered posts into a cohesive narrative that builds audience interest over time.
Your themes should align with business priorities and seasonal trends in your industry. A tax software company emphasizes deadline preparation in March and April, then shifts to year-round planning strategies in summer months.
Map your campaign timeline
Plot specific campaigns across your calendar with clear start dates, end dates, and milestones. A product launch campaign might span three weeks with announcement posts, feature highlights, customer testimonials, and launch day coverage. Mark when each campaign phase begins and which channels receive dedicated content. Include campaign identifiers in your calendar template so you can filter and view all related content together.
Space campaigns strategically instead of clustering them. Running two major campaigns simultaneously splits your team's focus and confuses your audience. Leave buffer weeks between campaigns for regular content that maintains your baseline publishing schedule without campaign pressure.
Step 5. Plan content ideas and workflows
Your calendar fills faster when you separate idea generation from content creation. Set aside dedicated time each month to brainstorm topics, then add them to your calendar as placeholders. This approach prevents the daily panic of "what should I post today" and gives your team clear direction weeks in advance. You'll also need a defined workflow that moves content from idea to published post without confusion about who handles each step.
Build an idea bank
Create a running list of content ideas that lives separate from your calendar. Add topics whenever inspiration strikes, customer questions come up, or you spot trending discussions in your industry. Store these ideas in a simple document or spreadsheet with columns for the topic, potential platforms, content format, and priority level. When planning your calendar, you'll pull from this bank instead of staring at blank cells wondering what to create.
Source ideas from specific places that produce reliable content angles. Mine your customer support tickets for common questions. Review competitor content to identify gaps they're missing. Track industry news and regulatory changes that affect your audience. Survey your email list about topics they want to learn. Check "People Also Ask" boxes in Google search results for your main keywords.
Keep your idea bank organized by tagging each entry with categories that match your content pillars. If you focus on productivity, automation, and team management, tag every idea with one of these labels. Add difficulty ratings so you can match complex topics to weeks when you have extra production time. Include notes about seasonal relevance so you remember which ideas work best in specific months.
Create your production workflow
Map out every step between "approved idea" and "published content" so your team knows exactly what happens when. A basic workflow includes research, outline or script creation, first draft, internal review, revisions, final approval, asset creation, scheduling, and publishing. Write down who's responsible for each step and how long it typically takes.
To customize a content calendar workflow to fit different content types, create separate workflow tracks. A blog post workflow might include keyword research → outline → draft → SEO review → publish, while a social media post follows a shorter path: write caption → create graphic → approve → schedule. Video content needs its own track with scripting, filming, editing, and thumbnail creation stages. Document each track in your calendar template so team members follow the right process for each format.
A clear workflow turns content creation from chaos into a repeatable system.
Assign specific roles to team members based on their strengths rather than asking everyone to do everything. One person handles research and outlines, another writes drafts, a third creates visuals, and a fourth schedules and publishes. Document your workflow in your calendar template by adding status columns like Draft, In Review, Approved, and Scheduled.
Build in approval checkpoints before content goes live. Decide who needs to review each content type and how much advance notice they require. Blog posts might need three business days for review while social posts only need 24 hours. Set deadlines that account for revision time so a piece marked "due January 15" actually enters the approval process on January 12.
Step 6. Fill, track, and improve your calendar
Your calendar template becomes useful only when you fill it with actual content plans and track what happens after publishing. This step transforms your empty framework into a working system that shows real patterns and performance data. You'll move beyond just scheduling posts to understanding which content drives results and which wastes your time. The goal is creating a feedback loop that makes every month better than the last.
Populate your calendar with content details
Start by filling in your content calendar four weeks ahead so your team always knows what's coming. Add the specific headline or topic for each post, the assigned owner, and links to any supporting materials like research documents or image folders. Include exact copy when you have it ready, or add placeholders like "customer success story" or "product feature breakdown" when you're still developing the concept. You should complete each row with enough detail that someone else on your team could execute the post without asking clarifying questions.
Add asset requirements for each piece of content so nothing gets overlooked. Note if a post needs custom graphics, stock photos, video clips, or data visualizations. Include file dimensions and format specifications that match each platform's requirements.
Track performance metrics
Create dedicated columns in your calendar for the metrics that matter to your goals. If you're focused on engagement, add fields for likes, comments, shares, and click-through rates. For traffic goals, track unique visitors, time on page, and bounce rate. Lead generation requires monitoring form submissions, email signups, or download completions. Fill in these numbers within 48 hours after each post publishes while the data is fresh and patterns are easier to spot.
Tracking metrics in your content calendar reveals which topics and formats actually move your business forward.
Compare performance across different variables to identify what works. Sort your calendar by content type to see if videos outperform images. Filter by publication time to spot your best performing hours. Making decisions based on evidence instead of assumptions is what separates a functional calendar from a decorative one.
Review and adjust your strategy
Schedule monthly calendar reviews where you analyze the past 30 days and plan improvements for the next period. Look for gaps in your publishing schedule and weeks where certain content types dominated too heavily. Identify your top five performing posts and examine what they have in common. Find your lowest performers and determine if they failed because of poor execution, wrong timing, or audience disinterest.
Adjust your posting frequency based on what your team can sustain. If you consistently miss deadlines or rush content quality to hit quotas, reduce your planned posts per week. When you're hitting targets with time to spare, gradually increase frequency.
Watch for these common mistakes that undermine even well-built calendars: planning too far ahead with rigid topics that can't adapt to breaking news or trends, overloading the calendar so quality drops, neglecting to update the status of each piece (which makes the calendar unreliable), and skipping the monthly review entirely. The teams who avoid these pitfalls are the ones whose calendars actually last beyond the first quarter.
Templates and examples to use
You don't need to build your content calendar from scratch when proven templates already exist. Free, ready-to-use templates save hours of setup time and include the essential fields most teams need. The best templates let you customize fields, add automation, and scale as your content operation grows. Choose templates based on your team size, the platforms you manage, and whether you need approval workflows or simple scheduling.
Spreadsheet templates you can copy
Google Sheets offers the fastest way to start planning content because you can copy a template and begin filling it immediately. A basic spreadsheet template needs columns for date, time, platform, content type, headline, owner, status, and notes. Add conditional formatting to color-code rows by status so you see drafts, scheduled posts, and published content at a glance. Use data validation to create drop-down menus for repeating fields like platform names and content types, which prevents typos and maintains consistency across your entire calendar.
Here's a simple template structure you can build:
| Date | Time | Platform | Type | Headline | Owner | Status | Campaign | Notes |
|---|---|---|---|---|---|---|---|---|
| 2026-01-15 | 9:00 AM | Article | How to automate SEO | Sarah | Draft | Q1 Launch | Include customer quote | |
| 2026-01-16 | 1:00 PM | Video | Product demo: keyword tool | Mike | Scheduled | Q1 Launch | 30-second clip | |
| 2026-01-17 | 3:00 PM | Blog | Guide | Content calendar tutorial | Alex | Review | Organic | 2000 words |
Export your spreadsheet to CSV format if you need to import data into other tools or share with stakeholders who don't use collaborative platforms.
Platform-specific calendar examples
Social media calendars work differently than blog calendars because posting frequency and content formats vary dramatically. A social calendar might track five posts per day across three platforms, while a blog calendar plans two articles per week with longer production timelines. Instagram calendars need fields for image dimensions, caption character counts, and hashtag lists. LinkedIn calendars should include post format options like article, image post, poll, or video. When you create a content calendar that matches your primary platform, you add fields that capture platform-specific requirements your team references during production.
Templates designed for your specific content type eliminate wasted columns and focus your team on information that matters.
Blog editorial calendars require different tracking elements. Add columns for target keyword, word count, internal links, meta description status, and SEO checklist completion. Include fields for featured image specifications and call-to-action type. Track which stage each article sits in: research, outline, first draft, editing, SEO review, or published.
Multi-channel calendar structure
When managing multiple platforms simultaneously, your calendar needs a view that shows everything in one place plus filtered views for individual channels. Create separate tabs or sheets for each platform while maintaining a master calendar that aggregates all content. Tag each entry with campaign identifiers so you can filter and see all posts related to specific launches or promotions. Add a weekly summary section that counts total posts per platform and highlights any gaps in your schedule.
Start planning your content
You now know how to create a content calendar that transforms random posting into strategic publishing. The templates and steps in this guide give you everything needed to build a working system that matches your team size and posting frequency. Start with a simple spreadsheet and your primary platform, then expand as you prove the system drives measurable results for your business.
Your content calendar eliminates the daily stress of deciding what to post while ensuring consistent quality across channels. Block two hours this week to set up your template, add 30 days of content ideas, and assign owners to each piece. Track performance for one month, review what works, and adjust your approach based on real data instead of assumptions.
Want to eliminate even more planning work? RankYak automates your entire SEO content strategy, generating optimized articles daily and publishing them directly to your site without manual intervention.

Get Google and ChatGPT traffic on autopilot.
Start today and generate your first article within 15 minutes.

SEO revenue calculator
How much revenue is your website leaving on the table?
Take a quick quiz and see exactly how much organic revenue you're missing out on, along with personalized tips to fix it.
-
4 questions, under 1 minute
-
See traffic and revenue potential
-
No email required
Free · takes 1 minute · no signup needed
Question 1 of 4
Question 2 of 4
Question 3 of 4
Question 4 of 4
Your SEO growth potential
Extra visitors / month
after 6-12 months of consistent publishing
Revenue potential / year
at your niche's avg. conversion rate
Articles needed (12 mo)
to reach this traffic level
ROI with RankYak
at $99/mo ($1,188/year)
To hit that number, you'd need to:
- Build a topical authority strategy for your niche
- Research keywords & map out a full topical cluster
- Write, edit & publish an article every single day
- Build backlinks to the articles you publish
RankYak handles all of this automatically, every day.
* Estimates based on industry averages. Results vary by niche, competition, and domain authority. Most SEO results become visible after 3-6 months of consistent publishing.