SEO Content Optimization Guide: How to Rank Higher

You publish an article, wait a few weeks, and it sits on page four of Google. Sound familiar? Most content doesn't fail because it's badly written. It fails because nobody optimized it for the way search engines and readers actually evaluate pages. This seo content optimization guide walks you through the exact fixes that move content from ignored to ranked, without guesswork.
If you're wondering how to optimize content for SEO, the short answer is: match search intent, structure your page so both readers and crawlers understand it fast, and back up your claims with real substance. That means keyword placement that feels natural, internal linking that builds topic authority, and formatting that keeps people scrolling instead of bouncing.
Below, you'll get a practical, step-by-step optimization checklist covering title tags, headers, readability, E-E-A-T signals, and technical basics like schema and image alt text. We'll also cover how these same principles now affect visibility in AI tools like ChatGPT and Perplexity, since ranking well increasingly means optimizing for more than just Google's blue links.
What is SEO content optimization?
SEO content optimization is the practice of adjusting your content, both before and after publishing, so it satisfies what search engines look for and what readers actually need. It's broader than writing a good article. You're aligning word choice, structure, internal links, and technical markup with search engine algorithms while keeping the page genuinely useful for a human reader. Google's own guidance on helpful content makes this dual goal explicit: pages built mainly to rank, without real value for readers, tend to slide back down over time. Real SEO content optimization treats both audiences as equally important, never one as an afterthought.
What counts as optimization
Optimization isn't a single task, it's a set of interconnected edits that touch nearly every part of a page. Some happen once during drafting, others get revisited every few months as rankings shift and competitors publish new content. A typical optimization checklist includes:
- Search intent alignment: matching the page format (list, guide, comparison, product page) to what's already ranking for that query
- Keyword placement: title tag, first 100 words, subheadings, and image alt text
- Internal linking: connecting the page to related content elsewhere on your site
- Content depth: covering subtopics competitors skip over
- Readability: short paragraphs, active voice, scannable formatting
- E-E-A-T signals: author bylines, citations, and evidence of first-hand experience
- Technical basics: schema markup, meta descriptions, fast load times
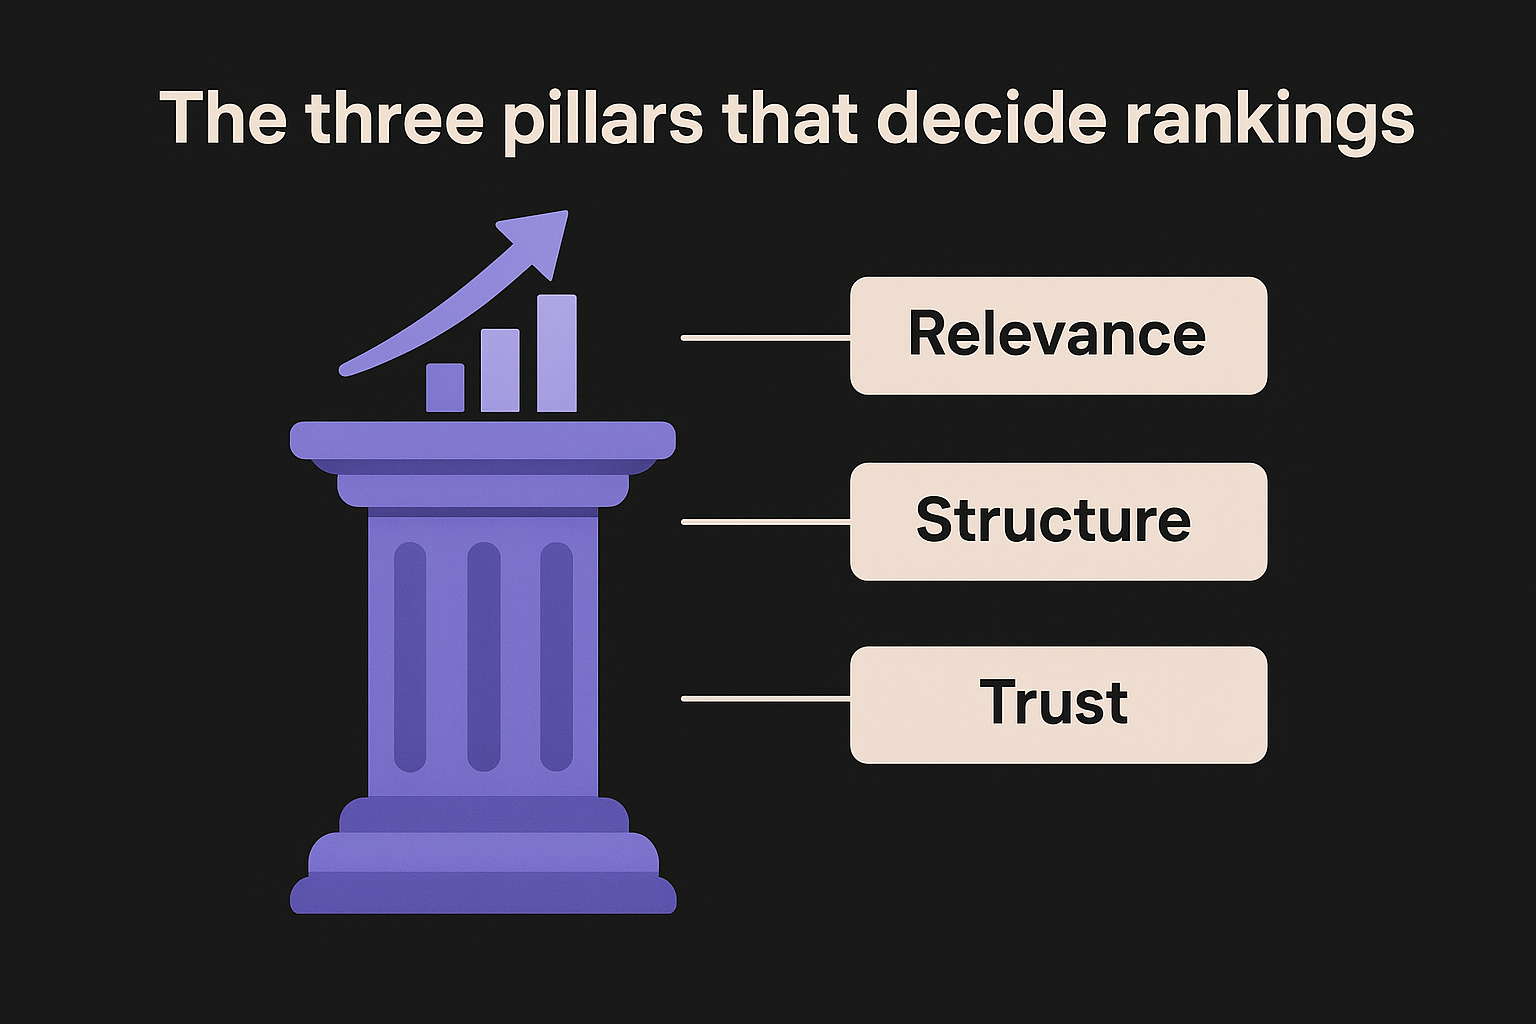
The three pillars that decide rankings
Most of this work falls under three pillars: relevance, structure, and trust. Miss any one of them and the other two won't save the page. A perfectly structured article with no real expertise behind it reads as hollow, and a deeply researched piece buried in dense paragraphs never gets read past the first screen.
| Pillar | What it covers | Common mistake |
|---|---|---|
| Relevance | Matching search intent and keyword usage | Targeting the wrong intent, like writing a blog post when searchers want a product page |
| Structure | Headers, formatting, internal links | Wall-of-text paragraphs with no scannable breaks |
| Trust | Author expertise, citations, accuracy | Vague claims with no sourcing or named expertise |
Content that ranks well almost always gets all three pillars right at once, not just one of them.
Why this matters beyond Google's blue links
Lately, optimization work has expanded past traditional search results pages. AI tools like ChatGPT, Perplexity, and Google's AI Overviews pull from web content to generate answers, and they tend to favor pages with a direct answer near the top, clear headers, and credible sourcing, the same qualities that help traditional rankings. Treating AI visibility as a separate discipline from SEO is a mistake most teams make early on. The same well-structured, well-sourced content tends to perform in both places at once. Getting cited inside an AI-generated answer and ranking on page one of Google increasingly come from the same underlying work: matching intent precisely, structuring the page for fast comprehension, and backing claims with demonstrable expertise rather than filler.
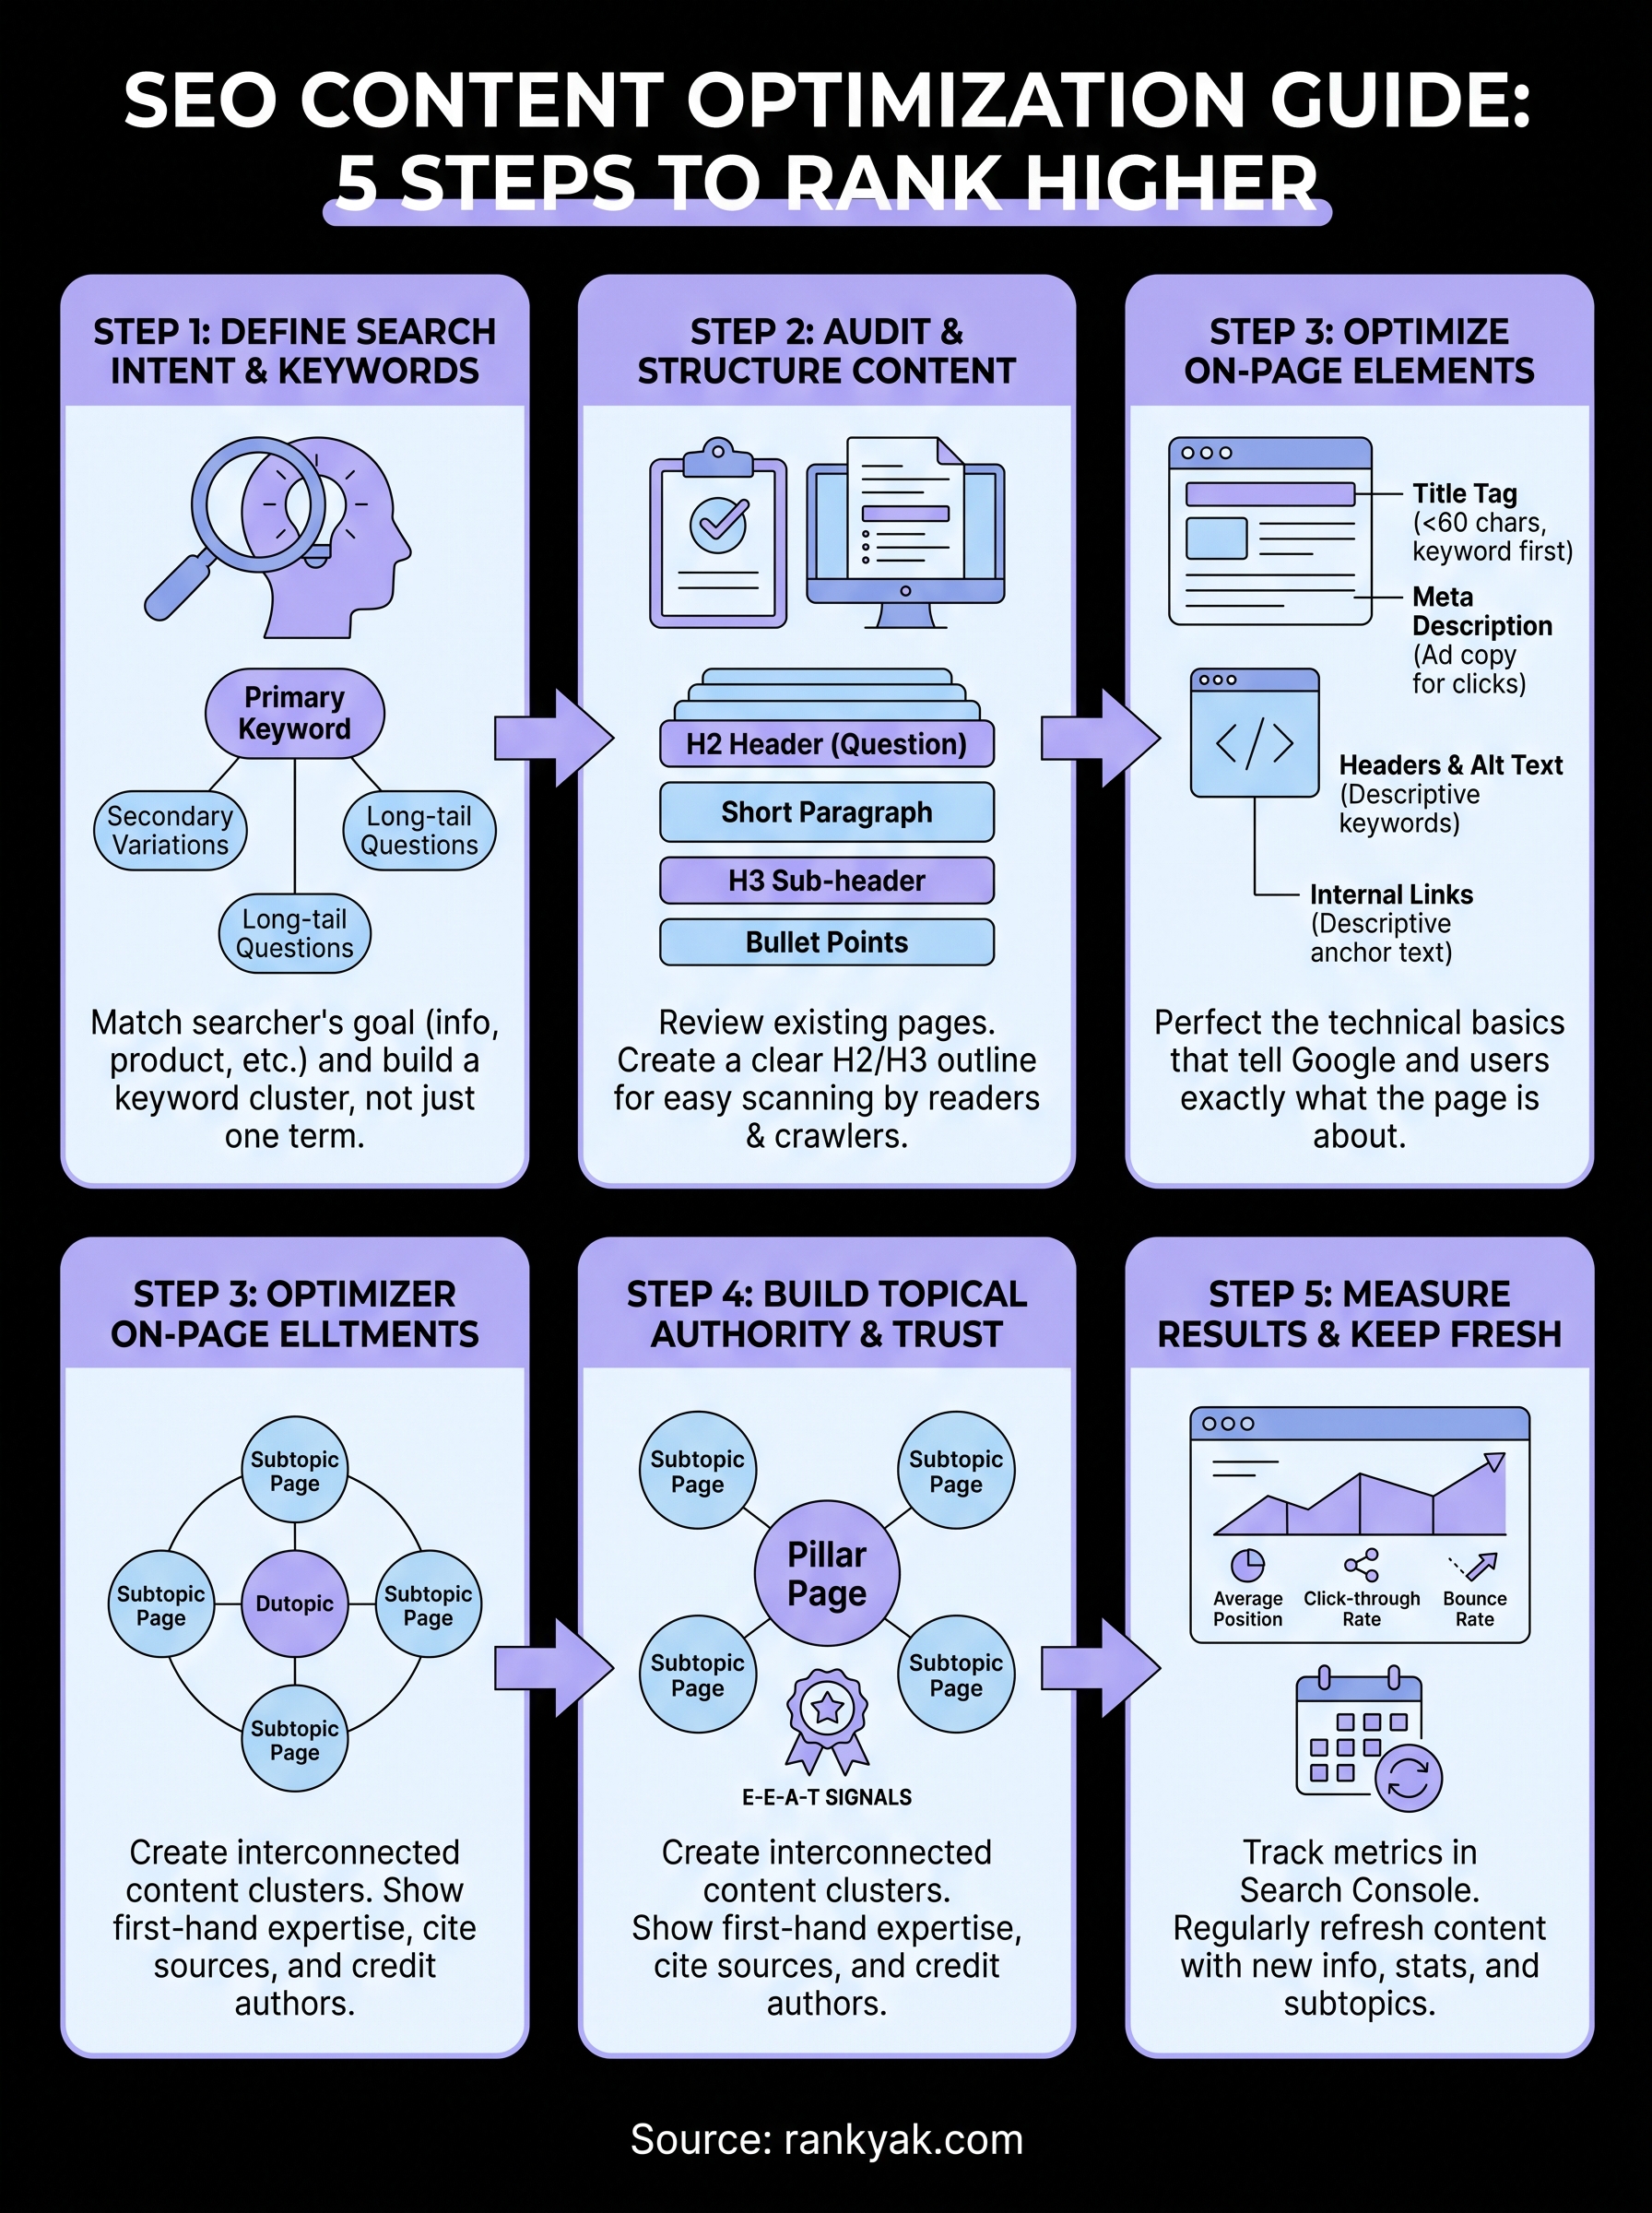
Step 1. Define your search intent and keywords
Before you write a single sentence, figure out what someone actually wants when they type a query into Google. Search intent is the reason behind the search, and it decides everything downstream: format, length, tone, even which subtopics you need to cover. Skip this step and you risk building a detailed guide for a query where searchers actually want a quick product comparison, or the reverse. Google sorts queries into informational, navigational, commercial, and transactional intent, and mismatching your content to that intent is one of the fastest ways to stall on page five no matter how well the page is written.

Spot intent by studying the results page
Open an incognito window and search your target keyword. The top ten results tell you almost everything you need to know. If they're all long-form guides, Google has decided this query deserves depth. If they're product pages or comparison tables, writing a 3,000-word essay won't fix your ranking problem, it'll just waste your time.
- List posts dominating? Match the format, don't fight it.
- Mix of blog posts and tools? The intent might be split, consider which segment your business actually serves.
- Local pack showing up? That's a signal the query has local intent, and a generic national page won't compete.
If the top-ranking pages don't look like what you're planning to publish, you're already optimizing for the wrong intent.
Build a keyword cluster, not a single keyword
Once intent is clear, expand beyond your one seed keyword into a small cluster of related terms searchers use for the same underlying question. Tools like Google Search Console, Google Keyword Planner, or a paid keyword tool will surface these variations, but you can also just scroll to the "People also ask" and related searches sections on the results page. Group terms by the same intent and target them within one comprehensive page rather than splitting them across five thin ones. This is exactly the kind of research RankYak's keyword discovery automates, scanning your niche and site to surface high-potential terms without you manually cross-referencing five tools.
Map keywords to page sections early
Decide where each keyword variation belongs before you draft, not after. A rough map might look like:
| Keyword variation | Placement |
|---|---|
| Primary keyword | Title tag, H1, first 100 words |
| Secondary variations | H2/H3 subheadings |
| Long-tail questions | FAQ section or dedicated paragraph |
| Related terms | Naturally within body paragraphs |
Mapping this out prevents the two most common mistakes: keyword stuffing in one section and total absence in another.
Step 2. Audit and structure your content
Before you write anything new, check whether you already have a page competing with itself. Many sites publish three or four articles targeting near-identical keywords, splitting authority instead of building it. A quick content audit using Google Search Console's performance report shows which existing URLs already rank for your target terms, even weakly. If you find overlap, consolidate rather than create a fifth competing page.
Run a fast content audit
Pull up Search Console, filter by your target keyword or topic, and sort by impressions. Pages with high impressions but low click-through rate usually have a title tag or meta description problem, not a content problem. Pages with low impressions probably need more depth or better internal linking pointing to them. Use this quick checklist before drafting or rewriting:
- Does an existing page already rank for this keyword, even on page two or three?
- Is the current content outdated, thin, or missing subtopics competitors cover?
- Would merging two similar pages create one stronger, more comprehensive resource?
- Is the format wrong for the intent, like a product page where searchers want a guide?
Outline before you draft
Once you know what you're building, sketch the structure before writing a single paragraph. A clear outline with H2 and H3 headers does two things at once: it helps Google's crawlers parse the page's topic hierarchy, and it gives readers a scannable map so they can jump straight to the section they need. Structure your headers as questions or clear statements, not vague labels like "Overview" or "More Info," which tell neither readers nor search engines anything useful.
A page without a logical header hierarchy forces both readers and crawlers to guess what it's actually about.
Break up dense paragraphs
Long, unbroken paragraphs are one of the fastest ways to lose a reader on mobile, where most search traffic now happens. Keep paragraphs to two or three sentences where possible, and use bullet points or short tables whenever you're listing steps, comparisons, or specs. This isn't just a readability nicety, Google's helpful content guidance explicitly rewards pages built for actual human comprehension over pages stuffed with keywords and thin explanations.
This is also where automation earns its keep. RankYak builds this structural work into every article it generates, applying header hierarchy, internal links, and paragraph-level formatting automatically instead of leaving it to a manual editing pass you might skip when you're rushing to hit a publishing deadline.
Step 3. Optimize on-page elements
Once your structure is solid, the individual on-page elements decide whether Google understands what the page is about and whether searchers actually click through to read it. These are the smallest, most concrete edits in this whole guide, and they're the ones people skip most often because they feel minor. They aren't. A weak title tag can cut your click-through rate in half even when you're ranking in position three.
Title tags and meta descriptions
Your title tag is the first thing both Google and a searcher see, so put your primary keyword near the front and keep it under 60 characters so it doesn't get truncated in results. Meta descriptions don't directly affect rankings, but they heavily influence whether someone clicks, so write them like ad copy: a specific benefit plus a reason to click now.
Title: SEO Content Optimization Guide: How to Rank Higher
Meta description: Learn the exact steps to optimize content for Google and AI search, from keyword mapping to schema markup, with a practical checklist.
Headers, alt text, and internal links
Every H2 and H3 should describe what's actually in that section, ideally using natural variations of your target keywords rather than the exact same phrase repeated. Image alt text needs the same treatment: describe what's in the image accurately, and work in a relevant keyword only when it fits naturally, since alt text also serves screen readers and accessibility matters on its own. Internal linking deserves more attention than most sites give it. Link to related pages using descriptive anchor text instead of "click here," and make sure your most important pages get linked from multiple places across the site.
A page can have great content and still underperform if its title tag, headers, and internal links don't tell Google what it's actually about.
Technical basics that back up the content
Schema markup, page speed, and mobile rendering round out the on-page checklist. Structured data doesn't move rankings directly, but it does make your page eligible for rich results like FAQ snippets or review stars, which pull more clicks at the same ranking position. Run your key pages through Google's PageSpeed Insights and fix anything flagged as a Core Web Vitals issue, since slow-loading pages lose readers before they even see your content.
- Title tag under 60 characters, keyword near the front
- Meta description written to earn the click, not just describe the topic
- Descriptive alt text on every image
- Internal links using specific anchor text, not generic phrases
- Schema markup added where relevant (FAQ, article, review)
- Core Web Vitals checked and fixed
RankYak handles most of this automatically during article generation, adding structured headers, alt text, and internal links as part of the writing process instead of a separate technical pass you have to remember to run.
Step 4. Build topical authority and trust
One strong article rarely ranks on its own merit. Google increasingly rewards sites that demonstrate topical authority, meaning you've published enough related, connected content that you clearly understand the subject beyond a single page. This step of any serious seo content optimization guide is where most smaller sites fall behind larger competitors, not because their writing is worse, but because they've never built out the surrounding cluster of pages that proves depth.

Build topic clusters, not isolated pages
Group your content into clusters: one comprehensive pillar page covering the broad topic, surrounded by narrower pages covering specific subtopics, all linked to each other with descriptive anchor text. Search engines read this linking pattern as a signal that your site has real depth on the subject, not just a lucky single hit. A site with fifteen interlinked pages on email marketing will usually outrank a site with one excellent standalone article, even if that single article is better written.
A pile of disconnected articles rarely beats a smaller cluster of pages that clearly link to and reinforce each other.
Show first-hand expertise, not just research
Generic summaries of other articles rarely earn trust from readers or from Google's ranking systems. Weave in specifics only someone with direct experience would know: a screenshot from your own dashboard, a number pulled from a real campaign, a mistake you made and fixed. First-hand expertise is one of the clearest signals in Google's own guidance on helpful content, and it's also the hardest thing for competitors to copy, since it can't be faked with better phrasing.
Cite sources and credit your authors
Every factual claim that isn't common knowledge needs a source, ideally a primary one like a government agency, a major platform's documentation, or original research rather than another blog's summary of that research. Pair this with visible author credentials: a byline, a short bio, and a link to an author page that explains why this person is qualified to write on the topic. A quick checklist for trust signals on any page:
- Byline naming a real author, not "Admin" or "Team"
- Author bio linking to relevant experience or credentials
- Sources cited for statistics, studies, or claims
- Publish and update dates visible on the page
- Contact or About page reachable from the article
These details cost little to add, but pages missing all five rarely earn the trust needed to compete for their target keyword long term.
Step 5. Measure results and keep content fresh
Publishing isn't the finish line, it's the point where you start collecting evidence about whether your optimization actually worked. Most sites check rankings once and move on, but content performance tracking should be a recurring habit, not a one-time glance. Search results shift as competitors publish, algorithms update, and search intent itself evolves for a given query. A page that ranked well six months ago can quietly slide without any change on your end, simply because someone else's page got better.
Track the metrics that actually matter
Skip vanity metrics like raw pageviews and focus on the numbers that tell you whether the page is doing its job. Google Search Console gives you most of this for free, and it's worth checking monthly rather than only when rankings suddenly drop.
| Metric | What it tells you | Where to find it |
|---|---|---|
| Average position | Whether you're ranking near page one or buried on page three | Search Console performance report |
| Click-through rate | Whether your title and meta description earn clicks at your current position | Search Console performance report |
| Bounce rate / time on page | Whether the content matches what searchers expected | Google Analytics |
| Ranking keywords | Whether you're picking up related queries beyond your target term | Search Console queries tab |
A page that ranks but doesn't get clicked, or gets clicked but doesn't get read, still isn't finished doing its job.
Refresh content on a schedule, not a whim
Set a recurring reminder, quarterly for competitive topics and twice a year for everything else, to revisit your top pages and check whether the information, statistics, or examples still hold up. Add a section covering a subtopic competitors have since published on, update any outdated screenshots or pricing, and tighten sections that Analytics shows people skip past. Content freshness doesn't mean changing the publish date without touching the substance, Google's own guidance is explicit that superficial date changes without real updates don't help rankings and can backfire if readers notice.
Know when to rewrite versus update
Small tweaks work when the core structure and intent match still hold up. A full rewrite makes more sense when the ranking has dropped significantly, the format no longer matches what's ranking above you, or the topic itself has shifted enough that half the article is now irrelevant. This is where RankYak's daily content plan helps without extra manual tracking, since it keeps building out the surrounding topic cluster and can flag ground your existing pages haven't covered yet, so refreshing becomes part of a routine instead of a scramble you only remember after a ranking drop.
Keep your content working for you
Ranking well isn't about one clever trick, it's about stacking small, correct decisions: matching intent, structuring pages for fast comprehension, backing claims with real expertise, and revisiting content before it quietly slides. Skip any one of these and the page underperforms no matter how good the writing is. The sites that keep climbing are the ones that treat content optimization as an ongoing habit rather than a one-time launch task, checking Search Console monthly and refreshing pages on a schedule instead of waiting for a ranking drop to force their hand.
Doing all five steps manually, across every article, every month, is exactly the workload that burns teams out. If you'd rather have keyword research, structure, on-page optimization, and content refreshes running in the background automatically, see how RankYak automates your SEO from keyword discovery through publishing, so your content keeps working for you long after it goes live.

Get Google and ChatGPT traffic on autopilot.
Start today and generate your first article within 15 minutes.

SEO revenue calculator
How much revenue is your website leaving on the table?
Take a quick quiz and see exactly how much organic revenue you're missing out on, along with personalized tips to fix it.
-
4 questions, under 1 minute
-
See traffic and revenue potential
-
No email required
Free · takes 1 minute · no signup needed
Question 1 of 4
Question 2 of 4
Question 3 of 4
Question 4 of 4
Your SEO growth potential
Extra visitors / month
after 6-12 months of consistent publishing
Revenue potential / year
at your niche's avg. conversion rate
Articles needed (12 mo)
to reach this traffic level
ROI with RankYak
on the Professional plan ($129/mo)
To hit that number, you'd need to:
- Build a topical authority strategy for your niche
- Research keywords & map out a full topical cluster
- Write, edit & publish an article every single day
- Build backlinks to the articles you publish
RankYak handles all of this automatically, every day.
* Estimates based on industry averages. Results vary by niche, competition, and domain authority. Most SEO results become visible after 3-6 months of consistent publishing.