Airtable Content Calendar: How To Build One That Scales

Spreadsheets and sticky notes work fine when you're publishing one or two posts a week. But the moment your content operation grows, more writers, more channels, more keywords to target, that setup falls apart fast. An Airtable content calendar gives you the flexibility of a spreadsheet with the power of a database, so you can actually keep up with a scaling editorial workflow without losing your mind.
The problem is, most people create an Airtable base, toss in a few columns, and call it done. Three months later it's a graveyard of half-finished drafts and outdated deadlines. Building a content calendar that genuinely scales takes a bit more thought upfront, the right fields, the right views, and a structure that grows with your output instead of against it.
This guide walks you through how to build an Airtable content calendar from scratch, step by step, with a structure designed for teams that plan to publish consistently over time. You'll learn which fields matter, how to set up views that keep everyone aligned, and where automation can eliminate the busywork. And if you reach the point where even Airtable can't keep pace with your publishing goals, we'll show you how tools like RankYak can automate the entire content lifecycle, from keyword discovery to publishing, so your calendar practically fills itself.
What an Airtable content calendar should track
Before you build anything, you need to decide what data belongs in your calendar. Most teams track too little at first, then scramble to add fields later, which creates messy inconsistencies across records. A well-designed Airtable content calendar captures every piece of information your team needs to move content from idea to published, without anyone chasing down details in Slack or email threads.
The fields you choose at the start define how useful your calendar will be six months from now, so get them right before you add a single record.
You don't need 40 fields to get started. You need the right fields, grouped by function: content identity, workflow status, and performance data. Here's what each category should include.
Core content fields every record needs
Every record in your calendar represents one piece of content, and that record needs to answer the basic questions: what is it, who owns it, and when does it publish. Title and Primary Keyword are non-negotiable starting points. Without a keyword attached to every piece, you're producing content without a clear ranking goal.
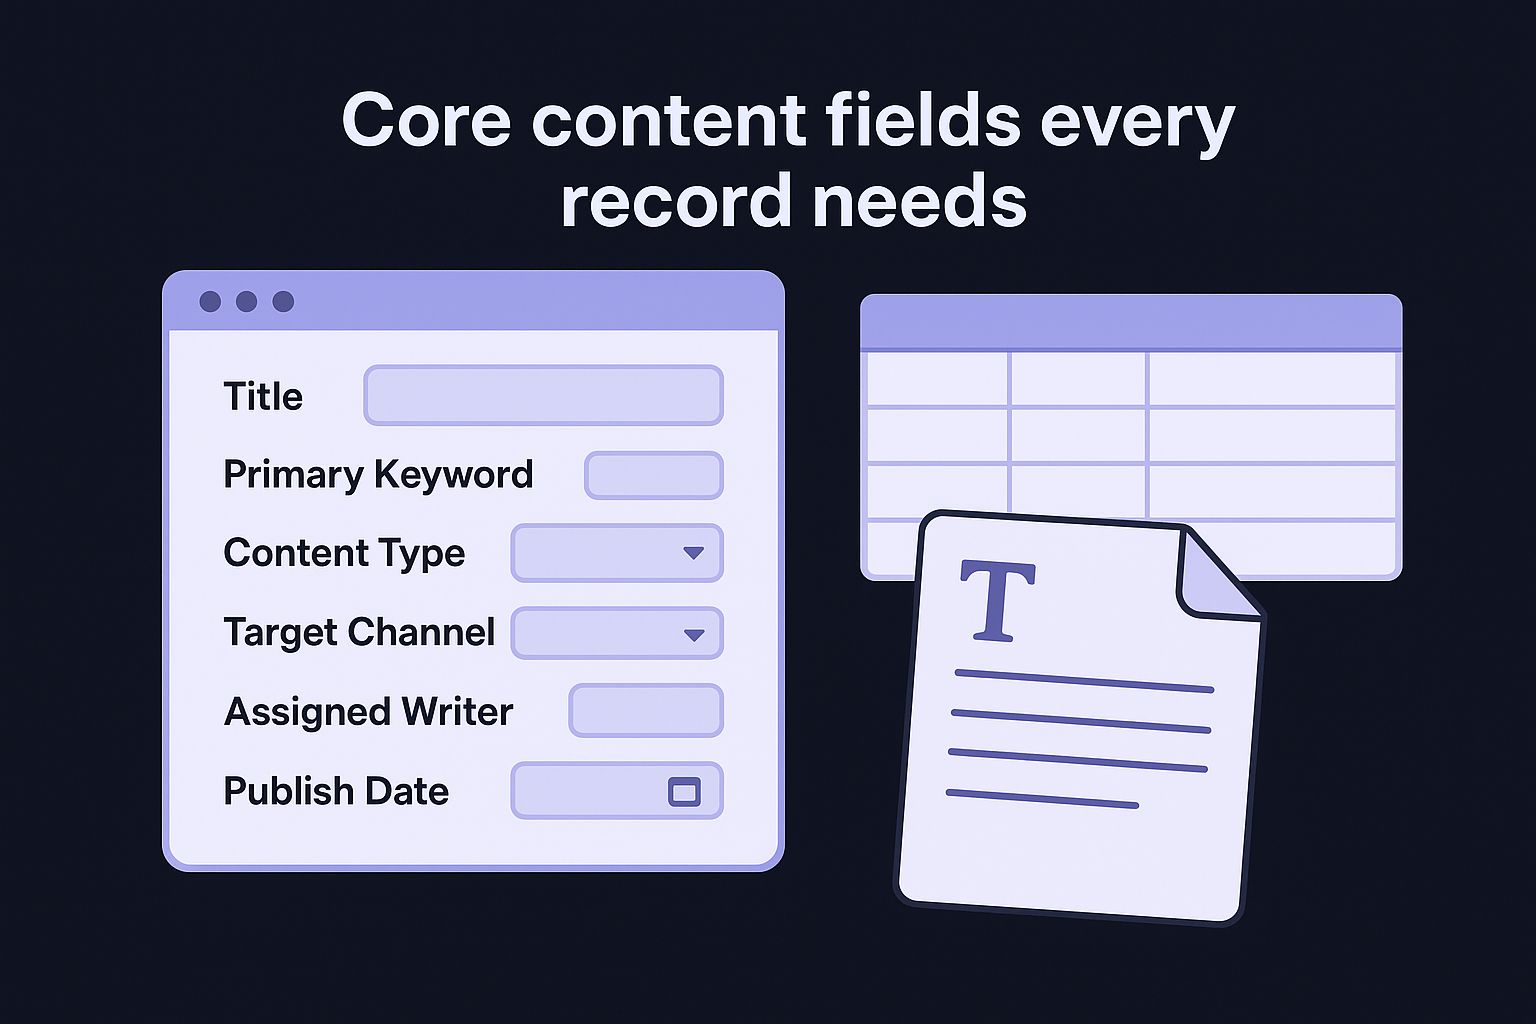
Add a Content Type field (article, video, social post, email) and a Target Channel field so you can filter by format or platform in seconds. An Assigned Writer field keeps accountability clear, and a Publish Date field gives your whole team a shared deadline. You'll also want a Brief URL field so the writer can access the content brief directly from the record without digging through shared folders.
| Field Name | Field Type | Purpose |
|---|---|---|
| Title | Single line text | Working title for the piece |
| Primary Keyword | Single line text | SEO target for the content |
| Content Type | Single select | Blog, video, email, social post |
| Target Channel | Single select | Website, LinkedIn, newsletter |
| Assigned Writer | Collaborator | Ownership and accountability |
| Publish Date | Date | Deadline visible to the whole team |
| Brief URL | URL | Direct link to the content brief |
Workflow and status tracking
Content status is the field your team will update most often, so it deserves careful thought. A status field with options like Idea, Brief Ready, In Progress, In Review, Approved, Scheduled, and Published gives everyone a clear picture of where each piece stands at any moment.
Pair your status field with a Draft Due Date field, separate from the publish date, so writers know exactly when their draft is expected and editors know when to plan reviews. Adding a Review Notes long-text field lets editors drop feedback directly into the record, which keeps revision history in one place rather than scattered across documents and email threads.
SEO and performance fields
Once content goes live, your calendar should function as a lightweight performance tracker, not just a planning tool. Add a Published URL field so you can reference the live post directly from the record. A Target Search Volume field and a Ranking Position field (updated monthly) let you see at a glance whether a piece is earning traffic the way it was intended to.
Internal Links Added as a checkbox field and Featured Image as an attachment field round out this category. These details push your content calendar to stay useful after publish day, not just before it. Teams that skip performance fields end up treating their calendar as a to-do list that goes quiet the moment content ships, which means they lose the data needed to improve their strategy over time.
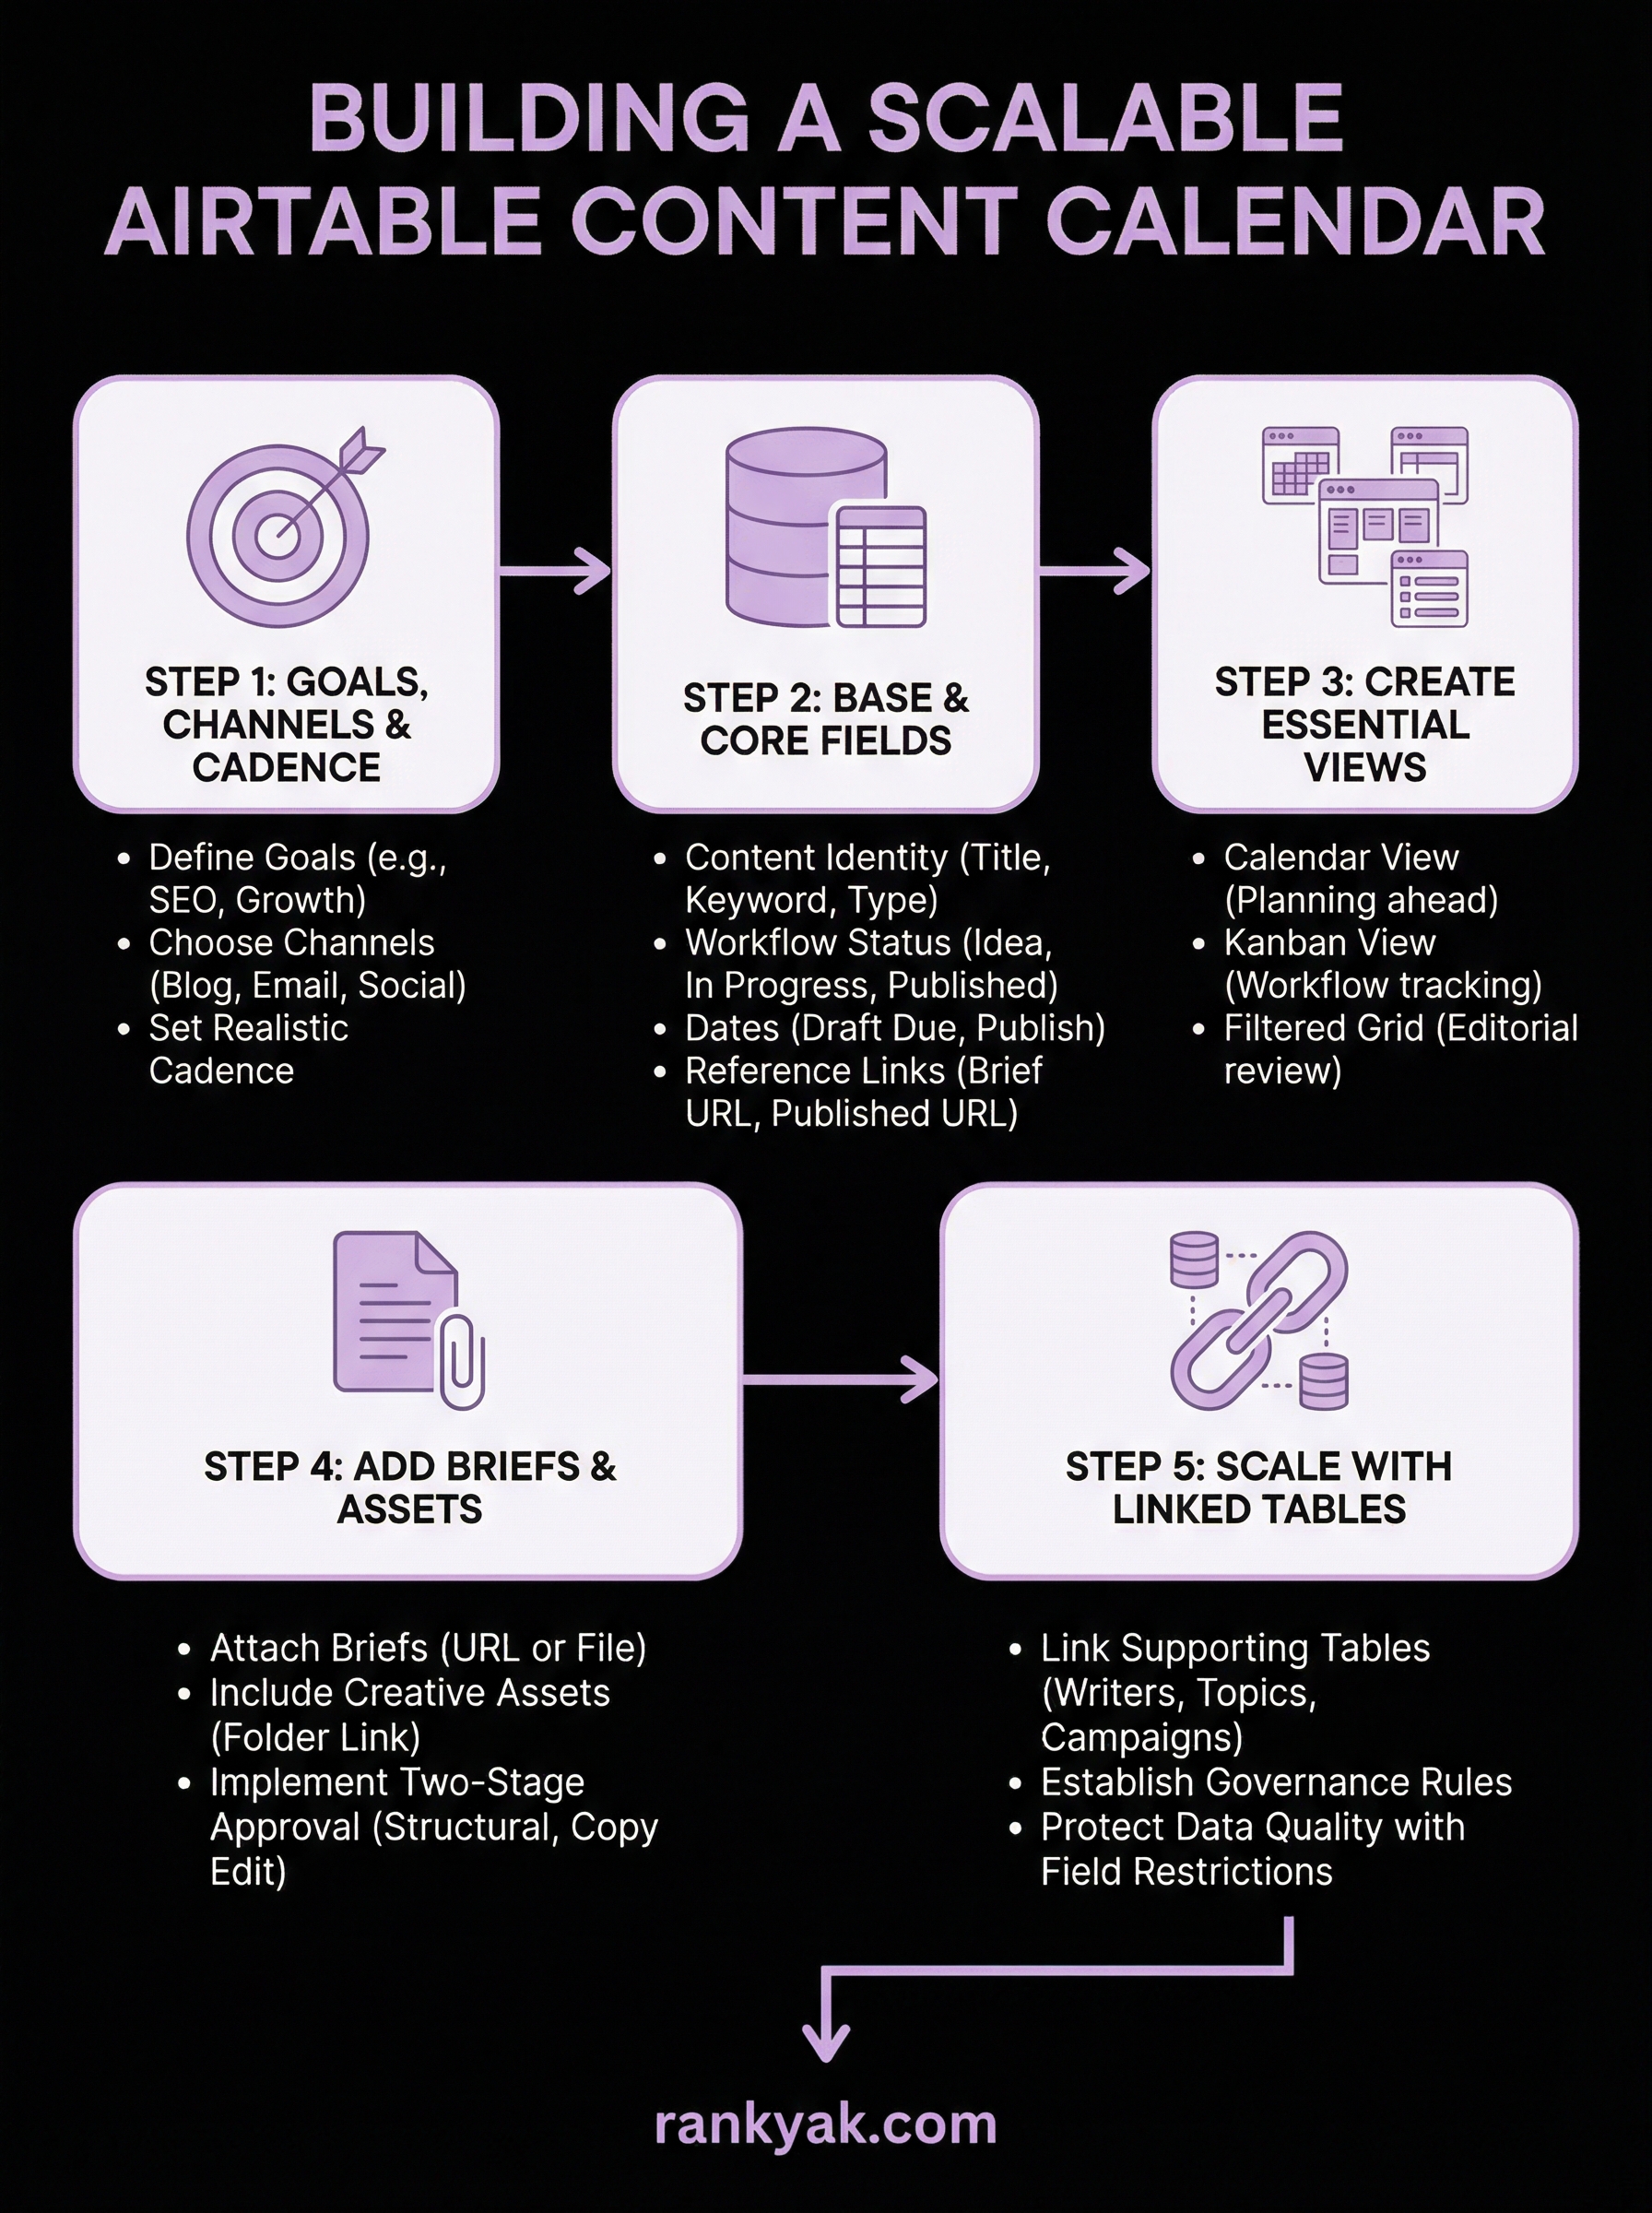
Step 1. Set goals, channels, and publishing cadence
Starting your Airtable content calendar without defined goals produces a calendar full of activity that generates no measurable results. Before you open Airtable, spend 30 minutes writing down what you want your content to accomplish: drive organic search traffic, grow an email list, generate social engagement, or support a sales funnel. Each goal shapes every structural decision that follows.
Define your content goals
Your goals determine which metrics you track and which fields matter most in your base. If your primary goal is SEO-driven organic traffic, every record needs a primary keyword, a target search volume, and a ranking position field. If your goal is social media audience growth, you need fields for platform, format, and engagement benchmarks instead.
Mixing goals without separating them by content type is the fastest way to end up with a calendar that feels chaotic after the first two weeks.
Write your goals in plain, specific language: "publish four blog posts per month that target high-intent keywords" or "send one email newsletter per week that links to a product page." Vague goals lead to vague fields, and vague fields mean your calendar won't filter or report in any useful way. Specificity at this stage saves you significant rework later.
Choose your publishing channels
Each channel your team publishes on follows a different production process. Blog content follows a keyword research and brief process. Email newsletters follow a list segmentation and send-schedule process. Social posts follow a short-form creation and scheduling process. If you manage all three in one undifferentiated table, every record will carry irrelevant fields for each content type.
List every active channel your team currently publishes to, then decide whether you want one unified table with a Target Channel filter or separate linked tables per channel. For most teams starting out, one table with a single-select channel field is the simpler and more maintainable choice.
Set a realistic publishing cadence
Your publishing cadence is the number that makes or breaks the calendar's long-term usefulness. Base your weekly or monthly publishing target on your current team capacity, not your aspirational output. One writer reliably producing two blog posts per week beats an overloaded team that misses every deadline.
Document your cadence decisions in a reference record or a simple table like this before you build anything else:
| Channel | Frequency | Owner |
|---|---|---|
| Blog | 2 posts per week | Writer |
| Email newsletter | 1 send per week | Editor |
| 3 posts per week | Social manager |
Step 2. Build your Airtable base and core fields
Once you've locked in your goals, channels, and cadence, you're ready to open Airtable and start building. Log in, click "Add a base," and select "Start from scratch" rather than using a pre-built template. Pre-built templates make assumptions about your workflow that rarely match your actual production process, and you'll spend more time dismantling them than building something useful.
Name your base and first table clearly
Name your base something specific, like "Content Operations 2026," so it doesn't blur into other bases on your home screen. Your first table is where every content record lives, so name it "Content Calendar" from the start. Airtable creates a default "Table 1" with sample fields and placeholder records when you start fresh; delete those sample records immediately so you're working with a clean slate.
A clearly named base with a single, well-structured content table is far easier to maintain than a base where every table carries a generic name and an unclear purpose.
Inside the table, keep the Name field as your Title column, delete all other default fields, and build every subsequent field from zero. This prevents orphaned columns from cluttering your views later.
Add and configure each field in order
Build your fields left to right in the order your team interacts with them during production. Start with the identity fields (Title, Primary Keyword, Content Type, Target Channel), then add the workflow fields (Status, Assigned Writer, Draft Due Date, Publish Date), then the reference fields (Brief URL, Published URL).
For each field, match the field type to the data it holds. Use Single Line Text for Title and Primary Keyword. Use Single Select for Content Type and Status. Use the Collaborator type for Assigned Writer so Airtable can send notifications when records are assigned. Use Date fields for Draft Due Date and Publish Date rather than plain text, because date fields unlock sorting and filtering that text fields cannot.
| Field | Recommended Type | Why |
|---|---|---|
| Title | Single line text | Fast editing, consistent format |
| Primary Keyword | Single line text | Easy to search and filter |
| Content Type | Single select | Filterable by format |
| Status | Single select | Powers workflow views |
| Assigned Writer | Collaborator | Enables notifications |
| Draft Due Date | Date | Enables sorting by deadline |
| Publish Date | Date | Enables calendar view |
| Brief URL | URL | Clickable from any record |
| Published URL | URL | Tracks live content |
Your Airtable content calendar takes real shape the moment these fields are in place. Each field type choice here directly affects which views and automations you can build in the steps that follow.
Step 3. Create views for planning, workflow, and review
Your fields hold the data, but your views are where your team actually works. Airtable lets you create multiple views of the same table, each filtered, sorted, and grouped differently, so every person on your team sees exactly what they need without scrolling past irrelevant records. A well-designed Airtable content calendar uses at least three distinct views: one for planning ahead, one for tracking production status, and one for reviewing content before it goes live.
Calendar view for planning ahead
The Calendar view maps your Publish Date field onto a visual calendar, giving your editorial team an instant look at content density across the month. To set it up, click "+ Add view" in the left sidebar, select Calendar, and configure it to use your Publish Date field. You'll immediately see gaps in your publishing schedule and days where you've stacked too many pieces.
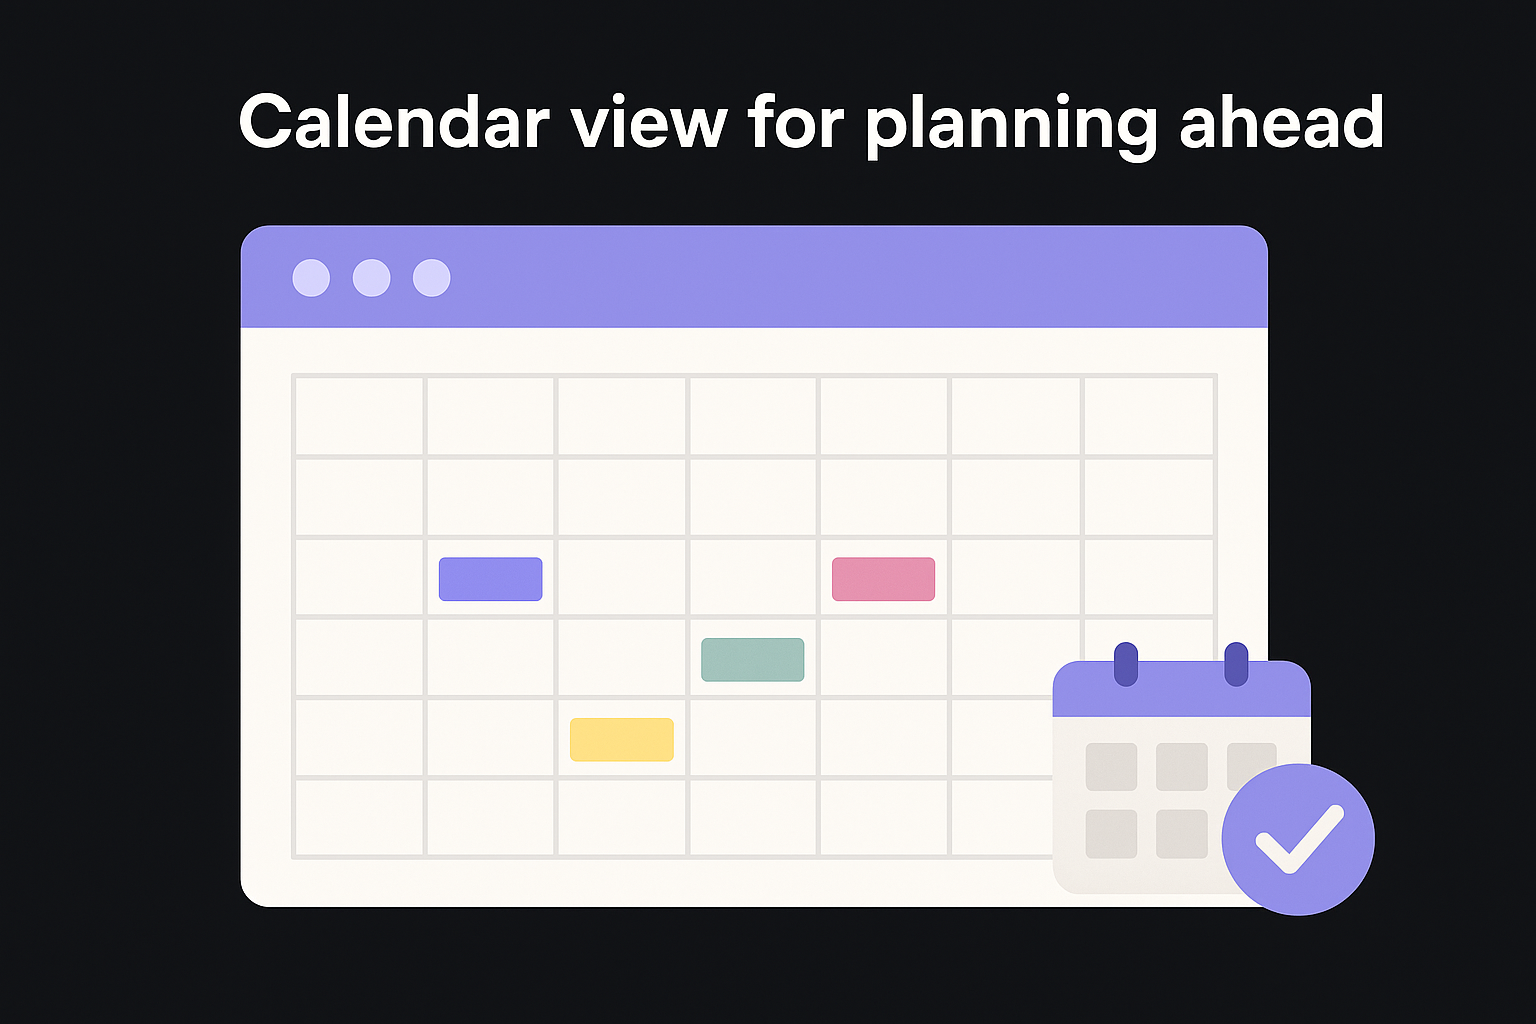
Color-code records in your Calendar view by Content Type so you can spot imbalances between blog posts, emails, and social content in seconds.
Use the Calendar view every Monday during planning sessions to confirm the week ahead is fully staffed and that no deadline is missing a writer assignment.
Kanban view for tracking workflow status
A Kanban view groups records into columns based on your Status field, turning your content calendar into a live production board. Add this view, select Status as the grouping field, and your columns will map directly to your workflow stages: Idea, Brief Ready, In Progress, In Review, Approved, Scheduled, and Published.
Writers can drag a card from In Progress to In Review the moment they finish a draft, which triggers a visual update that editors see immediately without anyone sending a message. This view reduces check-in meetings because the board itself answers the question "where does everything stand right now?"
Filtered grid view for editorial review
Your editors need a view that shows only content in the In Review status, filtered to their assignments and sorted by Draft Due Date. Create a new Grid view, add a filter for Status = "In Review," and save it as "Editor Queue." Add a secondary filter for Assigned Writer if your team includes multiple editors reviewing different writers.
This view becomes the single place editors open each morning to see what needs their attention, complete with links to briefs and draft URLs in the same row.
Step 4. Add briefs, assets, and approval handoffs
Your fields and views handle planning and tracking, but the actual content production depends on briefs and assets being accessible inside the same record your team is already working from. Forcing writers to hunt through shared drives for a brief breaks the workflow and introduces version confusion. Every record in your Airtable content calendar should carry everything the writer needs to start and everything the editor needs to approve.
Attach briefs and creative assets to each record
Airtable's Attachment field type lets you upload files directly to any record, or you can use a URL field to link to a Google Doc brief. For most teams, a URL field pointing to a shared document works better than an attachment because editors can update the brief without replacing the file. Add a "Brief URL" field and a separate "Asset Folder URL" field that links to the folder where brand images, product screenshots, or graphics live.
Keep your brief template consistent across every piece of content so writers never question what format the editor expects.
Use this brief template structure in your linked document for every content record:
| Brief Section | What to Include |
|---|---|
| Working Title | Current draft title |
| Primary Keyword | Target keyword and search volume |
| Target Audience | Who this piece is written for |
| Search Intent | What the reader expects to find |
| Outline | H2 and H3 structure |
| Word Count Target | Minimum and maximum |
| Internal Links | Pages to link within the piece |
| Deadline | Draft due date from the record |
Build a two-stage approval handoff
A single-step review process breaks down once your output grows past two or three pieces per week. A two-stage handoff separates the structural review from the final copy edit, so neither task gets rushed. Add two additional status options to your Status field: "Structural Review" and "Copy Edit" alongside your existing "In Review" option.

When a writer moves a record to Structural Review, the assigned editor checks the outline, argument flow, and keyword coverage. Once that passes, the record moves to Copy Edit for grammar, style, and formatting checks. This separation catches structural problems before anyone spends time polishing sentences that might get cut. Configure an Airtable automation to notify the next reviewer by email when the status changes, eliminating the need for manual hand-off messages entirely.
Step 5. Scale with linked tables and governance
A single content table works well up to roughly 20 to 30 records per month, but once your publishing volume climbs past that, one flat table becomes a bottleneck. Linked tables let you separate concerns, keep records clean, and pull related data across your entire Airtable content calendar without duplicating information in every row.
Link your content calendar to supporting tables
Airtable's Link to Another Record field type connects your main Content Calendar table to separate tables for Writers, Topics, and Campaigns. Instead of typing a writer's name as plain text in every record, you link directly to a Writers table where each writer has their own row, and you can store their rates, contact info, and article count all in one place.
Linked tables eliminate the data entry errors and inconsistencies that appear when the same information gets typed manually across hundreds of records.
Build these three supporting tables and link them to your Content Calendar:
| Supporting Table | Key Fields | What It Enables |
|---|---|---|
| Writers | Name, Email, Rate, Active Articles | Track workload and contact info centrally |
| Topic Clusters | Cluster Name, Pillar Page, Related Keywords | Group content by SEO topic strategy |
| Campaigns | Campaign Name, Start Date, End Date, Goal | Tie content to specific marketing initiatives |
Once linked, use Airtable's Rollup field in your Writers table to count how many articles each writer currently has in progress. This prevents overloading a single writer without anyone realizing it until a deadline is missed.
Set governance rules to protect data quality
Linked tables only stay useful if every team member follows the same field conventions. Without governance rules, one writer enters "Blog Post" in the Content Type field while another enters "blog" and a third enters "Article," which breaks every filter and view you built in earlier steps. Document a one-page field guide that lists every single-select option, who is allowed to add new options, and what each status means in plain language.
Lock your single-select fields by restricting who can add new options in Airtable's field settings. Go to each single-select field, open the field editor, and toggle on "Restrict adding new options" so only your designated calendar owner can expand the list. This single setting prevents the slow field drift that degrades most content calendars within six months of launch.
Keep it running week after week
Your Airtable content calendar only delivers value if your team actually uses it every single week. Block 15 minutes every Monday to review the current week's records, confirm every piece has a writer assigned, and check that Draft Due Dates are realistic given your current workload. Run a quick filter for any records still sitting in "Idea" status past their intended start date and either assign them or archive them. Monthly, review your Ranking Position fields to see which published pieces are gaining traction and which need a refresh. These small, consistent habits keep your calendar accurate and your publishing momentum intact.
At some point, even a well-built Airtable system requires manual upkeep that slows your team down. If you want a content engine that handles keyword research, writing, and publishing on autopilot, try RankYak and see how much faster your calendar fills itself.

Get Google and ChatGPT traffic on autopilot.
Start today and generate your first article within 15 minutes.

SEO revenue calculator
How much revenue is your website leaving on the table?
Take a quick quiz and see exactly how much organic revenue you're missing out on, along with personalized tips to fix it.
-
4 questions, under 1 minute
-
See traffic and revenue potential
-
No email required
Free · takes 1 minute · no signup needed
Question 1 of 4
Question 2 of 4
Question 3 of 4
Question 4 of 4
Your SEO growth potential
Extra visitors / month
after 6-12 months of consistent publishing
Revenue potential / year
at your niche's avg. conversion rate
Articles needed (12 mo)
to reach this traffic level
ROI with RankYak
at $99/mo ($1,188/year)
To hit that number, you'd need to:
- Build a topical authority strategy for your niche
- Research keywords & map out a full topical cluster
- Write, edit & publish an article every single day
- Build backlinks to the articles you publish
RankYak handles all of this automatically, every day.
* Estimates based on industry averages. Results vary by niche, competition, and domain authority. Most SEO results become visible after 3-6 months of consistent publishing.