How to Set Up Google Search Console for Your Website (2026)

Google Search Console is one of the most powerful free tools Google offers, and yet a surprising number of website owners either skip it entirely or set it up incorrectly. If you're wondering how to set up Google Search Console, you're making a smart move. It's the single best way to understand how Google sees your website, from indexing issues to keyword performance.
Without it, you're flying blind. You won't know which pages are indexed, which queries drive clicks, or whether Google is hitting crawl errors that tank your rankings. Search Console gives you that visibility, and it costs exactly $0 to use.
This guide walks you through every step: creating your account, adding your website as a property, choosing the right verification method, and confirming ownership. No fluff, no guesswork. By the end, you'll have a fully verified Search Console setup ready to feed you real performance data. And if you're using a tool like RankYak to automate your SEO content, connecting Search Console is what allows it to pull actual search data and optimize your strategy based on real results, not assumptions.
Let's get it set up.
What you need before you start
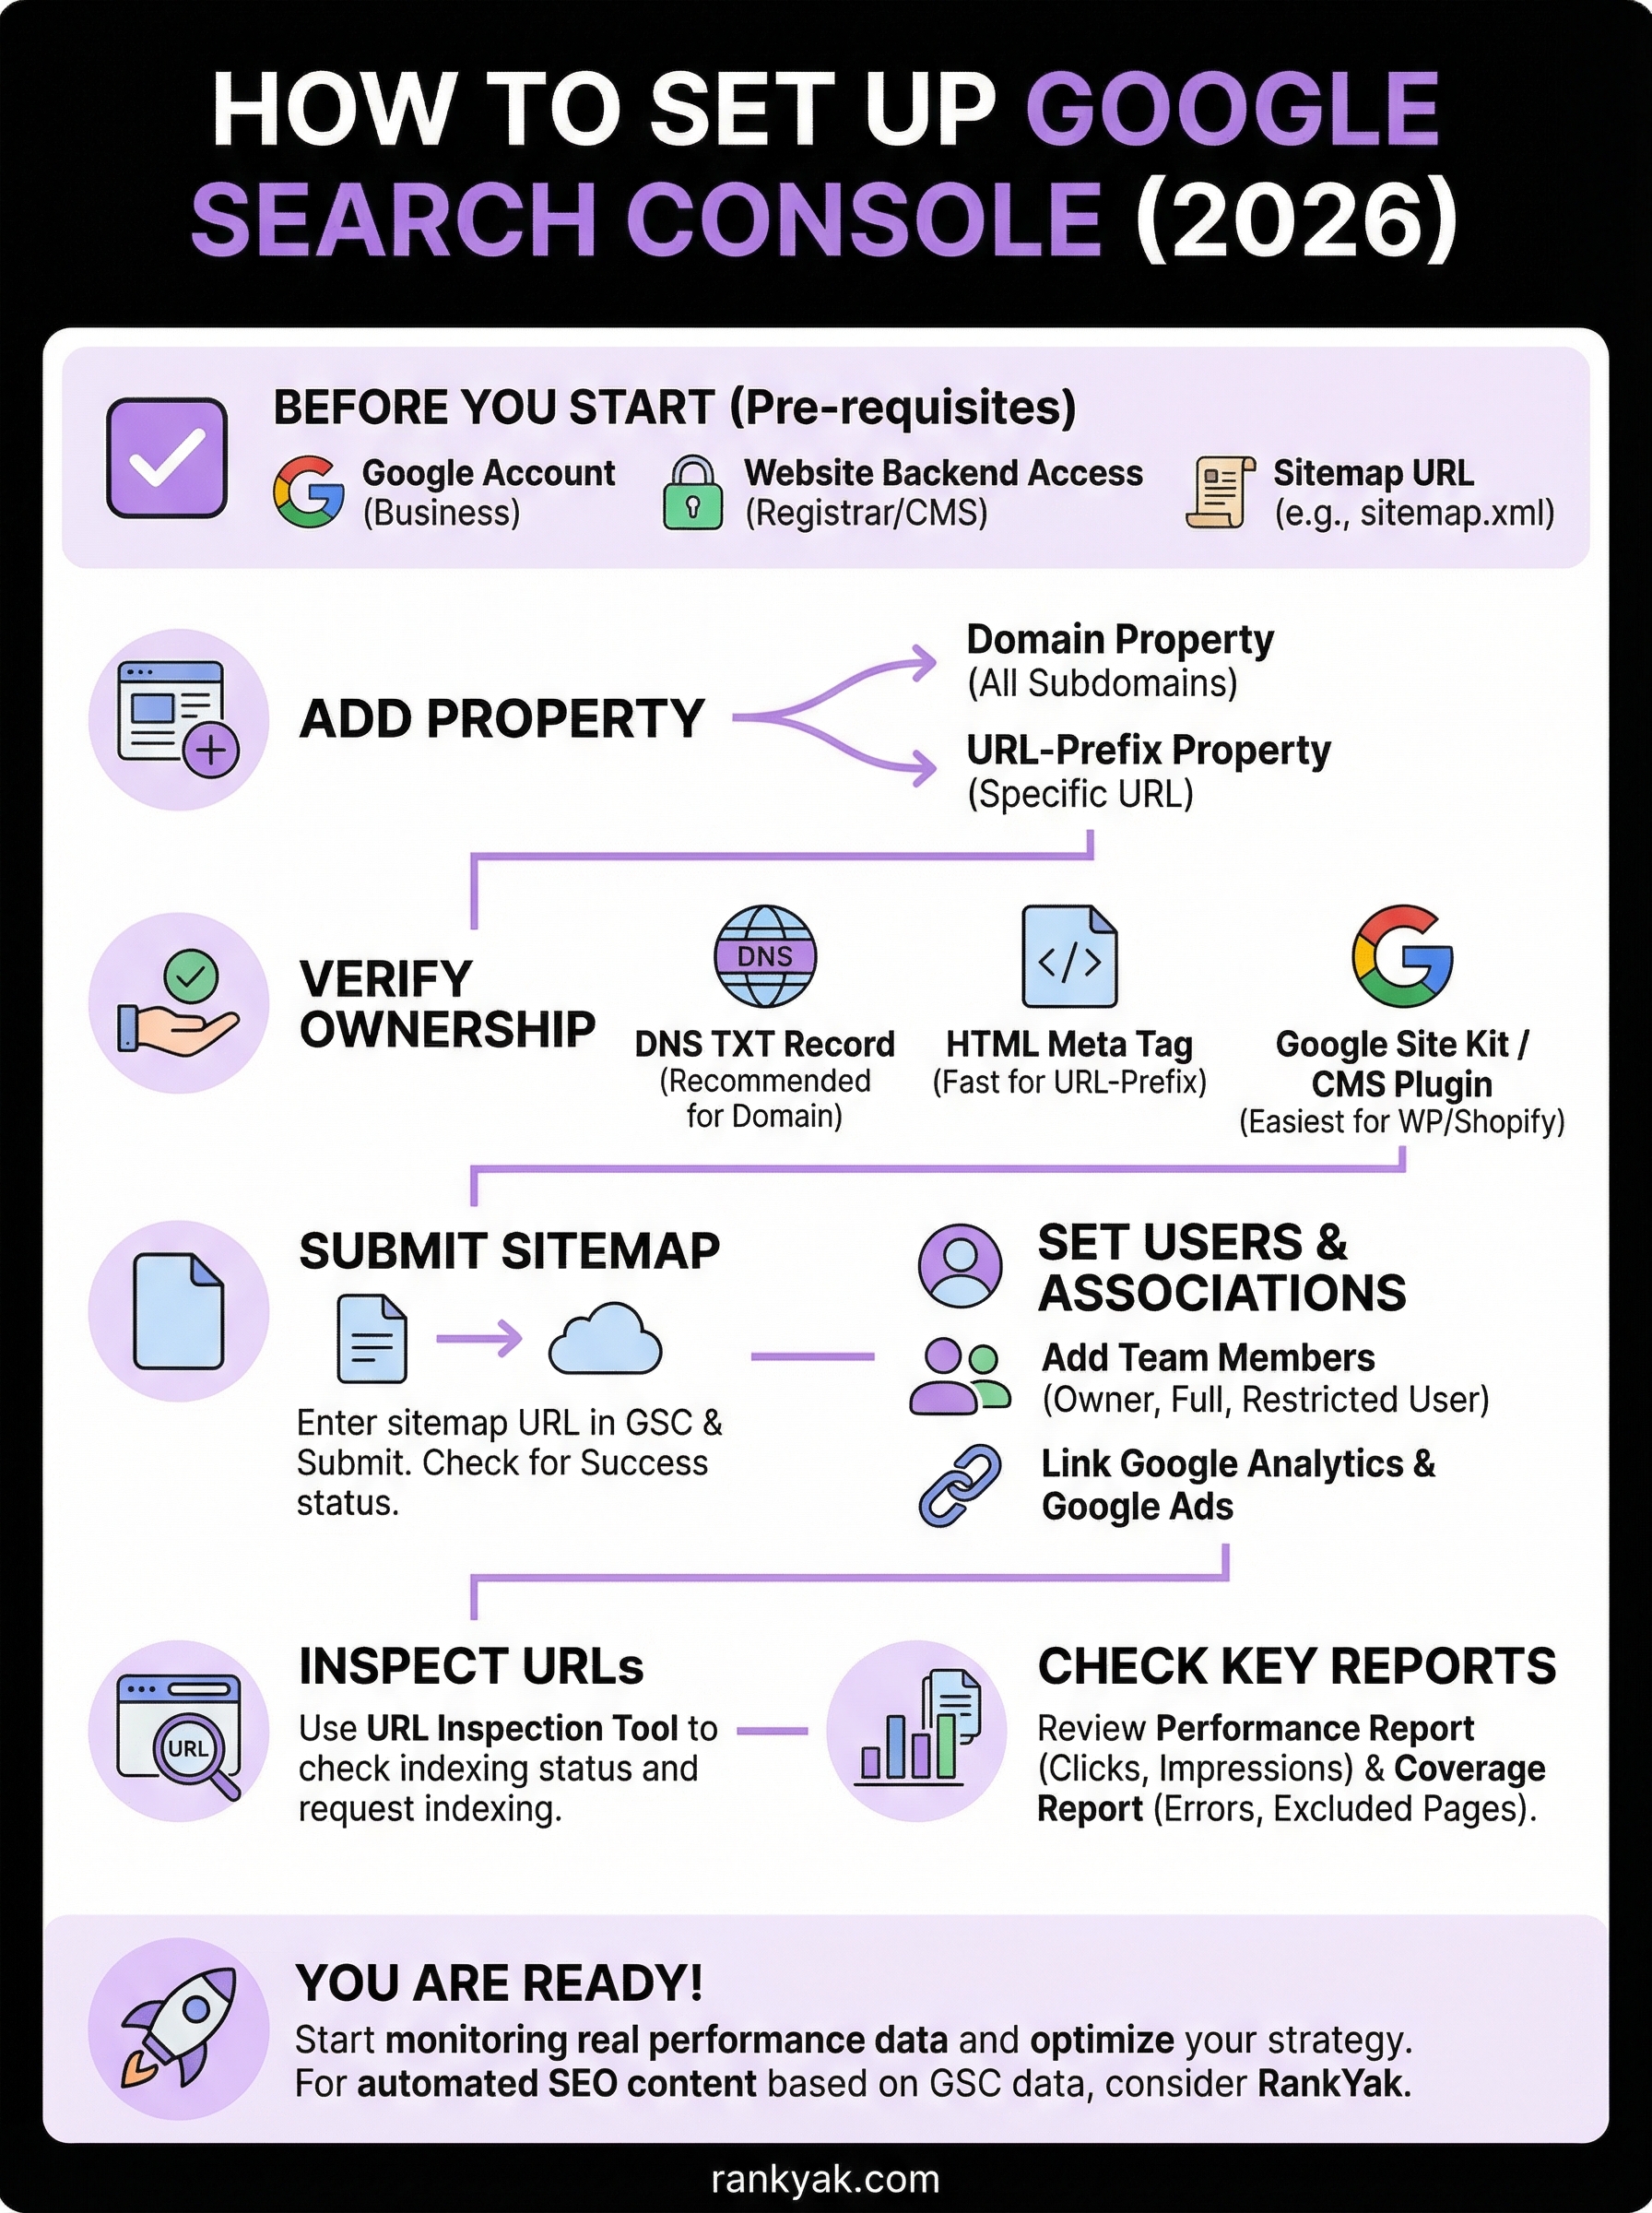
Before you learn how to set up Google Search Console, you need three things in place. Missing even one of them can stall the process and force you to start over partway through. Spending five minutes on this checklist now means you won't need to stop mid-setup to hunt down login credentials or figure out where a file lives on your server.
A Google account tied to your business
Google Search Console requires a Google account to access it. If you already use Gmail, Google Analytics, or Google Ads for your business, you're set. If not, you'll need to create one at accounts.google.com before you proceed.
One important detail: use the account you intend to keep long-term. If you sign in with a personal Gmail and later want to hand Search Console access to a team member or agency, you'll need to add users manually or re-verify ownership. Starting with a business email address or a shared team account saves you that trouble entirely.
Use an email address connected to your business, not a personal account you might lose access to down the road.
Access to your website and its backend
You'll need at least one of the following to verify ownership of your site: access to your domain registrar (like GoDaddy, Namecheap, or Google Domains), access to your website's HTML source code, or the ability to upload files to your web server. Which one applies to you depends on the verification method you pick in Step 2.
If you're on WordPress, Shopify, or Webflow, you have options that don't require touching code directly. A plugin or a built-in settings field handles the heavy lifting. But if you're running a custom CMS or a static site, have your hosting credentials ready before you open Search Console.
Here's a quick reference for what each platform supports:
| Platform | Easiest verification method |
|---|---|
| WordPress | Google Site Kit plugin or HTML meta tag |
| Shopify | HTML meta tag via theme settings |
| Webflow | HTML meta tag in site SEO settings |
| Custom HTML site | Upload HTML file to root directory |
| Any platform | DNS TXT record via domain registrar |
Your sitemap URL
Your XML sitemap is a file that lists every indexable URL on your site. You'll submit it in Step 3, but knowing where it lives before you start saves time. Most platforms generate one automatically, so you likely already have one.
Common sitemap URLs follow these formats:
https://yourdomain.com/sitemap.xmlhttps://yourdomain.com/sitemap_index.xmlhttps://yourdomain.com/wp-sitemap.xml(WordPress default since version 5.5)
Check that your sitemap exists by typing the URL directly into your browser right now. If it loads a page of XML code, you're ready. If it returns a 404 error, you'll need to generate one using your platform's built-in settings or a plugin before you get to Step 3. On WordPress, the Yoast SEO or Rank Math plugin handles this. On Shopify and Webflow, the sitemap is generated automatically and requires no action on your part.
With your Google account ready, your backend access confirmed, and your sitemap URL noted, you have everything you need to move through setup without interruption.
Step 1. Add your website as a property
The first thing you do inside Search Console is tell Google which website you want to track. This is called adding a property, and before you click anything, you need to make a choice that affects how much data you see. Getting this decision right upfront saves you from re-verifying or creating duplicate properties later.
Domain property vs. URL-prefix property
Google Search Console offers two property types, and they are not equal in what they capture.
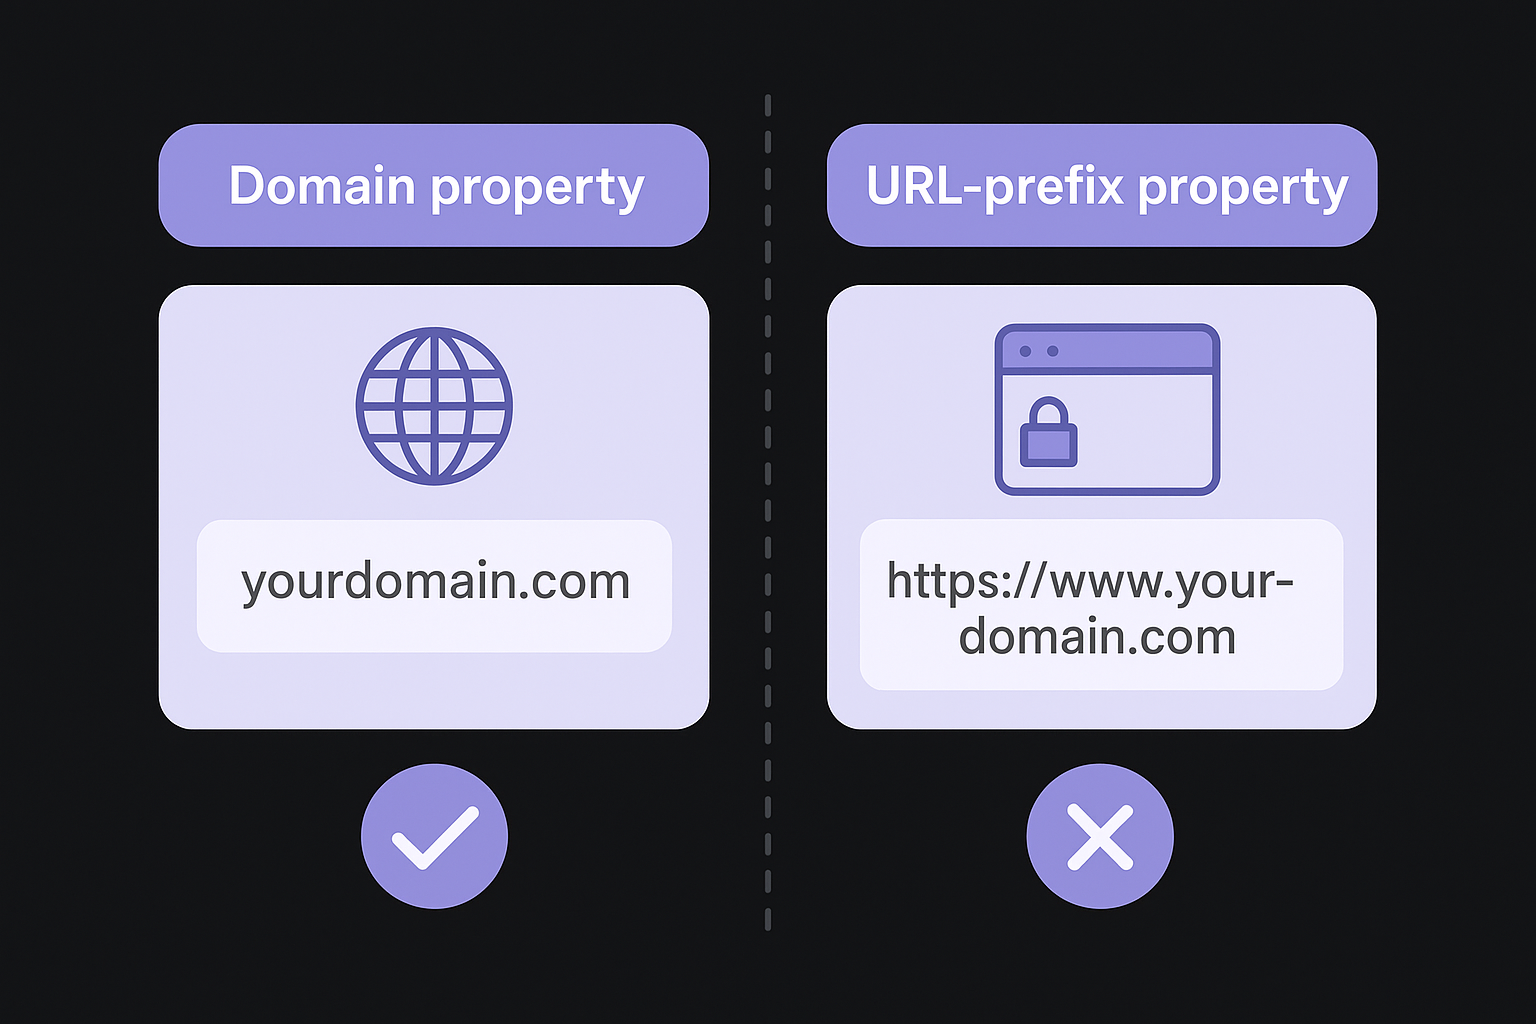
A Domain property tracks everything under your domain: all subdomains (www, blog, shop, etc.), all protocols (HTTP and HTTPS), and all paths. It gives you the most complete picture of your site's performance in one place. The trade-off is that it requires DNS verification, which means you need access to your domain registrar to add a TXT record. If you manage your own domain, this is the option to choose.
A URL-prefix property tracks only the specific URL you enter. If you type https://www.yourdomain.com, it only tracks that exact version. Traffic to http://yourdomain.com or https://yourdomain.com (no www) would show up as separate data. This option accepts multiple verification methods, making it easier if DNS access is not available to you.
If you have access to your domain registrar, choose a Domain property. You will get cleaner, more complete data with zero segmentation issues.
| Property type | Covers | Verification options |
|---|---|---|
| Domain | All subdomains and protocols | DNS TXT record only |
| URL-prefix | One specific URL version | HTML file, meta tag, DNS, GA, GTM |
How to add the property
Open Google Search Console and sign in with your Google account. On the left sidebar, you will see a property selector dropdown at the top. Click it and select "Add property" to open the setup panel.
You will see two boxes side by side: Domain on the left and URL prefix on the right. Enter your website address in whichever box matches the property type you chose. For a Domain property, enter just the root domain without any prefix, such as yourdomain.com. For a URL-prefix property, enter the full URL including the protocol, such as https://www.yourdomain.com.
Once you enter your URL and click Continue, Search Console moves you directly into the verification step. That is where Step 2 picks up. The property is not live until ownership is confirmed, so do not close the browser or navigate away from this screen.
Step 2. Verify site ownership
After you add your property, Google needs to confirm that you actually own or control the website. Verification is a one-time step, and once it completes, Search Console begins collecting performance data for your site immediately. The method you use depends on the property type you chose in Step 1 and what backend access you have available.
Verification does not expire as long as the verification token stays in place. Remove it and Google may lose access to your property.
DNS TXT record verification
The DNS TXT record method works for Domain properties and is the most reliable option because it covers your entire domain regardless of protocol or subdomain. To use it, log in to your domain registrar (such as GoDaddy, Namecheap, or Google Domains) and navigate to DNS management.
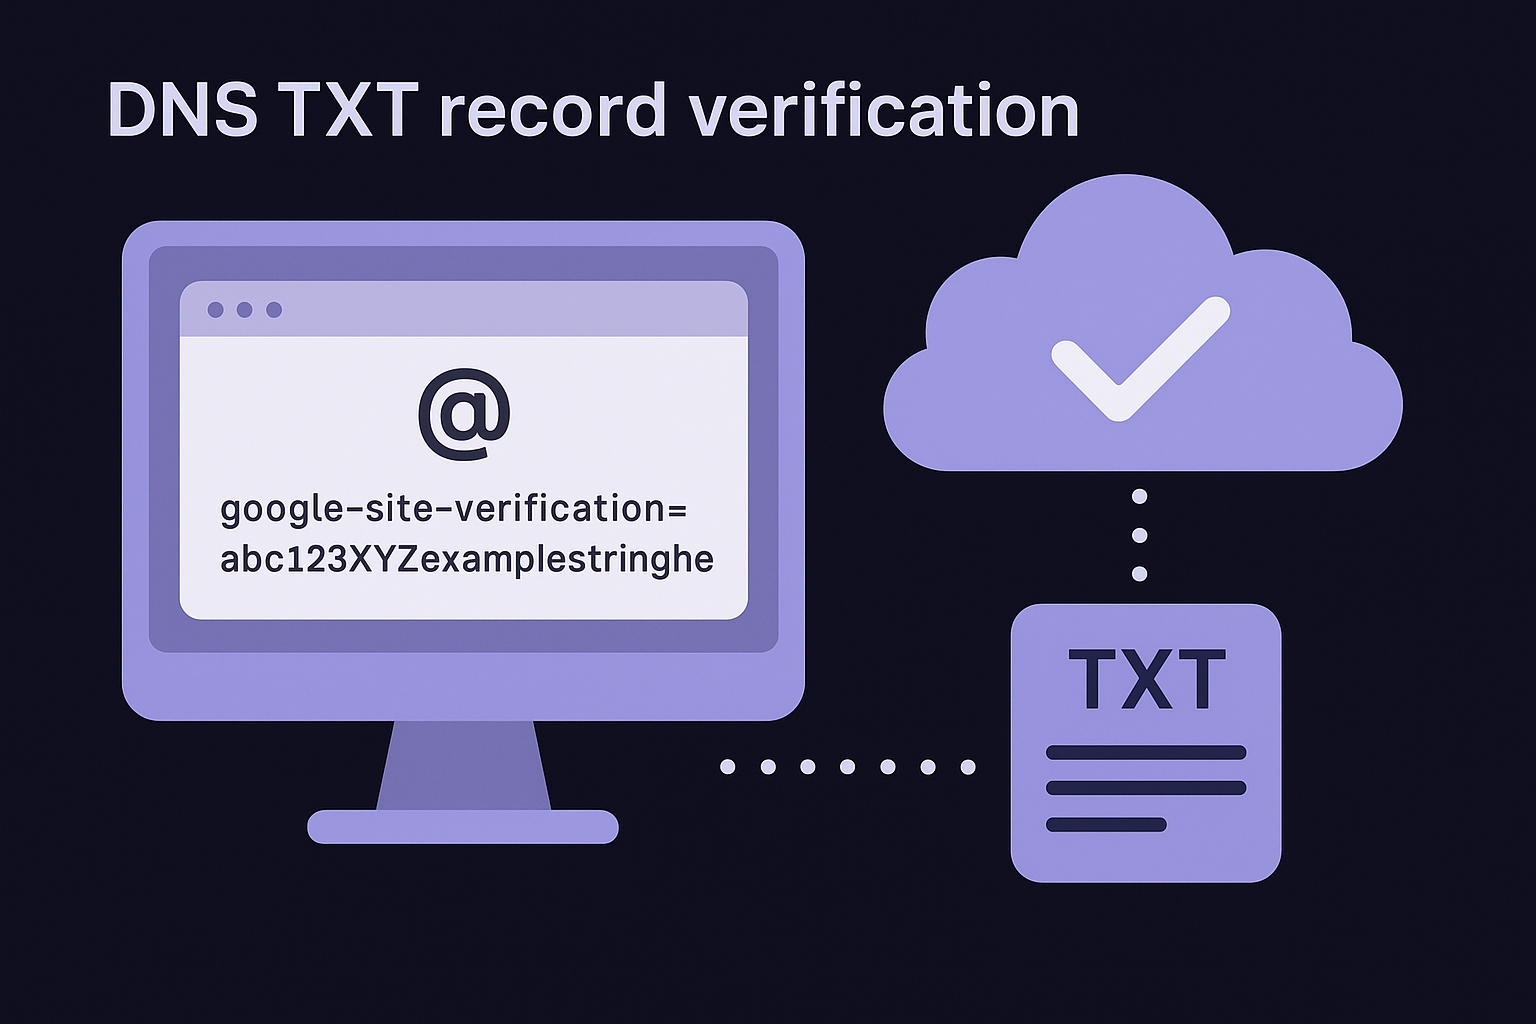
Search Console generates a unique verification string that looks like this:
google-site-verification=abc123XYZexamplestringhere
Copy the full string exactly from Search Console, create a new TXT record in your registrar's DNS panel, set the host field to @ (your root domain), and paste the string as the value. DNS changes can take up to 48 hours to propagate, but most registrars apply the update within minutes. Return to Search Console and click Verify.
HTML meta tag verification
For URL-prefix properties, the HTML meta tag method is the fastest option for most platforms. Search Console provides a snippet that looks like this:
<meta name="google-site-verification" content="abc123XYZexamplestringhere" />
You need to paste this tag inside the <head> section of your homepage's HTML before the page renders. On WordPress, use a plugin like Google Site Kit or add it through your theme's header settings. On Shopify, go to Online Store > Themes > Edit Code and paste it into theme.liquid. On Webflow, go to Site Settings > SEO > Custom Code and drop it into the Head Code field.
Once the tag is live, return to Search Console and click Verify. Part of learning how to set up Google Search Console correctly is understanding that you must leave the tag in place permanently. If Google checks again and the tag is missing, your property becomes unverified and data collection stops until you re-verify.
With ownership confirmed, you are ready to submit your sitemap so Google knows exactly which pages to crawl and index.
Step 3. Submit your sitemap
Submitting your sitemap is the step that puts Google to work on your behalf. Once your ownership is verified, Search Console is ready to accept your sitemap URL, and doing this early means Google starts discovering and queuing your pages for crawling faster than if you left it to chance. This is one of the most overlooked parts of how to set up Google Search Console correctly, and skipping it leaves your indexing timeline entirely up to Google's schedule rather than your own.
How to find and submit your sitemap
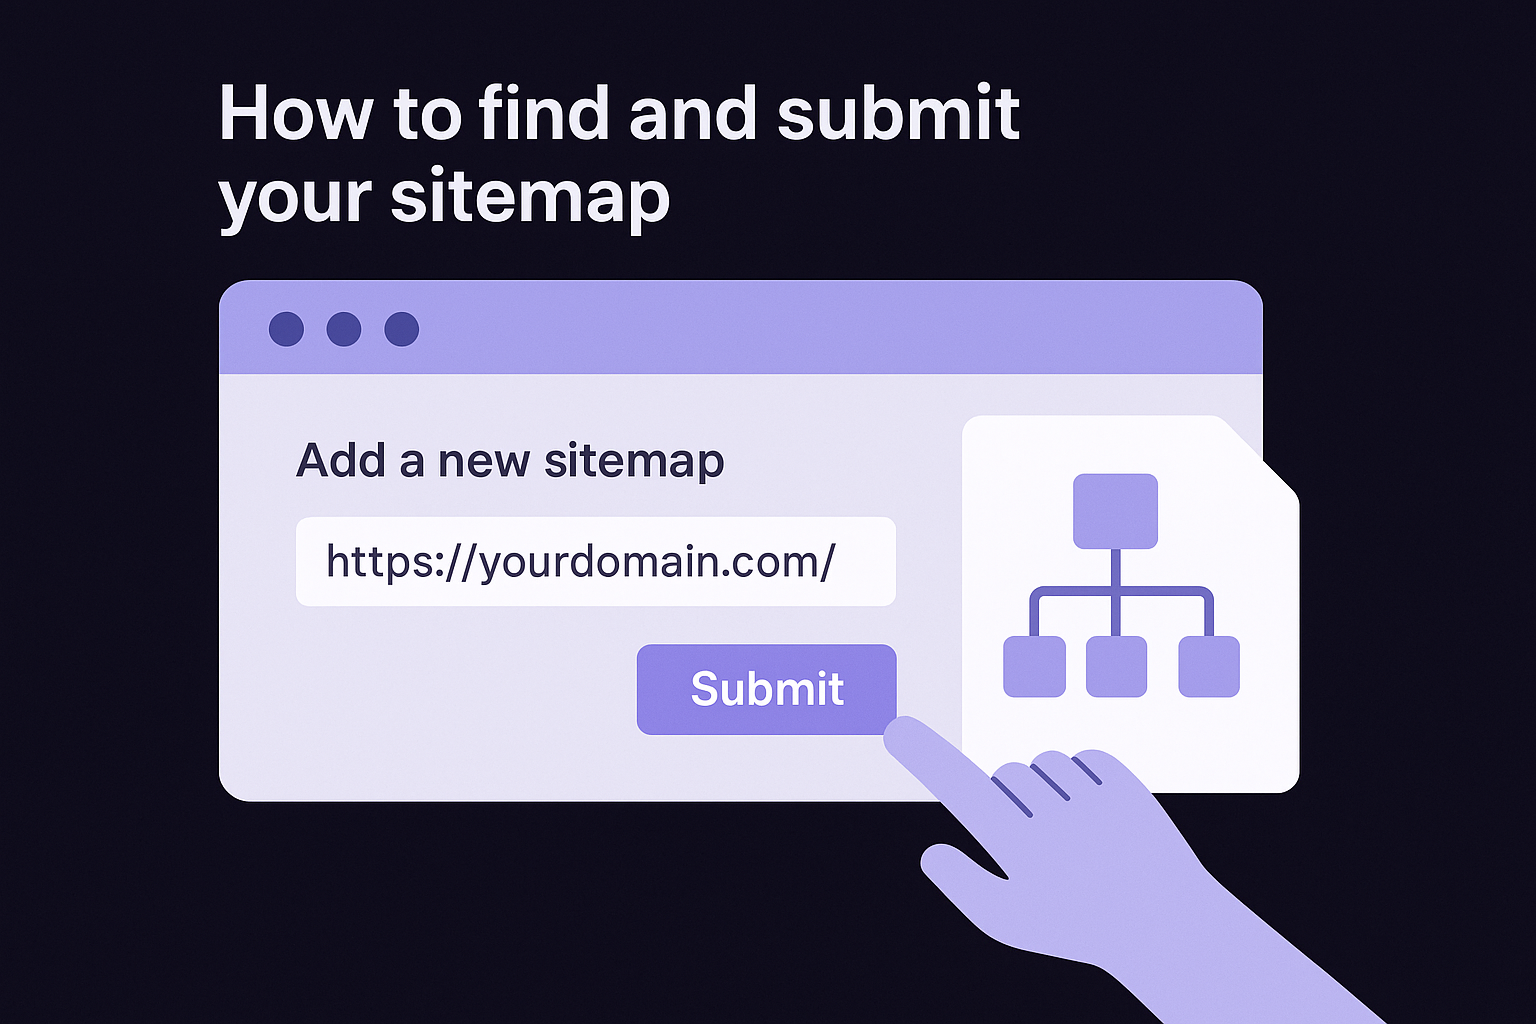
In the left sidebar of Search Console, click Sitemaps under the Index section. You will see a field that reads "Add a new sitemap" with your domain pre-filled. Type the path to your sitemap after the domain and click Submit.
Most platforms generate your sitemap at a predictable URL. Here are the most common ones by platform:
| Platform | Default sitemap URL |
|---|---|
| WordPress (5.5+) | https://yourdomain.com/wp-sitemap.xml |
| WordPress with Yoast | https://yourdomain.com/sitemap_index.xml |
| Shopify | https://yourdomain.com/sitemap.xml |
| Webflow | https://yourdomain.com/sitemap.xml |
| Custom HTML site | Varies, check your root directory |
After you submit, Search Console shows a status column next to your sitemap. A green "Success" label means Google received the file and will begin processing it. You will also see a count of how many URLs were discovered inside the sitemap, which is a quick way to confirm the file is working as expected.
Submit your sitemap even if you believe Google will find your pages on its own. The sitemap speeds up discovery and reduces the chance of orphaned pages being missed entirely.
What to do if your sitemap returns an error
If Search Console flags your sitemap with an error instead of a success status, the most common cause is a malformed XML file. Open your sitemap URL directly in a browser and look for any broken formatting. Each URL entry in a valid sitemap follows this structure:
<url>
  <loc>https://yourdomain.com/page-slug/</loc>
  <lastmod>2026-01-15</lastmod>
  <changefreq>weekly</changefreq>
  <priority>0.8</priority>
</url>
Regenerate the sitemap using your plugin or platform settings if the XML looks corrupted, then resubmit. On WordPress, toggling the sitemap off and back on inside Yoast SEO rebuilds the file cleanly within seconds.
Step 4. Set users, permissions, and associations
Search Console doesn't have to be a solo tool. Once your property is verified, you can invite team members, contractors, or agencies to access your account without sharing your Google login. You can also link Search Console to other Google products, which unlocks deeper data inside both platforms. Setting this up early prevents access headaches and data gaps down the road.
Add users and assign permission levels
To add a user, open Search Console and navigate to Settings > Users and permissions in the left sidebar. Click "Add user," enter the person's Google account email address, and select their permission level before confirming. The three permission levels work as follows:
| Permission level | What they can do |
|---|---|
| Owner | Full access: add/remove users, change settings, see all data |
| Full user | View all reports, take actions like requesting indexing |
| Restricted user | View most reports, no ability to take actions |
Owners have the highest level of access, so reserve that role for yourself or a trusted technical lead. Give agencies or freelancers Full user access unless they specifically need to manage property settings. Restricted user works for stakeholders who only need to review performance data without taking any actions.
Never grant Owner-level access to a third party you don't fully trust. Owners can remove other owners and change your property settings without your approval.
Link to Google Analytics and Google Ads
Connecting Search Console to Google Analytics lets you see organic search data directly inside your Analytics reports, including which queries drive sessions and where users land after clicking. To set this up, go to Settings > Associations inside Search Console, click "Associate a property," and select your Google Analytics 4 property from the list. Both accounts must use the same Google login, or you must have edit access to the Analytics property.
Linking to Google Ads is just as straightforward and lets you view paid and organic results side by side. Inside Associations, select "Google Ads" and choose the relevant Ads account. This connection is especially useful if you run paid campaigns alongside your organic strategy, since you can spot keyword gaps where paid ads cover ground your organic content hasn't reached yet.
Part of knowing how to set up Google Search Console properly is understanding that these associations are not required, but they significantly expand the insights you can pull from both platforms without any extra configuration work on either side.
Step 5. Check indexing with URL Inspection
Once your sitemap is submitted, you have a direct way to confirm whether individual pages have made it into Google's index. URL Inspection is the tool inside Search Console that lets you look up any URL on your site and see exactly what Google knows about it. This step is a critical part of how to set up Google Search Console correctly, because it tells you whether your pages are actually live in search results or sitting in a queue waiting to be processed.
How to run a URL inspection
At the top of any Search Console screen, you will see a search bar with the placeholder text "Inspect any URL in [your domain]". Type the full URL of a page you want to check, including the protocol, and press Enter. For example:
https://www.yourdomain.com/your-page-slug/
Search Console fetches the most recent data Google has for that URL and returns a status screen within a few seconds. The top of the result shows either "URL is on Google" in green or a different status indicating a problem. Below that, you get a breakdown covering coverage status, the last crawl date, the crawl type, and whether canonical tags are set correctly.
If a high-priority page shows "URL is not on Google," use the "Request Indexing" button to push it into Google's crawl queue immediately.
Reading the results and taking action
The status screen uses plain language, but a few results deserve your attention right away. "Discovered - currently not indexed" means Google found the page but hasn't crawled it yet, typically because your crawl budget is stretched or the page was recently published. "Crawled - currently not indexed" is more serious: Google visited the page and actively chose not to include it, which usually points to thin content, a noindex tag, or a canonicalization issue.
When you see either of these statuses, click "View crawled page" inside the inspection panel to see the HTML Google actually fetched. This rendered version shows you exactly what Googlebot sees, including whether JavaScript is loading content correctly or whether any tags are misconfigured. If the rendered page looks wrong, that is your signal to check your CMS settings or remove any accidental noindex directives from your page's meta tags before requesting indexing again.
Step 6. Use key reports to find quick wins
Once you complete how to set up Google Search Console and your data starts flowing in, you gain access to reports that surface real opportunities without any extra tools. Most of these insights live in the Performance and Coverage reports, and checking them within your first week of setup gives you a concrete starting point for improving your rankings fast. You don't need weeks of data to act. Even a few days of impressions and click data tells you a lot about where Google is already trying to send traffic.
Performance report
The Performance report is where you find the keywords driving impressions and clicks to your site. Open it from the left sidebar and make sure your date range covers at least the last 28 days. By default, you see Total Clicks, Total Impressions, Average CTR, and Average Position across all your queries.
The quick win strategy here is to filter for queries where your average position is between 8 and 20 and impressions are above 100. These are pages sitting just outside the top results, and they already have momentum. A targeted update to the title tag, meta description, or the body content on those pages is often enough to push them into the top five results and significantly increase clicks without building new content from scratch.
Sort by impressions descending after applying the position filter. The queries with the highest impression count and lowest click-through rate are your highest-priority targets.
Here is the filter logic to apply inside the Performance report:
| Filter | Setting |
|---|---|
| Date range | Last 28 days |
| Position filter | Greater than 8, less than 20 |
| Impressions threshold | Greater than 100 |
| Sort column | Impressions (descending) |
Coverage report
The Coverage report shows you which pages Google has indexed and which ones it excluded. Open it from the Index section in the sidebar. Your goal is to keep the Error and Excluded counts as low as possible, since these represent pages Google either cannot access or has decided not to show in search results.
Click into the "Excluded" category and review the reason labels. Pages marked "Duplicate without user-selected canonical" or "Alternate page with proper canonical tag" are expected in many setups and usually require no action. Pages flagged as "Crawled - currently not indexed," however, are worth investigating one by one using URL Inspection to identify thin content or misconfigured tags before they drag down your site's overall crawl health.
You Are Ready to Use GSC
You now know how to set up Google Search Console from scratch, and your site is in a stronger position than most. A verified property, a submitted sitemap, and an active Coverage report give you a foundation that most website owners never fully build. The Performance report will start showing real query data within a few days, and from there you can act on what Google tells you directly.
The next step is putting that data to work. Search Console shows you which keywords are close to ranking, but turning those insights into consistent organic growth requires publishing the right content on a reliable schedule. If that sounds like a time investment you don't have, RankYak handles keyword research, SEO-optimized article creation, and automatic publishing for you every day. Connect your Search Console account, and RankYak builds your strategy around real performance data, not guesswork.

Get Google and ChatGPT traffic on autopilot.
Start today and generate your first article within 15 minutes.

SEO revenue calculator
How much revenue is your website leaving on the table?
Take a quick quiz and see exactly how much organic revenue you're missing out on, along with personalized tips to fix it.
-
4 questions, under 1 minute
-
See traffic and revenue potential
-
No email required
Free · takes 1 minute · no signup needed
Question 1 of 4
Question 2 of 4
Question 3 of 4
Question 4 of 4
Your SEO growth potential
Extra visitors / month
after 6-12 months of consistent publishing
Revenue potential / year
at your niche's avg. conversion rate
Articles needed (12 mo)
to reach this traffic level
ROI with RankYak
at $99/mo ($1,188/year)
To hit that number, you'd need to:
- Build a topical authority strategy for your niche
- Research keywords & map out a full topical cluster
- Write, edit & publish an article every single day
- Build backlinks to the articles you publish
RankYak handles all of this automatically, every day.
* Estimates based on industry averages. Results vary by niche, competition, and domain authority. Most SEO results become visible after 3-6 months of consistent publishing.