Using AI for Blog Posts: A Step-by-Step Guide That Ranks Fast

Most business owners know they should be publishing blog content consistently. Few actually do. The gap between "we need more content" and "we published this week" is where using AI for blog posts comes in, not as a shortcut to spam Google, but as a practical way to produce quality content without burning out your team or your budget.
AI blogging tools have matured significantly. They can research topics, draft structured articles, optimize for search intent, and even publish on your behalf. But using them well still requires a process. Throw a keyword at ChatGPT and hit publish? That's not a strategy, it's a coin flip. The difference between AI content that ranks and AI content that collects dust comes down to how you set up your workflow, what you optimize for, and how much human direction you layer in.
This guide walks you through each step of building an AI-powered blogging process that actually moves the needle on organic traffic. We built RankYak to automate exactly this workflow, from keyword discovery to SEO-optimized publishing, so the advice here reflects what we've seen work firsthand. Whether you use our platform or piece together your own stack, you'll leave with a repeatable system for creating blog posts that rank faster and more consistently.
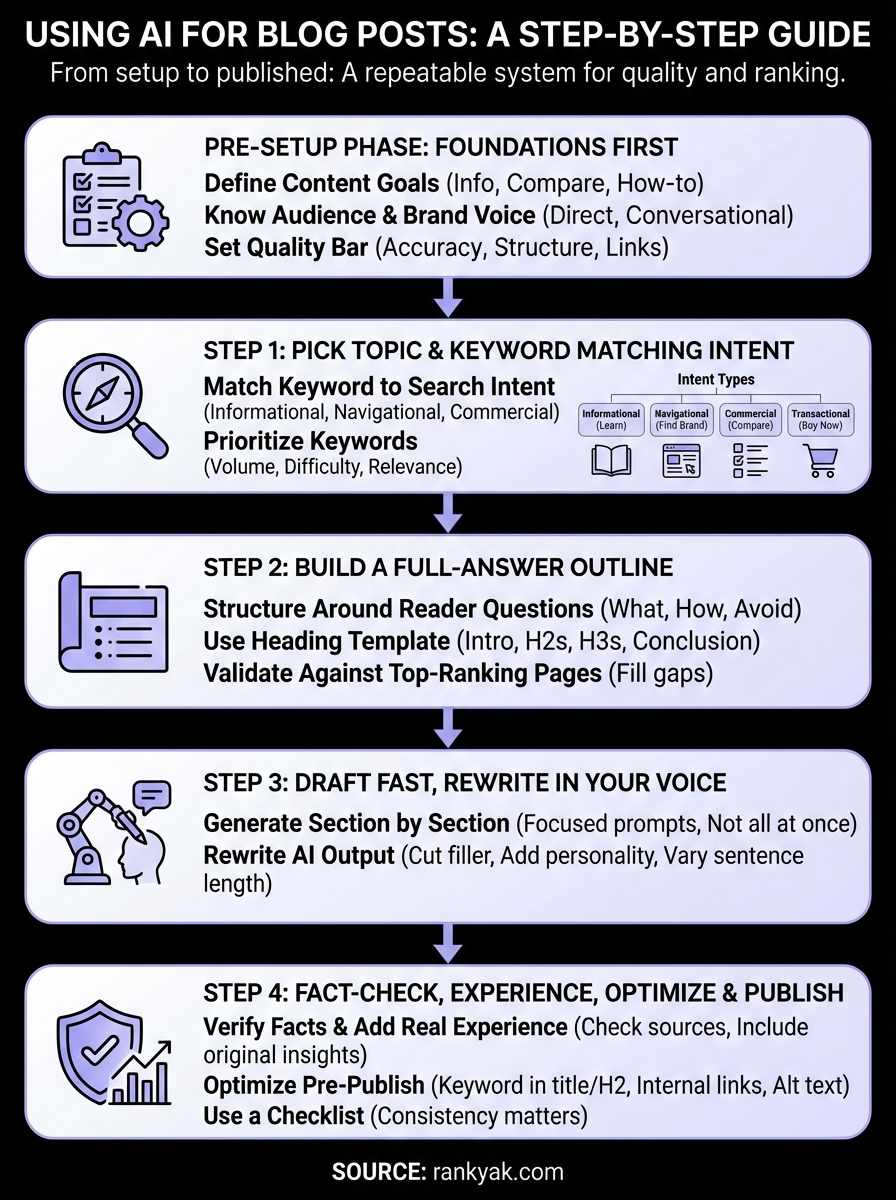
What to do before you use AI for blog posts
The biggest mistake people make with using AI for blog posts is skipping the setup phase entirely. They open a tool, type a prompt, and wonder why the output feels generic. AI is a capable writing assistant, but it performs best when you give it a clear direction to follow. Spend 30 minutes on these foundations now, and every article you produce afterward will be sharper, more consistent, and far more likely to rank.
Define your content goals
Before you generate a single word, you need to know what you want your blog to accomplish. Are you driving leads for a specific product? Building topical authority in a niche? Growing an email list? The answer shapes everything: which topics you cover, how technical you go, and what a successful post looks like. Write down two or three concrete goals in plain language, such as "rank for high-intent keywords in our industry" or "answer questions our sales team hears every week."
Once your goals are clear, map them to a content type. Informational posts build awareness. Comparison pages attract buyers ready to make a decision. How-to guides capture mid-funnel readers who want to act right now. Keeping this mapping visible helps you stay focused when topic ideas start multiplying:
| Content Goal | Content Type | Example |
|---|---|---|
| Build awareness | Informational | "What is [X]?" |
| Capture ready buyers | Comparison | "[X] vs [Y]" |
| Drive conversions | How-to guide | "How to do [X] with [Y]" |
Know your audience and brand voice
Your AI tool has no idea who your readers are unless you tell it. Before you write a single prompt, document the basics: who your ideal reader is, what they already know, what they are trying to accomplish, and what tone fits your brand. A cybersecurity firm writing for CISOs needs a completely different voice than a direct-to-consumer brand writing for first-time buyers.
The more specific your audience brief, the less editing you will do after every AI draft.
Build a short brand voice reference you can paste into any prompt. Include tone descriptors like "direct," "conversational," or "authoritative," a list of words you avoid, and one or two sample sentences that sound like your brand at its best. This document takes about 20 minutes to build and saves hours of revision every month.
Set a quality bar before you generate anything
Decide what "good enough to publish" looks like before you start generating content. This means setting a minimum standard for factual accuracy, original insight, internal link count, and structure. Without a checklist, quality decisions become subjective and inconsistent, especially when multiple people touch the same post.
A simple pre-publish checklist removes that guesswork. At minimum, confirm that each post includes a clear primary keyword, at least one original perspective or verified data point, a reviewed facts section, and a logical flow from introduction to conclusion. These checks take under 10 minutes but significantly reduce the risk of publishing thin content that damages your rankings instead of improving them.
Step 1. Pick a topic and keyword that fit intent
The most important decision in using AI for blog posts happens before you open any writing tool: choosing a keyword that matches what your reader actually wants when they search. Google ranks content that satisfies intent, not just content that contains the right words. If you target "best CRM software" with a how-to article, you will compete against comparison pages and lose, no matter how well AI wrote your draft. Start every post by identifying the dominant intent behind your target keyword.
Match keyword to search intent
Search intent falls into four clear categories. Once you identify which one your keyword belongs to, you know exactly what format and depth your post needs. Getting this wrong wastes your AI writing time and hurts your chances of ranking from day one.
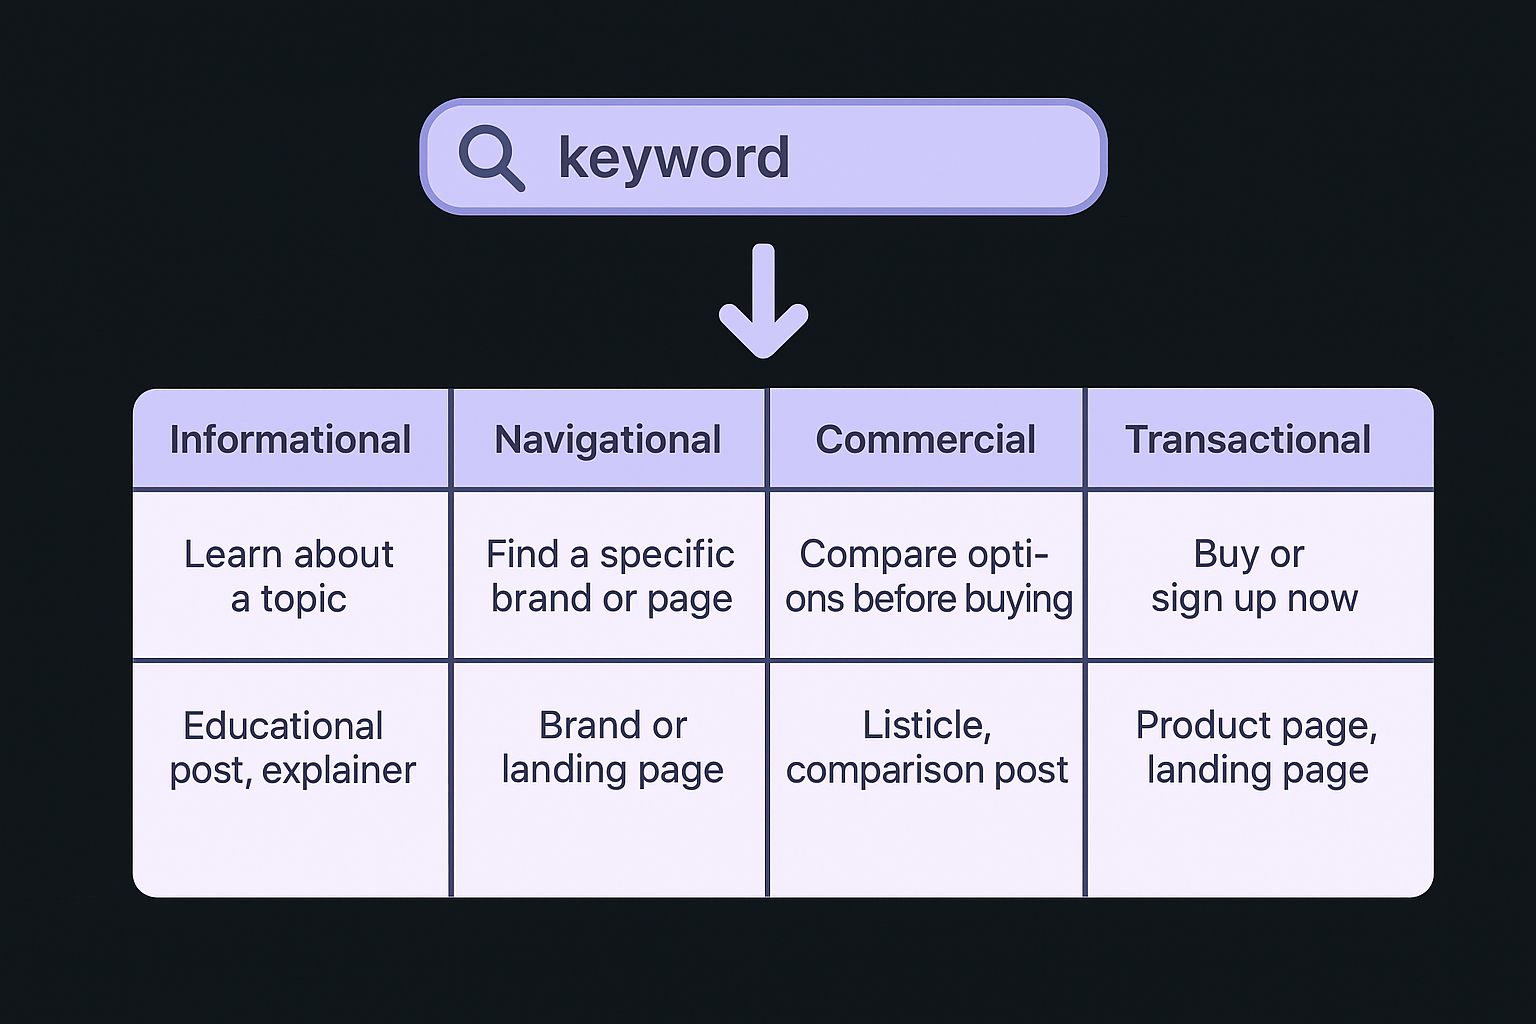
| Intent Type | What the Reader Wants | Content Format to Use |
|---|---|---|
| Informational | Learn about a topic | Educational post, explainer |
| Navigational | Find a specific brand or page | Brand or landing page |
| Commercial | Compare options before buying | Listicle, comparison post |
| Transactional | Buy or sign up now | Product page, landing page |
Match your content format to the dominant intent first, then worry about word count and structure.
To identify intent quickly, search your target keyword in Google and look at the top five organic results. If most are listicles, write a listicle. If most are how-to guides, write a how-to guide. The format pattern the results show you is the format Google already trusts for that keyword.
Use keyword research signals to filter your list
Not every keyword worth ranking for is worth writing about right now. Prioritize keywords where your site has a realistic chance of ranking based on current authority and competition level. Focus on three signals when filtering your keyword list:
- Search volume: Look for keywords with consistent monthly searches, not just spikes
- Keyword difficulty: Lower difficulty scores give newer or smaller sites a faster path to rankings
- Relevance to your offer: Pick keywords your existing audience would actually search
Run your shortlist through Google Search Console to see if any terms already generate impressions for your site. Those keywords deserve first priority because you are already on Google's radar for them.
Step 2. Build an outline that covers the full answer
A strong outline is the single most important input you give an AI writing tool. When you skip the outline, you get AI output that technically covers the topic but wanders, repeats itself, or misses the sections readers actually need. Before generating a single paragraph, build a skeleton that answers every question a reader might have after finishing your post. This is where using AI for blog posts shifts from guesswork into a controlled, repeatable process.
Structure your outline around reader questions
Think about the three things your reader wants to know: what the topic is, how to act on it, and what to avoid. Map each of those to a heading in your outline, then add subheadings for any nuance the main heading does not capture. This approach keeps your AI draft focused and cuts editing time significantly.
A post that answers the reader's next question before they have to search again is one Google will reward with more clicks.
Use this template as a starting point for any how-to or informational post:
Title: [Primary keyword + specific benefit]
Intro: [Problem + solution preview + what this post covers]
H2: [What is X / Why X matters]
  H3: [Key concept 1]
  H3: [Key concept 2]
H2: [How to do X - Steps]
  H3: [Step 1]
  H3: [Step 2]
  H3: [Step 3]
H2: [Common mistakes to avoid]
H2: [Next steps / Conclusion]
Fill each node with two or three bullet points describing what that section will cover. Those bullet points become your AI prompt for each section, which keeps the draft tightly aligned with your plan and prevents generic filler content from sneaking through.
Validate your outline against the top-ranking pages
Pull up the top three results for your target keyword and scan their headings to identify any major subtopics you have missed. You do not need to copy their structure, but any heading pattern that appears across multiple top results signals that Google considers it essential coverage for that keyword.
Also check whether top-ranking posts cover angles you had not considered, such as FAQs, comparisons, or specific use cases. A quick 10-minute review of competitor outlines before you write saves you from publishing a post that feels incomplete next to better-ranked alternatives. Your outline is your quality filter, and checking it against real results is the most efficient way to strengthen it.
Step 3. Draft fast with AI, then rewrite in your voice
Once your outline is locked, the drafting phase becomes mechanical. You feed each section into an AI tool with a precise prompt and let it generate a first pass. The key to using AI for blog posts effectively at this stage is treating the AI output as raw material, not a finished product. Speed matters here, but so does knowing where the AI's job ends and yours begins.
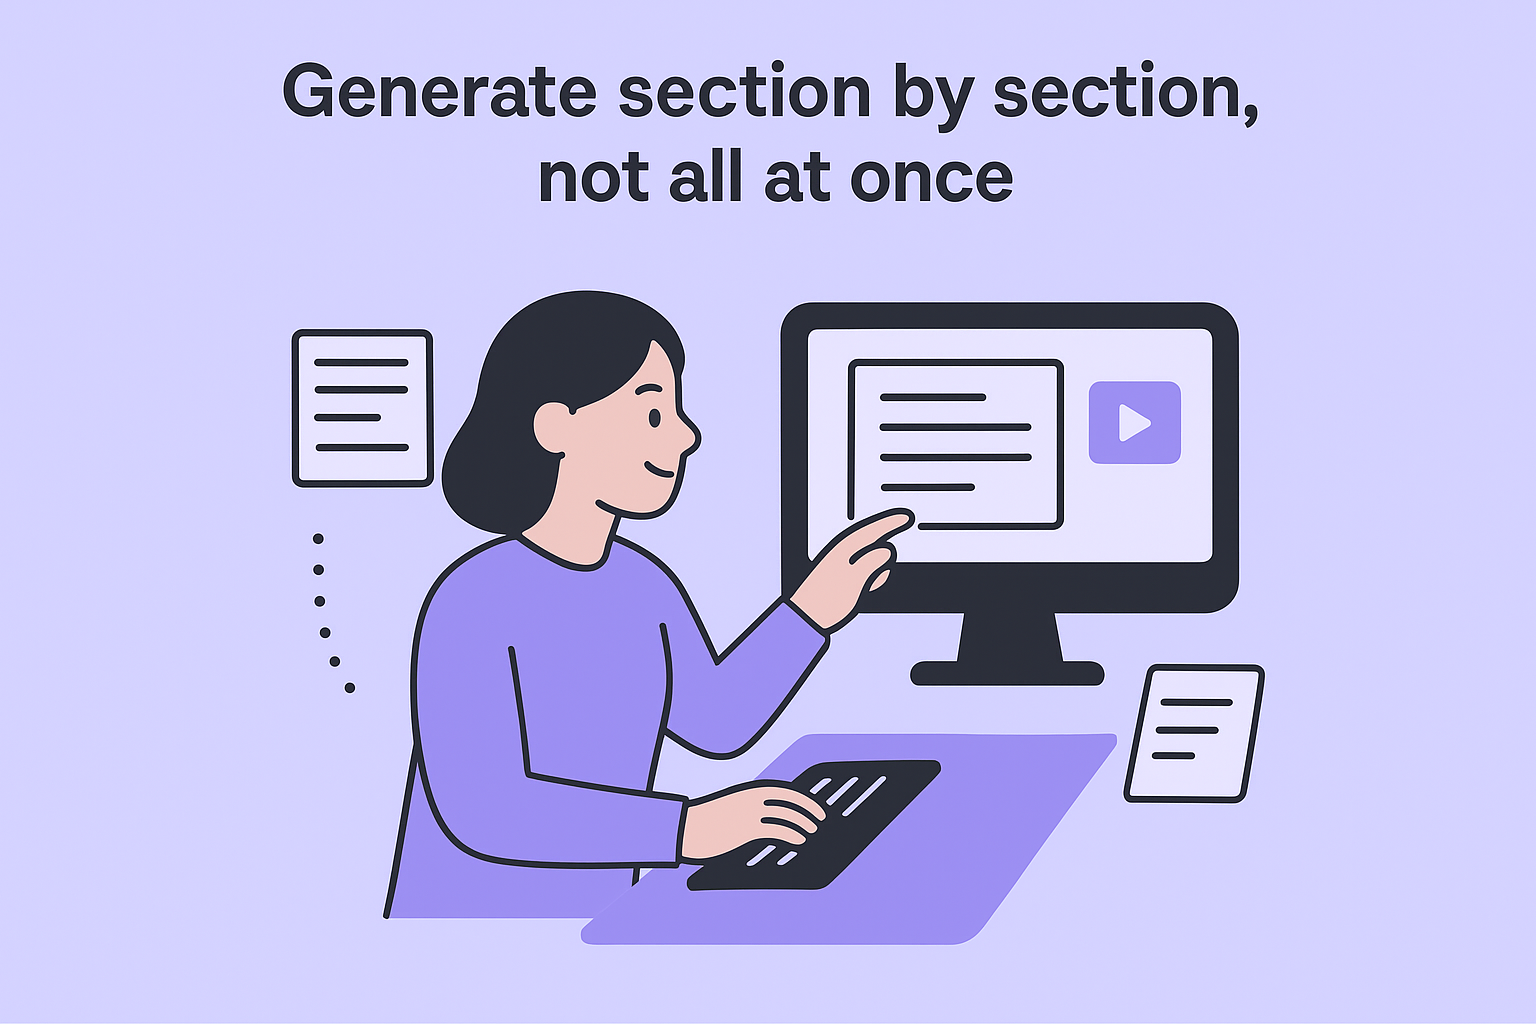
Generate section by section, not all at once
Prompt your AI tool one section at a time, using the bullet points from your outline as direct input. This keeps each output tightly focused and gives you a natural editing checkpoint before moving forward. When you try to generate an entire 2,000-word post in a single prompt, the output drifts, repeats itself, and fills space with vague transitions that weaken the whole piece.
Use this prompt template for each section:
Write [section heading] for an article titled "[title]".
Audience: [brief description]
Tone: [2-3 tone descriptors]
Cover these specific points:
- [bullet 1 from your outline]
- [bullet 2 from your outline]
- [bullet 3 from your outline]
Keep it under [word count] words. Be direct and specific. No filler.
Paste each output into a running document before moving on. Review the draft against your bullet points to confirm the AI covered what you asked, then move to the next section.
Rewrite AI output in your voice
AI drafts tend to sound polished but hollow. They hedge with phrases like "it's worth noting" or open with broad statements that say nothing. Your job in the rewrite is to strip those out and replace them with how you actually communicate. Read each paragraph out loud. If you would not say it to a client in a meeting, rewrite the sentence until you would.
The rewrite pass is what separates AI content that ranks from AI content readers skim once and forget.
Focus your edits on three things: cutting filler phrases, injecting one specific example or data point per major section, and varying sentence length to match your natural rhythm. Short sentences hit hard. Longer ones build context. Alternating both makes the writing feel like a person wrote it, because a person did.
Step 4. Fact-check, add experience, optimize, and publish
Publishing an AI draft without review is the fastest way to undermine your credibility. Using AI for blog posts means you are responsible for everything that goes live under your name, so this step is where you close the gap between "AI-assisted draft" and "trustworthy published article." Spend 15 to 20 minutes here before you push anything live, and you protect both your reputation and your rankings.
Verify facts and inject real experience
AI tools pull from training data that may be outdated or simply wrong. Check every statistic, product name, and specific claim against a primary source before publishing. If you cannot verify a number quickly, cut it or replace it with something you can confirm. One factual error in a post erodes reader trust faster than a dozen weak sentences ever will.
Readers who catch a factual mistake in your post do not return, and search engines reward content that consistently earns trust over time.
Beyond accuracy, add at least one piece of original first-hand experience to each major section. This could be a result from your own campaigns, a specific client outcome, or a concrete observation from your work. A single grounded detail makes your post more useful than three AI-generated paragraphs combined, and it signals to Google that a real expert contributed to this content.
Optimize before you hit publish
Once your draft is solid, run a final optimization pass before you schedule it. Your primary keyword should appear naturally in the title, the first 100 words, at least one H2, and the meta description. Beyond keyword placement, confirm internal links and image alt text are in place.
Use this checklist before every publish:
Pre-Publish Optimization Checklist
-------------------------------------
[ ] Primary keyword in title
[ ] Primary keyword in first 100 words
[ ] Primary keyword in at least one H2
[ ] Meta description written (under 160 characters)
[ ] At least 2 internal links added
[ ] Featured image with descriptive alt text
[ ] Facts verified against primary sources
[ ] One first-hand insight or example included
Run this checklist on every post, regardless of who drafted it. Consistency here compounds over time and keeps your content quality from slipping as your publishing volume grows.
Next steps
You now have a complete workflow for using AI for blog posts the right way: define your goals, match keywords to intent, build a tight outline, draft section by section, and review before you publish. Each step builds on the last, so skipping any one of them tends to show up in your rankings within weeks.
Putting this process into practice consistently is where most people stall. Writing daily posts, managing keyword research, and keeping up with optimization checks takes real time, even with AI doing the heavy lifting. That is where automation closes the gap entirely. RankYak handles the full workflow for you, from identifying high-potential keywords to generating SEO-optimized articles and publishing them directly to your site every day.
If you want to see what consistent, optimized publishing looks like on autopilot, start your free 3-day trial on RankYak and let the platform do the work.

Get Google and ChatGPT traffic on autopilot.
Start today and generate your first article within 15 minutes.

SEO revenue calculator
How much revenue is your website leaving on the table?
Take a quick quiz and see exactly how much organic revenue you're missing out on, along with personalized tips to fix it.
-
4 questions, under 1 minute
-
See traffic and revenue potential
-
No email required
Free · takes 1 minute · no signup needed
Question 1 of 4
Question 2 of 4
Question 3 of 4
Question 4 of 4
Your SEO growth potential
Extra visitors / month
after 6-12 months of consistent publishing
Revenue potential / year
at your niche's avg. conversion rate
Articles needed (12 mo)
to reach this traffic level
ROI with RankYak
at $99/mo ($1,188/year)
To hit that number, you'd need to:
- Build a topical authority strategy for your niche
- Research keywords & map out a full topical cluster
- Write, edit & publish an article every single day
- Build backlinks to the articles you publish
RankYak handles all of this automatically, every day.
* Estimates based on industry averages. Results vary by niche, competition, and domain authority. Most SEO results become visible after 3-6 months of consistent publishing.