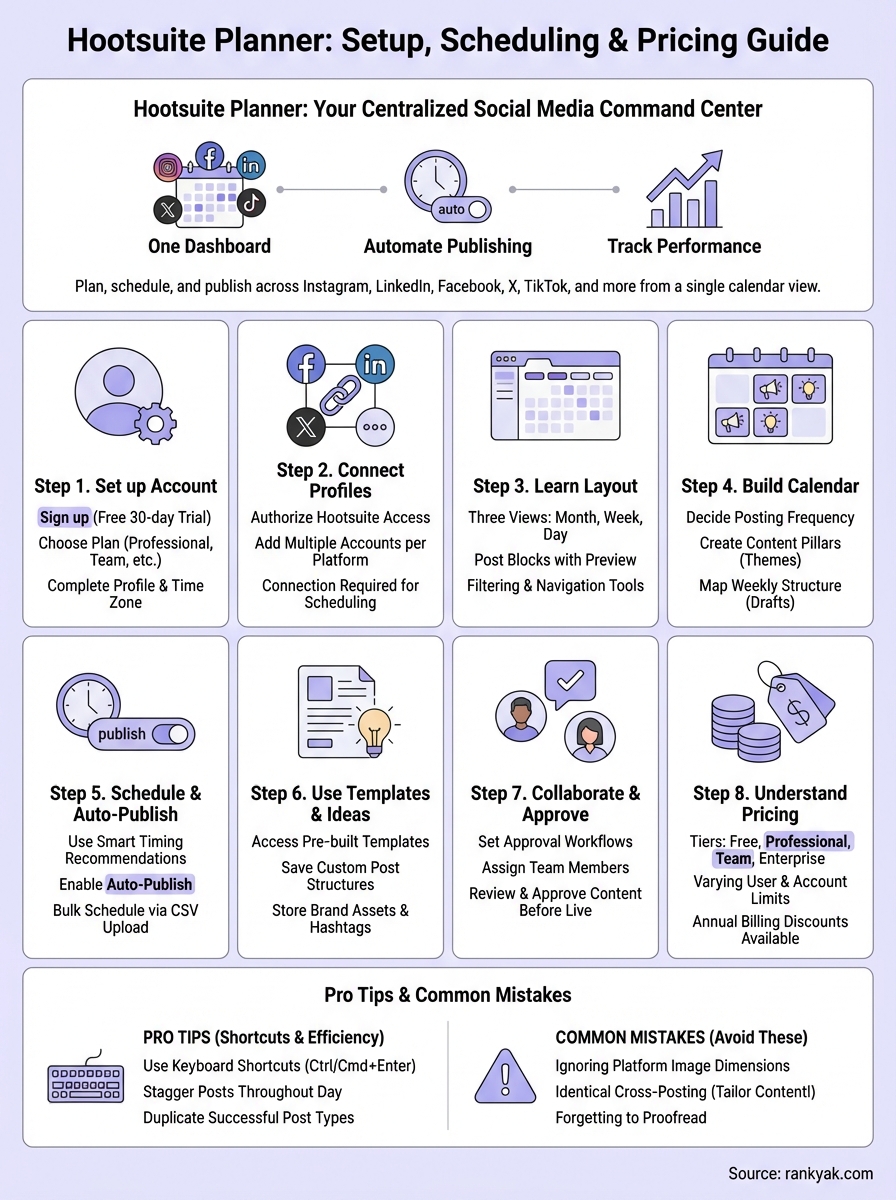
How to Use Hootsuite Planner: Setup, Scheduling, Pricing

You open five different tabs to schedule posts across Instagram, LinkedIn, Facebook, X, and TikTok. Each platform has its own quirks. You lose track of what you published where. Your content calendar lives in three different places. Sound familiar? Managing social media this way burns hours you don't have.
Hootsuite Planner solves this by giving you one dashboard to plan, schedule, and publish content across every social platform you use. You see all your posts in a single calendar view, schedule them to go live automatically, and track everything from one place. No more tab switching or missing posts because you forgot to hit publish.
This guide walks you through everything you need to know about Hootsuite Planner. You'll learn how to set up your account, connect social profiles, build a content calendar, schedule posts with smart timing, use templates to speed up your workflow, manage team approvals, and understand what each pricing tier includes. By the end, you'll know exactly how to use Hootsuite Planner to automate your social media and get your time back.
What Hootsuite planner actually does
Hootsuite planner is a centralized content calendar that lets you plan, organize, and schedule social media posts across multiple platforms from one dashboard. Instead of logging into each social network separately, you view all your scheduled content in a single calendar interface. You create posts once, set the publish times, and the planner automatically publishes them to your connected accounts without you touching anything.
Core planning features
The planner gives you three calendar views to organize your content: a monthly overview, a weekly breakdown, and a daily detailed view. You switch between views depending on whether you need a big-picture strategy perspective or granular control over individual post timing. Each post appears as a block on the calendar showing the platform, content preview, and scheduled time.
You can color-code posts by campaign, content type, or platform to spot gaps in your publishing schedule at a glance. The drag-and-drop interface lets you move posts between days and time slots instantly if your strategy changes or a trending topic pops up that shifts your priorities.
Planning your content in advance creates consistency, which algorithms reward with better reach and engagement.
Scheduling capabilities
The scheduler includes smart timing recommendations based on when your audience is most active on each platform. You input your post content, select target platforms, and Hootsuite suggests optimal publishing times using data from your account's historical performance. You can override these suggestions with manual times if specific campaigns require it.
Bulk scheduling lets you upload multiple posts at once through a CSV file or spreadsheet. This feature saves hours when you need to schedule a month's worth of content in one sitting, particularly useful for product launches, seasonal campaigns, or content batches created by your team in advance.
Organization tools
The content library stores reusable assets like brand hashtags, approved copy templates, and frequently used images. You access these saved elements when creating new posts instead of searching through folders or recreating content from scratch. This keeps your brand voice consistent and speeds up the content creation process significantly.
Team permissions control who can draft, schedule, and publish posts versus who only gets view access. Approval workflows route posts through designated reviewers before they go live, preventing unauthorized content from reaching your audience and maintaining quality standards across all your social channels.
Step 1. Set up your Hootsuite account
You need a Hootsuite account before accessing the planner. The signup process takes five minutes and requires a valid email address and payment method if you choose a paid plan. Hootsuite offers a 30-day free trial for new users, which gives you full access to the planner features without committing to a subscription upfront.
Choose your plan and sign up
Navigate to the Hootsuite pricing page and select the plan that fits your needs. The Professional plan ($99/month) includes the hootsuite planner for one user and up to 10 social accounts. The Team plan ($249/month) supports three users and 20 accounts with collaboration features. Enterprise plans offer unlimited users and custom pricing for larger organizations.
Click the "Start Free Trial" button on your chosen plan. Enter your email address and create a secure password with at least eight characters. You'll receive a verification email within minutes. Click the verification link to activate your account and proceed to the dashboard.
Starting with a trial lets you test the planner's full capabilities before spending money on a subscription.
Complete account setup
Fill out your company information including business name, industry, and time zone. The time zone setting controls when your scheduled posts publish, so select the zone where most of your audience lives. If you manage clients in different regions, you can adjust this later for individual posts.
Add your profile details including your name and role. This information appears in collaboration features when team members review or approve posts. Upload a profile picture to make your account recognizable to other users on your team.
Connect your payment method if you plan to continue after the trial ends. Hootsuite accepts credit cards and PayPal for subscription payments. Your card won't be charged during the trial period, and you can cancel anytime before it expires without any fees.
Step 2. Connect your social profiles
You cannot use the hootsuite planner until you connect at least one social media account to your dashboard. The connection process authorizes Hootsuite to publish content on your behalf and access analytics data from each platform. Without these connections, the planner displays an empty calendar with no scheduling capabilities.
Navigate to the connections page
Click the profile icon in the top right corner of your Hootsuite dashboard after logging in. Select "My Profile" from the dropdown menu, then click the "Social Networks and Teams" tab in the left sidebar. This page displays all your current connections and provides buttons to add new accounts.
Alternatively, click the "Add Social Network" button directly from the planner calendar view. Hootsuite prompts you to select which platform you want to connect before redirecting you to the authentication screen. Both methods achieve the same result, but accessing through the profile settings gives you a complete overview of all connected accounts in one place.
Add your first social account
Select the platform you want to connect from the grid of social network icons. Hootsuite supports Facebook, Instagram, LinkedIn, X (Twitter), TikTok, YouTube, Pinterest, and several other platforms. Click the icon for your primary platform to begin the authorization process.

A popup window appears requesting you to log into your social account if you're not already signed in. Enter your credentials and click the authorization button. The platform asks you to grant Hootsuite specific permissions like posting content, reading analytics, and managing comments. Review these permissions and click "Allow" or "Authorize" to complete the connection.
Connecting accounts through official platform APIs ensures your content publishes reliably and your account security remains protected.
Connect additional platforms
Return to the social networks page after adding your first account. Click "Add Social Network" again and repeat the authorization process for each additional platform. You can connect multiple accounts from the same platform, useful if you manage several business pages or client accounts.
The planner automatically displays all connected profiles in your calendar dropdown menu. Select which accounts receive each post when creating content. Your Professional plan allows up to 10 social accounts, while Team plans support 20 accounts across different platforms and brands.
Step 3. Learn the planner layout
The hootsuite planner dashboard displays your content calendar immediately after you connect social accounts. The interface centers around a calendar grid that shows all scheduled posts, with navigation controls at the top and filtering options on the left sidebar. Understanding this layout before creating content prevents confusion and helps you locate posts faster when managing multiple campaigns.
Your dashboard defaults to the weekly view, showing seven days of scheduled content across all connected platforms. Each day appears as a column, with individual posts stacked vertically within their scheduled time slots. Color-coded labels distinguish between different social networks, making it easy to see which platforms receive content each day.
Calendar view options
Switch between three calendar views using the tabs at the top of the planner screen. Click "Month" to see your entire publishing schedule across 30 or 31 days in a condensed format. This view helps you identify content gaps and ensures consistent posting frequency throughout the month.
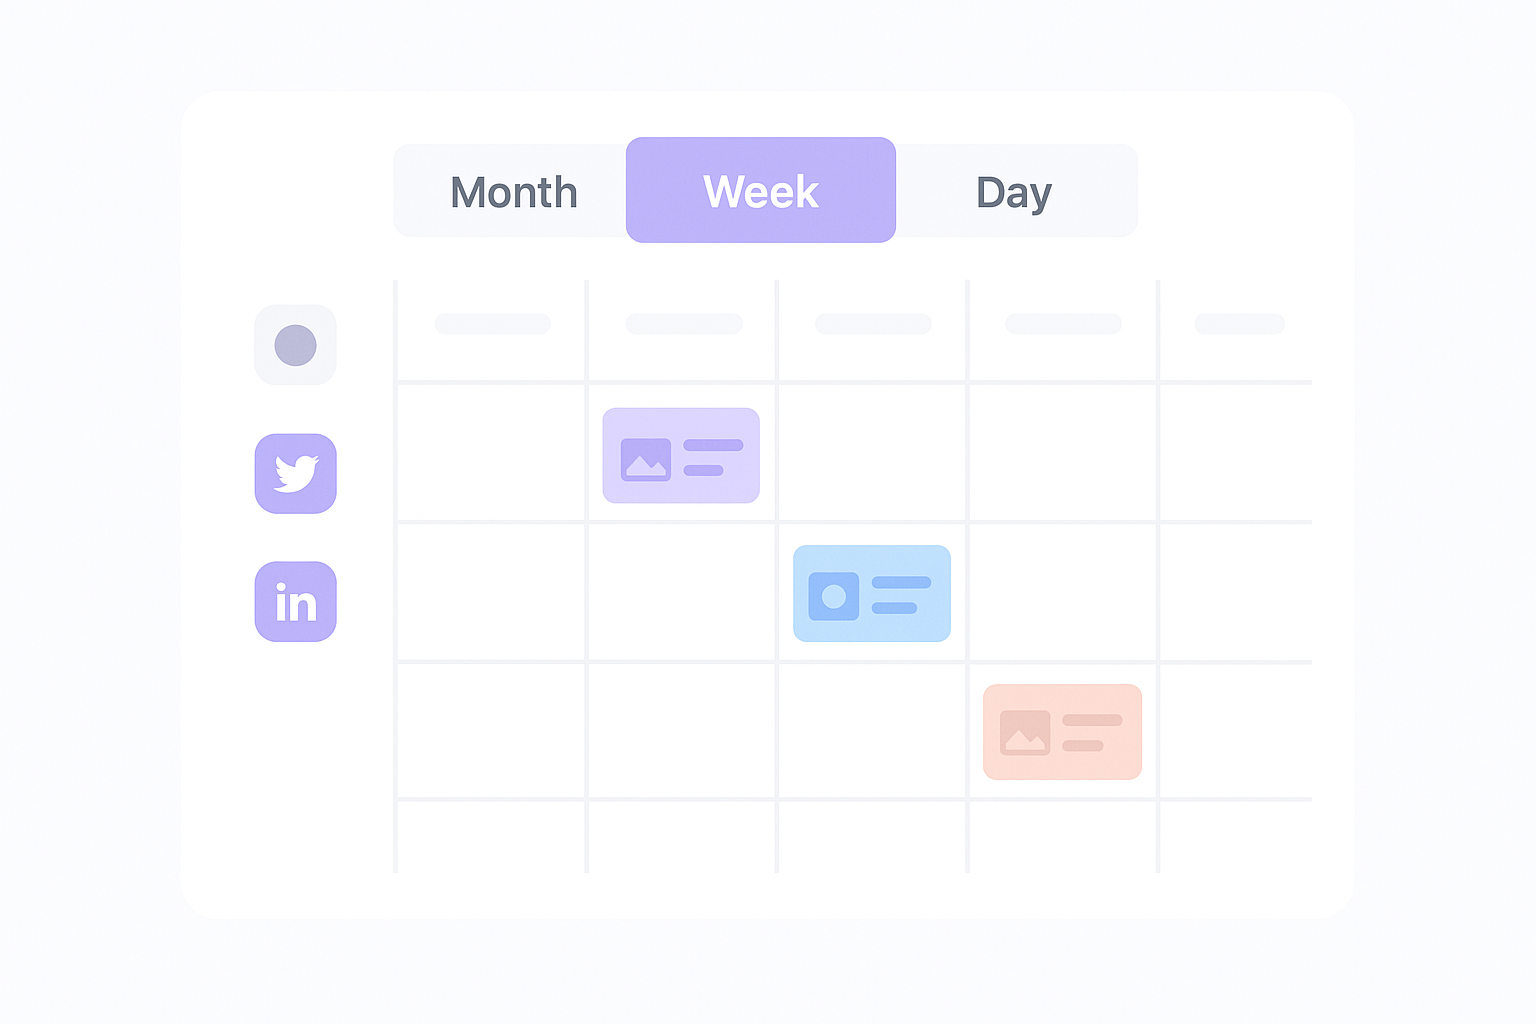
The "Week" view expands to show hourly time slots for each day, giving you precise control over when posts publish. Select this view when scheduling multiple posts per day or coordinating campaigns across different time zones. The "Day" view zooms into a single 24-hour period, displaying all scheduled content with detailed previews and full post text visible without clicking.
Switching between views regularly helps you balance strategic planning with tactical execution of your content calendar.
Content blocks and post details
Each scheduled post appears as a rectangular block within the calendar grid. The block displays a thumbnail image, the first line of post text, the destination platform icon, and the scheduled publish time. Click any block to open a detailed preview panel on the right side of your screen.
The preview panel shows the complete post content including all text, images, videos, links, and hashtags. Review buttons at the bottom let you edit the post, change the scheduled time, duplicate the content to other platforms, or delete it entirely. The panel also displays engagement metrics for published posts, showing likes, comments, shares, and reach data pulled from each platform's native analytics.
Navigation and filters
The left sidebar contains filtering tools that narrow down visible content by platform, campaign tag, or approval status. Click the platform icons to show only posts scheduled for specific networks like Instagram or LinkedIn. This feature becomes critical when managing accounts across multiple brands or client profiles from one dashboard.
Use the date picker at the top to jump to specific weeks or months without scrolling through your entire calendar. The search bar lets you locate posts by keyword or hashtag, useful when you need to update content across multiple scheduled posts for a campaign. Apply multiple filters simultaneously to find exactly the content you need among hundreds of scheduled posts.
Step 4. Build your content calendar
Building your content calendar transforms the empty hootsuite planner into a strategic publishing system. You start by deciding how frequently you publish on each platform, then organize content into thematic categories that align with your business goals. The calendar becomes your roadmap for consistent social media presence without the stress of daily content creation decisions.
Decide your posting frequency
Determine how many posts each platform receives per week based on audience expectations and resource availability. Instagram typically performs best with three to five posts weekly, while X requires daily updates to maintain visibility in fast-moving feeds. LinkedIn audiences engage with two to three high-quality posts per week, and Facebook reaches optimal engagement with one daily post.
Click the blank spaces in your planner calendar where you want content to appear. Mark these slots with placeholder blocks before creating actual posts. This approach reveals gaps in your schedule and prevents overloading specific days while leaving others empty. Adjust the frequency if you spot patterns that create content bottlenecks or leave long periods without audience engagement.
Consistent posting schedules train your audience to expect and look for your content at predictable times.
Create content themes and pillars
Organize your calendar around three to five content pillars that represent your brand's core topics. A software company might use pillars like product education, customer success stories, industry insights, company culture, and promotional offers. Assign each pillar a distinct color in the planner to visualize your content mix across the month.
Balance promotional content with educational and entertaining posts using the 80/20 rule. Eighty percent of your calendar focuses on providing value through helpful information, behind-the-scenes content, and community engagement. Twenty percent directly promotes your products or services. This ratio prevents audience fatigue and maintains trust while still driving conversions.
Map out your first week
Start with a simple weekly structure using this template:
Monday: Educational post (blog article, industry tip, how-to content)
Tuesday: User-generated content or customer testimonial
Wednesday: Product feature highlight or service explanation
Thursday: Behind-the-scenes or team culture content
Friday: Engagement post (question, poll, caption contest)
Weekend: Lighter content (inspirational quote, fun fact, community spotlight)
Apply this framework to your planner by creating draft posts in each time slot. Click the plus icon on any calendar day and select "Create Post" to open the composition window. Enter placeholder text like "Monday blog post: SEO tips" rather than full content initially. This method builds your calendar structure first and lets you batch-create actual content later when you have focused writing time.
Duplicate successful post types across multiple weeks by clicking any post block and selecting "Duplicate". Modify the duplicated content with fresh information while maintaining the proven format. This technique fills your calendar faster and capitalizes on content types that already generate engagement with your audience.
Review your completed first week to ensure variety in post formats including images, videos, carousels, and text-only updates. Each platform favors different formats, so mix visual content with text-heavy posts to maximize reach across algorithms. Expand this weekly template across the entire month once you verify the structure serves your strategic objectives.
Step 5. Schedule and auto publish posts
Scheduling posts in the hootsuite planner means creating content once and letting the system publish it automatically at your chosen times. You compose posts in the content editor, select which platforms receive the content, set publish times manually or use smart scheduling, and enable auto-publish to eliminate the need for manual posting. This process converts your calendar plan into published content without requiring you to be online when posts go live.
Create your first post
Click the "New Post" button in the top left corner of your planner dashboard or select any empty time slot on your calendar. The composer window opens with text fields for your post copy, media upload buttons for images and videos, and platform selection checkboxes at the bottom. Type or paste your post content into the main text box, keeping platform-specific character limits in mind.
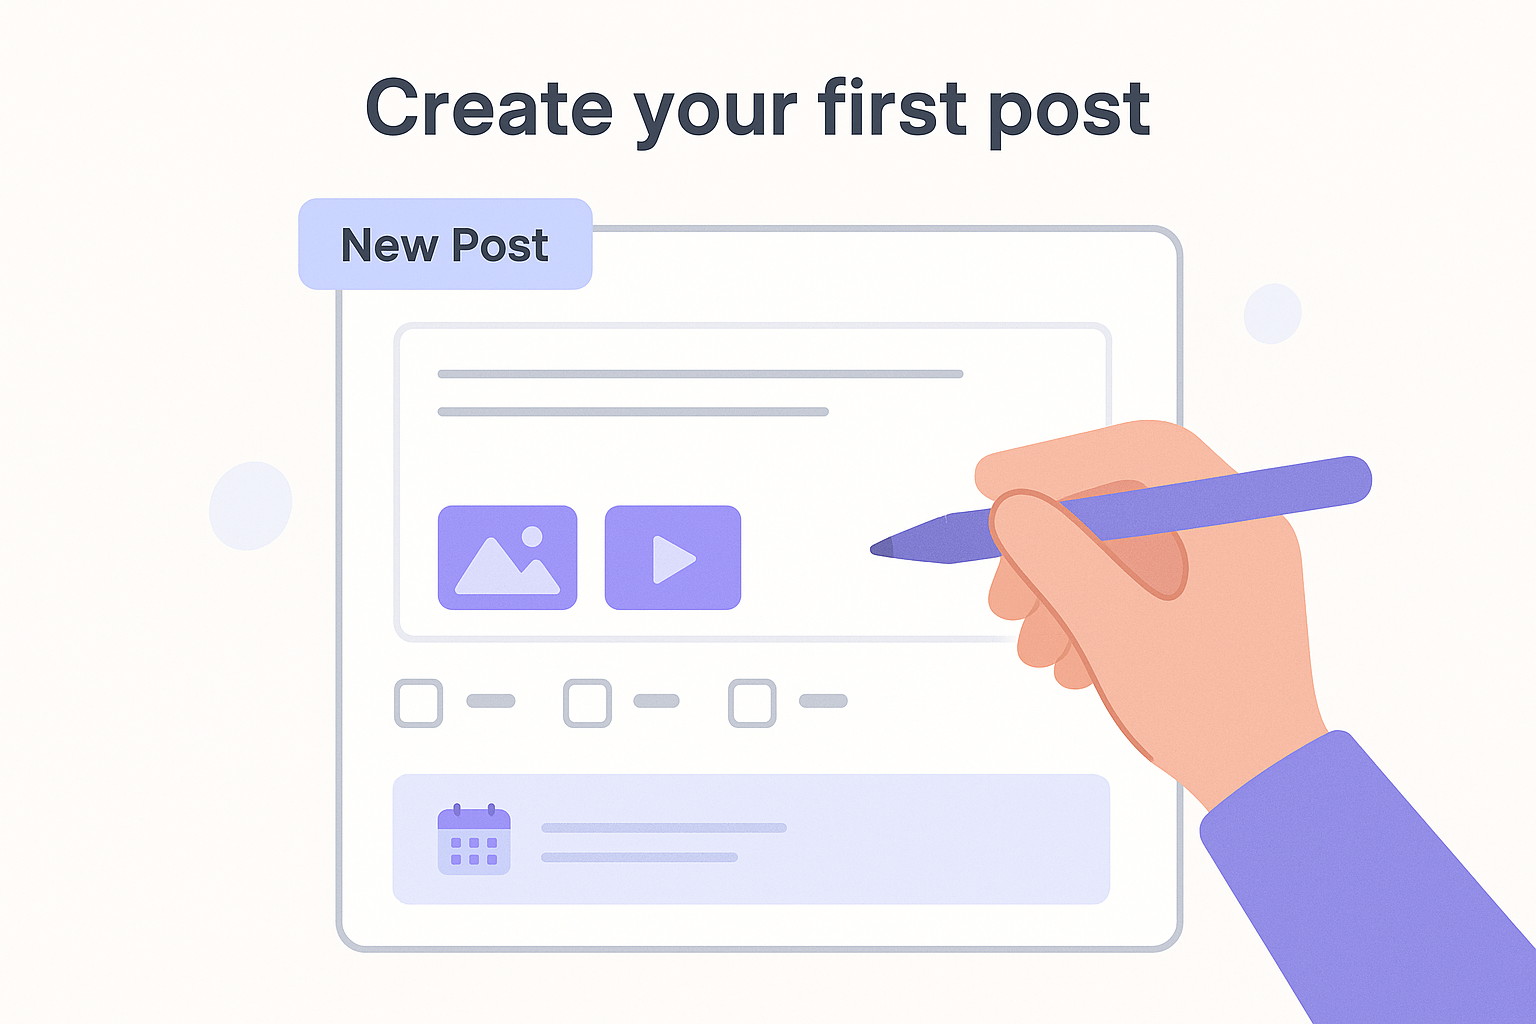
Upload visual assets by clicking the image icon and selecting files from your computer. Hootsuite accepts JPG, PNG, GIF, and MP4 formats up to 5GB per file. The preview panel shows how your post appears on each selected platform, accounting for different image crop ratios and text display formats. Add links, hashtags, and mentions directly in the text field using standard social media formatting.
Set publish times
Select "Schedule for later" below the post text to reveal date and time pickers. Click the calendar icon to choose your publish date, then use the dropdown menus to set the exact hour and minute. The system displays times in your account timezone, which you set during account creation. Schedule posts weeks or months in advance for product launches, seasonal campaigns, or vacation periods when you cannot manually publish.
Alternatively, click the "Auto-schedule" option to let Hootsuite determine optimal publish times based on your audience activity patterns. The platform analyzes when your followers engage most frequently and suggests times that maximize potential reach and engagement. These recommendations update as your audience behavior changes, ensuring your content reaches people when they actively browse their feeds.
Smart scheduling removes the guesswork from timing decisions and consistently places your content in front of active audiences.
Enable auto-publish
Toggle the "Auto-publish" switch to green before saving your post. This setting authorizes Hootsuite to publish content automatically without requiring your approval or manual intervention. Posts with auto-publish enabled move directly from scheduled status to published at the designated time, appearing on your social profiles exactly as previewed in the composer.
Disable auto-publish for posts requiring last-minute review by leaving the toggle gray. These posts remain in draft status until you manually click the publish button on their scheduled date. Use this option for time-sensitive content that might need updates based on breaking news, competitor actions, or internal company decisions.
Bulk schedule with CSV uploads
Click "Bulk Composer" in the planner menu to access the CSV upload feature. Download the Hootsuite template spreadsheet that includes columns for post text, media URLs, scheduled times, and target platforms. Fill each row with one post's complete information, ensuring dates follow the YYYY-MM-DD format and times use 24-hour notation.
| Column | Example | Required |
|---|---|---|
| Message | "New product launching Friday" | Yes |
| Date | 2025-12-30 | Yes |
| Time | 14:30 | Yes |
| Profile | "Facebook Page Name" | Yes |
| Media URL | https://yoursite.com/image.jpg | No |
Save your completed spreadsheet as a CSV file and upload it through the bulk composer interface. Hootsuite validates each row, flags errors like invalid dates or unsupported characters, and lets you fix issues before importing. This method schedules hundreds of posts in minutes, dramatically faster than creating individual posts through the standard composer.
Step 6. Use templates and content ideas
The hootsuite planner includes pre-built templates and a content library that eliminate starting from scratch every time you create a post. These resources provide proven post structures for common content types like product announcements, customer testimonials, blog promotions, and seasonal campaigns. You access templates directly in the composer, customize them with your brand details, and schedule posts in minutes instead of spending hours brainstorming content ideas.
Access pre-built templates
Click the lightbulb icon in the post composer to open the content library panel. Browse templates organized by categories including promotional posts, engagement questions, holiday content, and industry-specific formats. Select any template to preview the full post structure with placeholder text, suggested hashtags, and recommended posting times based on content type.
Customize the template by replacing bracket placeholders with your specific information. A product launch template might read "[Product Name] is finally here! Get [Discount %] off when you order today: [Link]". Fill in your product name, discount percentage, and purchase URL to create a ready-to-publish post. The template maintains the proven structure while personalizing content for your brand and offer.
Using tested templates reduces the mental energy required to create engaging posts and ensures consistent quality across your calendar.
Create custom templates
Build your own reusable templates for content types you publish frequently. Compose a successful post format in the standard composer, then click the three-dot menu and select "Save as Template". Name the template descriptively like "Weekly Blog Promo" or "Customer Win Thursday" so you locate it quickly when scheduling future posts.
Here's an example template structure for blog promotion:
New on the blog: [Blog Title]

[One-sentence value proposition]

Key takeaways:
• [Takeaway 1]
• [Takeaway 2]
• [Takeaway 3]

Read the full article: [Link]

#[Industry] #[Topic] #[YourBrand]
Store brand-approved hashtag sets in your content library for consistent tagging across platforms. Create separate collections for different campaign types, product lines, or seasonal initiatives. When composing posts, click the hashtag icon to insert entire sets rather than typing individual tags, ensuring you never forget important brand identifiers or campaign tracking hashtags.
Step 7. Collaborate and manage approvals
Team collaboration in the hootsuite planner prevents unauthorized content from reaching your audience and maintains quality standards across all social channels. You add team members to your account, assign specific permission levels that control who creates versus approves content, and route posts through designated reviewers before they publish automatically. This approval system protects your brand reputation while distributing content creation work across multiple team members.
Set up approval workflows
Navigate to your account settings and click "Team Settings" in the left sidebar to access collaboration features. Add team members by entering their email addresses and selecting permission levels from the dropdown menu. Choose "Create and Schedule" for team members who draft posts but cannot publish independently, or "Full Access" for senior staff who approve final content before it goes live.
Enable the approval workflow by toggling "Require approval" to green in your planner settings. Posts created by team members with limited permissions automatically enter pending status instead of scheduling directly to your calendar. Designated approvers receive email notifications when posts await review, ensuring content moves through the approval chain without delays.
Approval workflows prevent costly mistakes while empowering your team to create content without bottlenecking all decisions through one person.
Assign team members to posts
Tag specific team members when creating posts by typing @ followed by their name in the internal notes field. This notification system alerts the right people to review campaign-specific content without sending blanket notifications to your entire team. Use assignments for posts requiring subject matter expertise, legal review, or executive approval before publishing.
Create a simple assignment structure using these role-based tags:
- @ContentWriter: Initial draft completion
- @Designer: Visual asset creation
- @Manager: Campaign strategy approval
- @Legal: Compliance review for regulated industries
Review and approve content
Access pending posts by clicking "Pending Approval" in your planner's left sidebar filter menu. Each post displays the creator's name, scheduled publish time, and all attached media files. Click any pending post to open the preview panel showing exactly how content appears on each target platform.
Review the post content for brand voice consistency, factual accuracy, image quality, and compliance with platform-specific guidelines. Click "Request Changes" to send the post back to the creator with specific feedback in the comment field. The creator receives an email notification with your notes and revises the content before resubmitting for approval.
Approve posts by clicking the green "Approve" button at the bottom of the preview panel. The system immediately schedules the post to your calendar at its designated time and enables auto-publish. Bulk approve multiple posts by selecting checkboxes next to pending items and clicking "Approve Selected" to process an entire content batch in seconds rather than reviewing posts individually.
Step 8. Understand Hootsuite pricing
Hootsuite pricing determines which features you access in the planner, how many social accounts you can connect, and whether your team can collaborate on content creation. The platform offers four main pricing tiers ranging from free basic access to enterprise-level packages with custom pricing. Understanding these tiers before committing helps you avoid paying for features you don't need or hitting usage limits that restrict your social media strategy.
Plan tiers and monthly costs
The Free plan provides access to two social accounts and lets you schedule up to five posts monthly through the hootsuite planner. This tier works for individuals testing the platform but lacks the automation and analytics features necessary for consistent publishing. You cannot add team members or access performance reports in the free tier.

Professional plans cost $99 monthly and support one user managing up to 10 social accounts. This tier includes unlimited scheduling, basic analytics reports, and AI-powered content suggestions. You get access to the complete planner interface with all calendar views, smart scheduling, and bulk upload capabilities. The Professional plan suits solopreneurs, freelancers, and small business owners managing multiple platforms independently.
Team plans run $249 per month and accommodate three users sharing access to 20 social accounts. This tier adds approval workflows, team collaboration features, and advanced analytics with custom reporting. You assign different permission levels to team members and route posts through designated approvers before publishing. Organizations with dedicated social media teams choose this tier for coordinated content management across multiple brands or client accounts.
Selecting the right plan based on your current needs prevents overspending while leaving room to scale as your social presence grows.
Feature limitations by tier
Free accounts cannot access bulk scheduling tools or save custom post templates in the content library. You manually create each post individually and schedule them one at a time. Professional and Team plans unlock these time-saving features along with content calendar integration with external tools like Google Sheets and Trello.
Analytics depth increases with each tier. Professional users see basic engagement metrics including likes, comments, and shares for published posts. Team plans add competitor benchmarking, audience demographic breakdowns, and custom report builders that export data for stakeholder presentations. Enterprise customers receive dedicated analytics consultants who build custom dashboards tracking specific KPIs.
Trial and cancellation terms
Hootsuite offers a 30-day free trial for Professional and Team plans requiring a credit card at signup. The platform charges your card automatically when the trial expires unless you cancel beforehand. Access all premium features during the trial period including full planner functionality, unlimited scheduling, and analytics reports to evaluate whether the platform meets your needs.
Cancel your subscription anytime without early termination fees or penalties. Navigate to account settings, select "Billing," and click the cancellation button to stop future charges. Your account remains active until the end of your current billing period, giving you access to scheduled posts and published content. Export your analytics data before canceling to maintain records of your social media performance.
Annual subscriptions reduce monthly costs by approximately 20 percent compared to month-to-month billing. Pay $950 yearly for the Professional plan instead of $1,188 when billed monthly. This discount applies to Team plans as well, dropping the annual cost to approximately $2,400 versus $2,988 for monthly payments. Choose annual billing if you commit to using Hootsuite long-term and want to maximize your budget efficiency.
Pro tips and common mistakes
Mastering the hootsuite planner requires more than understanding basic features. You need practical shortcuts that accelerate your workflow and awareness of mistakes that waste time or damage your brand reputation. These tips come from real-world usage patterns that separate efficient social managers from those stuck in repetitive tasks.
Use keyboard shortcuts for faster scheduling
Keyboard shortcuts cut your content creation time in half by eliminating constant mouse clicking between fields. Press Ctrl+Enter (Windows) or Cmd+Enter (Mac) to instantly schedule posts without clicking the schedule button. Type Ctrl+K to insert links into post text, and use Ctrl+B to bold important phrases directly in the composer.
Navigate between calendar views using number keys. Press 1 for month view, 2 for week view, and 3 for daily view. Jump to today's date by pressing T regardless of which month you currently have displayed. These shortcuts transform the planner from a point-and-click interface into a keyboard-driven workflow that keeps your hands on the keys.
Power users schedule an entire week of content in under 15 minutes using keyboard shortcuts instead of spending an hour clicking through menus.
Avoid these scheduling mistakes
Never schedule posts without checking platform-specific image dimensions. Instagram requires square 1080x1080 images or vertical 1080x1350 formats, while LinkedIn performs best with horizontal 1200x627 images. Uploading one generic image to all platforms results in cropped content that cuts off important text or faces in your visuals.
Publishing the same exact content across all platforms simultaneously signals low-effort marketing to your audience. Each network has different user expectations and content formats that perform better. Tailor your message length, hashtag count, and tone for each platform rather than cross-posting identical content.
Forgetting to proofread scheduled posts leads to embarrassing errors sitting in your calendar for days. Typos, broken links, and outdated information damage your professional credibility when they publish automatically. Review all scheduled content weekly to catch mistakes before they go live.
Stagger posts throughout the day
Spacing content across multiple time blocks prevents audience fatigue from seeing three posts within an hour. Schedule posts at 4-hour intervals minimum to give each piece of content room to generate engagement before the next update appears. Morning posts at 9am, afternoon updates at 1pm, and evening content at 6pm create a natural rhythm across your followers' daily social media usage patterns.
Reserve your best-performing time slots for high-priority content like product launches or major announcements. Track when your specific audience engages most actively using analytics data rather than relying on generic "best time to post" recommendations. Your audience behavior might differ significantly from industry averages.
Next steps
You now have the complete framework to run your social media through the hootsuite planner. Start by connecting your most active platforms, building a simple weekly content structure, and scheduling your first batch of posts. The system handles publishing automatically once you set it up correctly.
While Hootsuite manages your social distribution, you still need consistent content to fill that calendar. RankYak automates your content creation with SEO-optimized articles published daily to your website. Combine both tools to maintain active social channels and a growing blog that drives organic traffic to your business.

Get Google and ChatGPT traffic on autopilot.
Start today and generate your first article within 15 minutes.

SEO revenue calculator
How much revenue is your website leaving on the table?
Take a quick quiz and see exactly how much organic revenue you're missing out on, along with personalized tips to fix it.
-
4 questions, under 1 minute
-
See traffic and revenue potential
-
No email required
Free · takes 1 minute · no signup needed
Question 1 of 4
Question 2 of 4
Question 3 of 4
Question 4 of 4
Your SEO growth potential
Extra visitors / month
after 6-12 months of consistent publishing
Revenue potential / year
at your niche's avg. conversion rate
Articles needed (12 mo)
to reach this traffic level
ROI with RankYak
at $99/mo ($1,188/year)
To hit that number, you'd need to:
- Build a topical authority strategy for your niche
- Research keywords & map out a full topical cluster
- Write, edit & publish an article every single day
- Build backlinks to the articles you publish
RankYak handles all of this automatically, every day.
* Estimates based on industry averages. Results vary by niche, competition, and domain authority. Most SEO results become visible after 3-6 months of consistent publishing.