Technical SEO Audit Checklist: Step-By-Step Guide (2026)

A single misconfigured robots.txt file can block Google from crawling your entire site. A missing canonical tag can split your ranking power across duplicate pages. These aren't hypothetical problems, they're the kind of issues that silently kill organic traffic every day. A thorough technical SEO audit checklist is the only reliable way to catch them before they cost you rankings you've already earned.
The challenge is that technical SEO covers a lot of ground: crawlability, indexing, site speed, structured data, internal linking, mobile usability, and each area has its own set of potential failures. Without a systematic approach, you'll either miss critical issues or waste hours chasing things that don't actually move the needle. What you need is a clear, repeatable process that walks through every check in the right order, so nothing falls through the cracks and you can prioritize fixes by impact.
This guide gives you exactly that, a step-by-step technical SEO audit you can run on any site, whether it's built on WordPress, Shopify, Webflow, or a custom CMS. We'll cover every major audit category, explain what to look for, and show you how to fix what's broken. At RankYak, we built our platform around automating the SEO work that drains your time, from keyword research to content creation and publishing, but even the best content won't rank if your technical foundation has holes. Consider this checklist the groundwork that makes everything else perform.
What this checklist covers in 2026
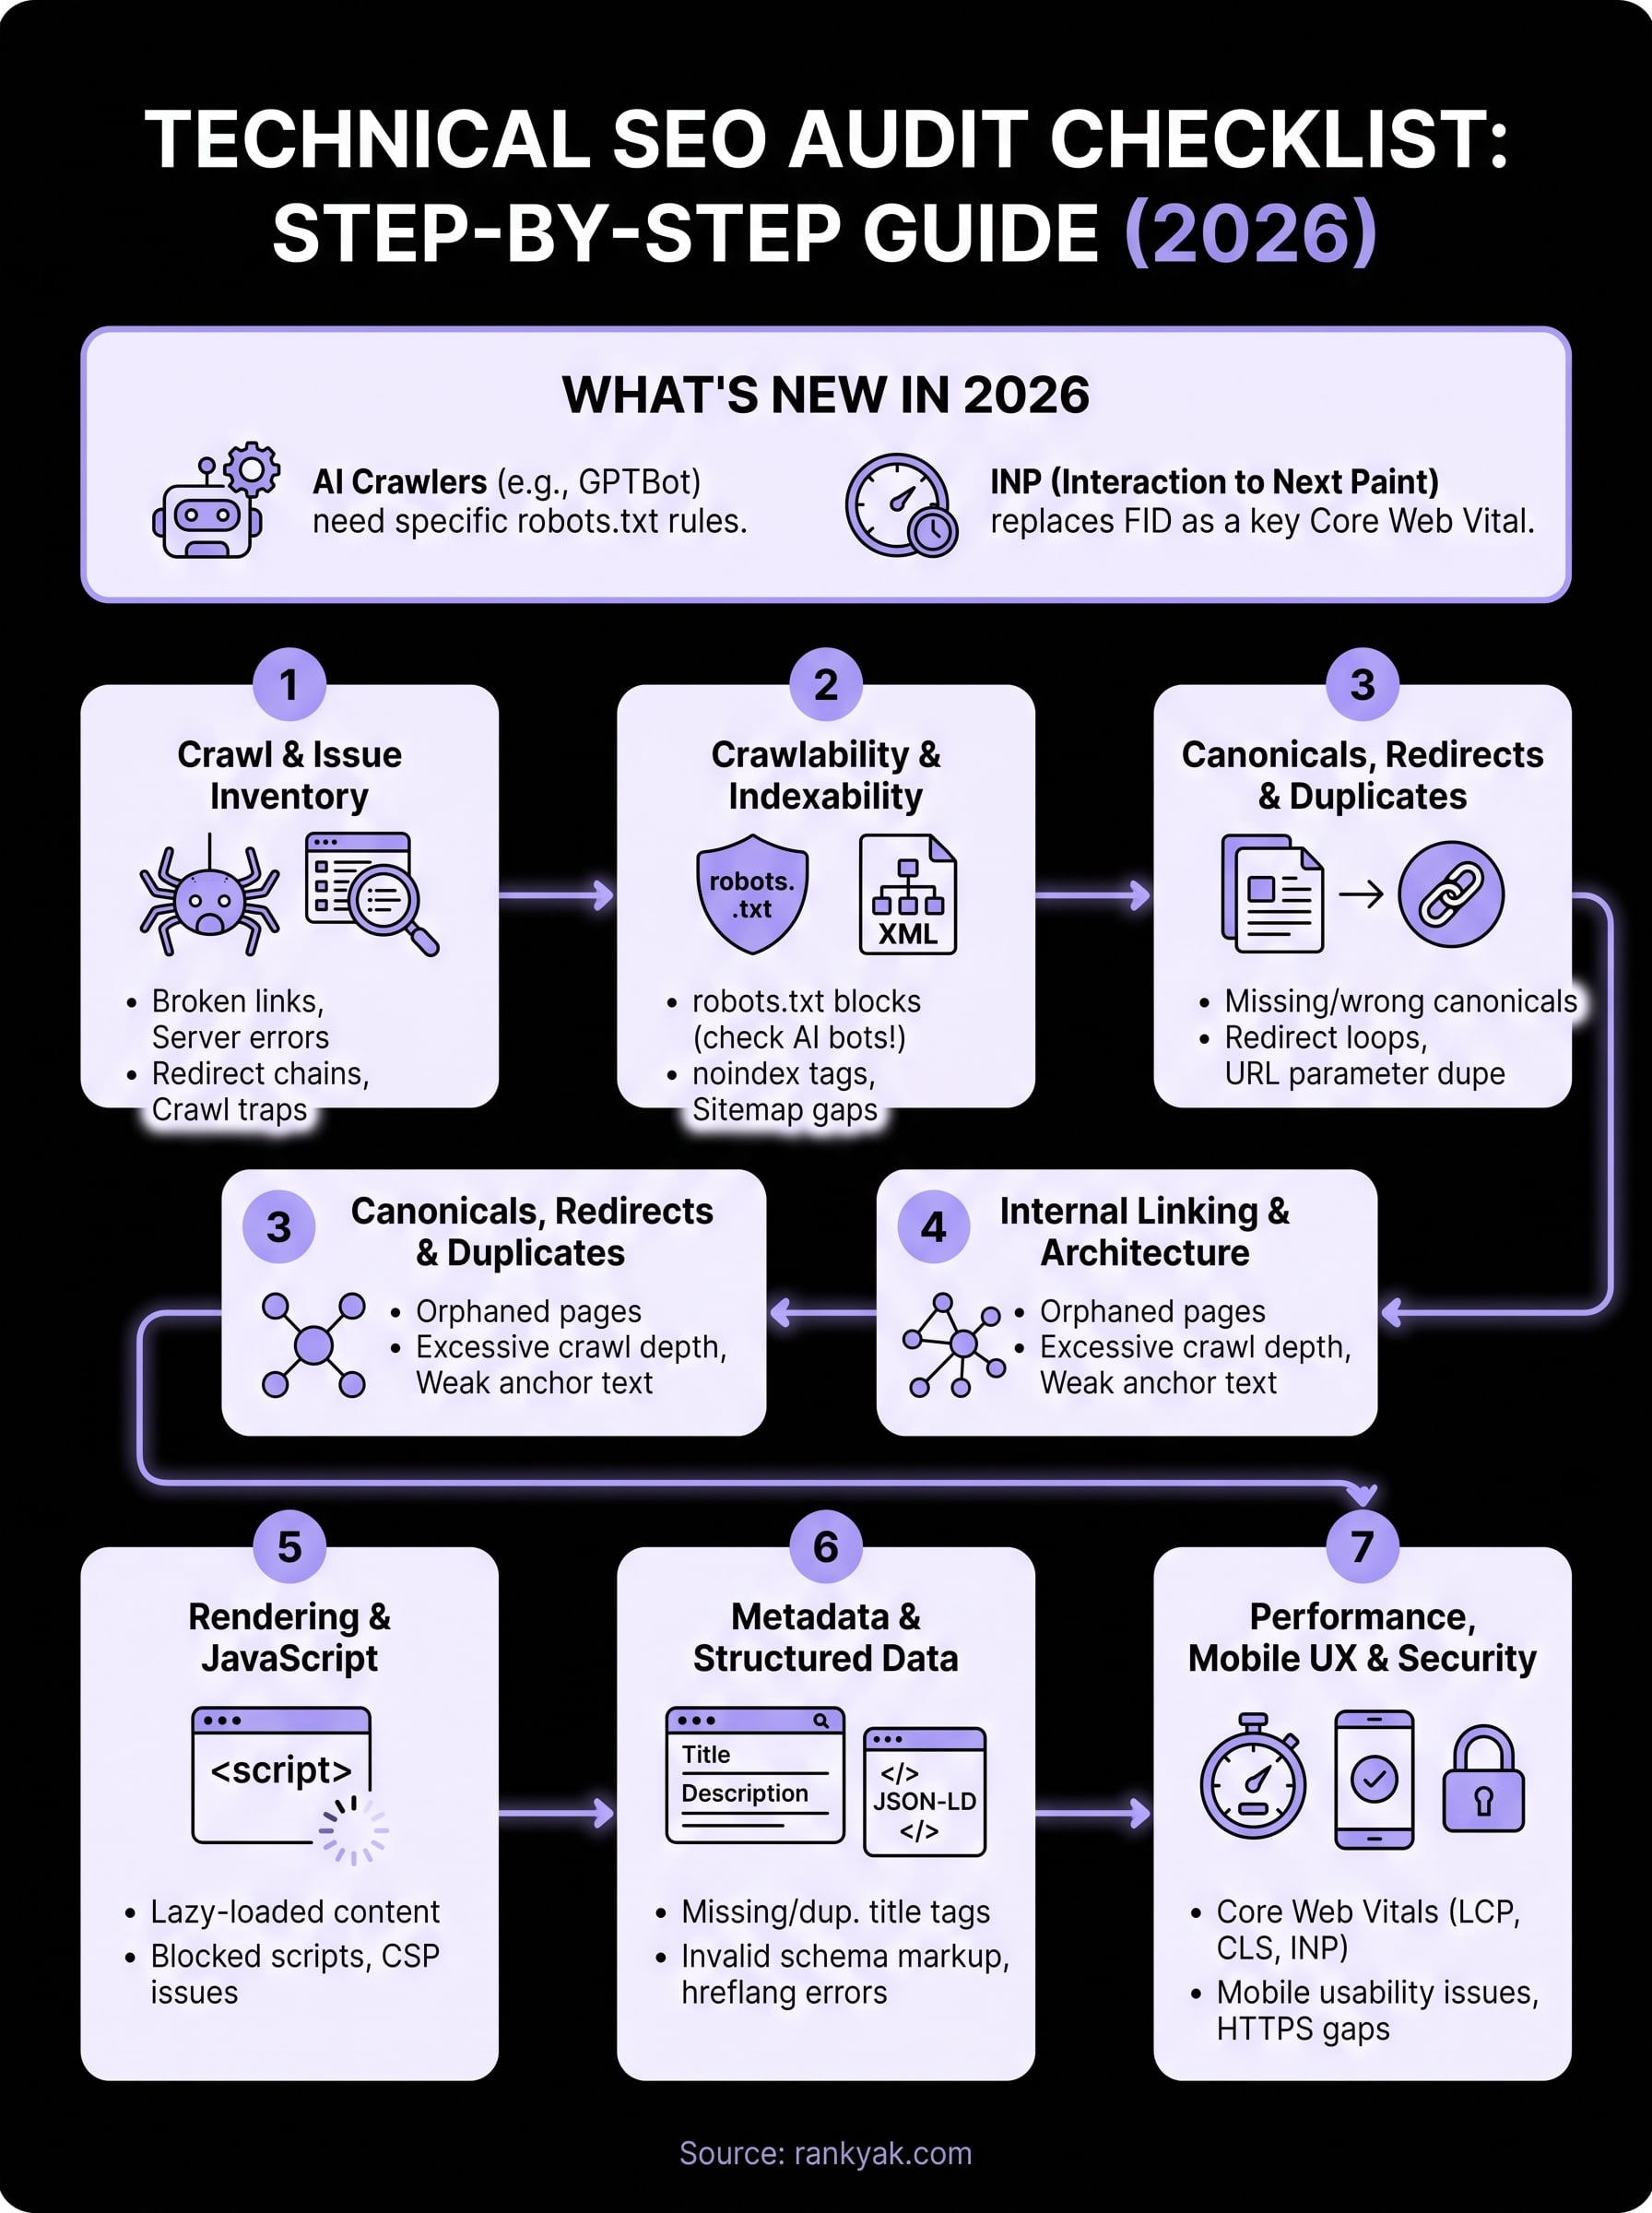
This technical SEO audit checklist breaks the work into seven sequential steps, each targeting a distinct layer of your site's technical health. Running these in order matters because the output of each step directly shapes the next one. For example, identifying crawl issues first tells you which pages to deprioritize when you review metadata later, and fixing your URL structure before auditing internal links prevents you from building links toward URLs that will eventually redirect or get removed. The sequence is deliberate, not arbitrary, and following it keeps you from doing the same work twice.
The seven audit areas this guide covers
Before you start pulling reports, it helps to know exactly what you are getting into so you can set realistic time expectations and assign the right people to the right tasks. The table below shows every step in this guide, the audit area it addresses, and the category of problems it surfaces.
| Step | Audit Area | Problems it catches |
|---|---|---|
| 1 | Crawl and issue inventory | Broken links, server errors, crawl traps, redirect chains |
| 2 | Crawlability and indexability | robots.txt blocks, noindex tags, sitemap gaps |
| 3 | Canonicals, redirects, and duplicates | Missing canonicals, redirect loops, URL parameter duplication |
| 4 | Internal linking and site architecture | Orphaned pages, excessive crawl depth, weak anchor text |
| 5 | Rendering and JavaScript | Lazy-loaded content, blocked scripts, content security policy issues |
| 6 | Metadata and structured data | Missing title tags, invalid schema markup, hreflang errors |
| 7 | Performance, mobile UX, and security | Core Web Vitals failures, HTTPS gaps, mobile usability issues |
Each step includes specific checks to run, the tools to use, and clear guidance on how to prioritize the fixes you find.
What's different in technical SEO for 2026
Two shifts have raised the stakes for technical audits this year. First, AI crawlers from platforms like OpenAI, Anthropic, and Google now index your content separately from traditional search bots. If your robots.txt or server configuration blocks these crawlers unintentionally, you lose visibility in AI-generated answers, not just search results. Checking your crawler directives now covers a broader audience than it did two years ago, which means a misconfiguration has wider consequences.
A robots.txt file that was "good enough" in 2023 may now be quietly blocking AI crawlers that drive referral traffic from tools like ChatGPT and Gemini.
Second, Google's Core Web Vitals thresholds have tightened, and Interaction to Next Paint (INP) replaced First Input Delay as a ranking signal in 2024. If you ran a technical audit before that transition and never revisited your performance metrics, your INP scores may be dragging down pages that otherwise look healthy. This guide covers both the established checks and the newer requirements that many older checklists still omit, so you get a complete picture of your site's technical standing rather than a partial one.
Who this checklist is built for
You do not need to be a developer to work through this audit. Each step is written for website owners, marketers, and SEO practitioners who have basic access to Google Search Console, can run a site crawl with a tool like Screaming Frog or Sitebulb, and can make or request changes to their CMS. Some steps, particularly the JavaScript rendering and security checks, may require a developer to implement the fixes, but identifying the issues is something anyone managing a site can do by following the instructions here.
Audit prep: scope, benchmarks, and access
Before you run a single crawl or open a tool, you need to do three things: define what you're auditing, record your current performance numbers, and confirm you have the access you need. Skipping this prep step is how audits turn into half-finished reports that nobody acts on. Spending 30 minutes here will save you hours of backtracking once you're mid-audit and realize you're missing a key credential or have no baseline to measure progress against.
Define your audit scope
Deciding what you're auditing upfront keeps the work focused. For a full-site technical SEO audit checklist, you'll typically want to crawl every page. But if the site has more than 10,000 URLs, it's often smarter to segment the audit by site section, such as blog posts, product pages, or landing pages, and tackle one section per sprint. Narrowing the scope doesn't mean doing less work; it means getting actionable results faster rather than drowning in a spreadsheet with no clear starting point.
List the audit boundaries before you start:
- URL range: Are you auditing the full domain, a subfolder (e.g.,
/blog/), or a subdomain? - Language/region: If the site is multilingual, which locale are you starting with?
- Device focus: Are you prioritizing desktop, mobile, or both?
- Staging vs. production: Confirm you're crawling the live site unless you have a specific reason to audit staging.
Pull your baseline benchmarks
You need numbers to compare against once fixes go live. Pull these current metrics from Google Search Console before you change anything: total indexed pages, total coverage errors, top crawled URLs, and your current Core Web Vitals scores broken down by URL group.
Record your baseline the day you start the audit, not after you've already made changes, so you have a clean before-and-after comparison.
Save a dated snapshot of these figures in a shared spreadsheet. Include organic traffic from Google Analytics for the same date range so you can measure the real business impact of your technical fixes, not just the raw change in error counts.
Confirm access before you start
Nothing stalls an audit faster than missing credentials. Before you begin, verify you have admin-level access to Google Search Console and your CMS, read access to the server or hosting panel for checking response headers and log files, and the ability to edit robots.txt, XML sitemaps, and redirect configuration files such as .htaccess.
If you're auditing a client site, request these permissions at least two days before you plan to start. Waiting on access mid-audit breaks your momentum and forces you to revisit steps you thought you had already completed.
Step 1. Crawl the site and create an issue inventory
A crawl gives you a complete map of every URL Google can reach on your site, along with the HTTP status codes, response times, page titles, meta descriptions, and link relationships for each one. This is the foundation of any solid technical SEO audit checklist because it surfaces issues you would never find by browsing the site manually. Run this crawl before you touch anything else, and treat the output as your single source of truth for the entire audit.
Your crawl data is only as reliable as your crawl configuration, so spend five minutes setting it up correctly before you hit start.
Configure your crawler correctly
Open your crawler tool (Screaming Frog is the most widely used option) and set the crawl mode to "Spider" rather than "List" so it follows links automatically rather than checking a predefined URL list. Under "Configuration > Spider," make sure you have these options enabled: crawl all subfolders, follow internal redirects, and report canonical URLs. Set your user agent to Googlebot to simulate how Google sees your site rather than how a browser renders it. If the site uses JavaScript heavily, enable JavaScript rendering under "Configuration > Spider > Rendering" and switch to AJAX crawling mode.
For sites with more than 50,000 URLs, set a crawl limit per run by section so your results stay manageable. Start with the most commercially important section of the site.
Build your issue inventory
Once the crawl finishes, export the full URL list and filter by status code. Create a spreadsheet with these columns to organize every issue you find across all seven audit steps:
| Column | What to record |
|---|---|
| URL | Full page address |
| Issue type | e.g., 404, redirect chain, missing title |
| Severity | High / Medium / Low |
| Fix required | Plain-language description of what needs to change |
| Owner | Developer, content team, or SEO |
| Status | Open / In progress / Fixed |
Severity ratings keep your team focused on fixes that actually affect rankings. Mark any issue that blocks crawling or indexing as High, anything that dilutes page authority as Medium, and cosmetic or minor issues like duplicate meta descriptions on low-traffic pages as Low. This inventory becomes the project management backbone for the entire audit, so keeping it updated as you work through the remaining steps is essential.
Step 2. Confirm crawlability and indexability
Now that you have your issue inventory from the crawl, the next priority is confirming Google can actually reach and index the pages you want ranked. Crawlability and indexability are two different things: crawlability controls whether search engines can access a URL, and indexability controls whether they can store and surface it in search results. A page can be crawlable but not indexable, which means Google visits it but never shows it to anyone. Your technical SEO audit checklist needs to catch both failure modes, not just one.
Check robots.txt for unintended blocks
Your robots.txt file tells crawlers which parts of the site they can and cannot access. One misplaced Disallow rule can block entire sections of your site from Google. Open your robots.txt file by navigating to yourdomain.com/robots.txt and review every Disallow directive against the pages you want indexed.
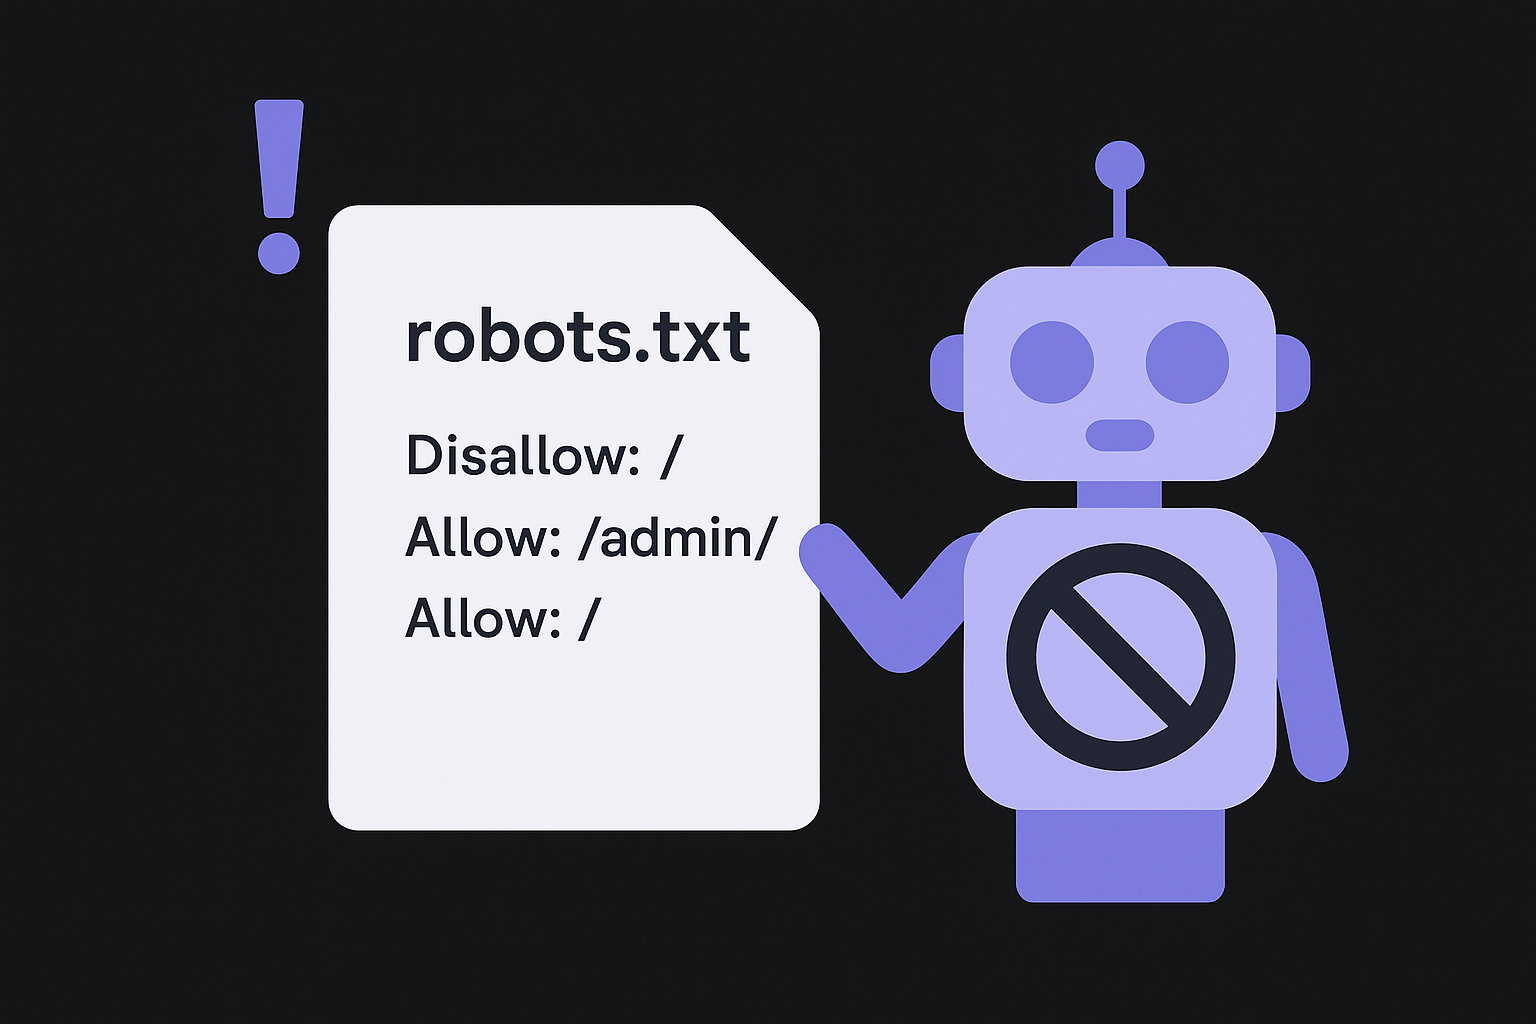
Here is an example of a properly configured robots.txt file that blocks admin areas, allows AI crawlers, and references your sitemap:
User-agent: *
Disallow: /wp-admin/
Allow: /wp-admin/admin-ajax.php

User-agent: GPTBot
Allow: /

User-agent: ClaudeBot
Allow: /

Sitemap: https://yourdomain.com/sitemap.xml
Notice the separate blocks that explicitly allow GPTBot and ClaudeBot, the crawlers used by ChatGPT and Claude respectively. If you want your content to appear in AI-generated answers, your robots.txt must not block these crawlers. Cross-check every Disallow rule against your crawl inventory to flag any high-value URLs that are being blocked unintentionally.
A single wildcard rule like
Disallow: /blocks all crawlers from your entire site and is one of the most damaging configuration errors you can make.
Audit your XML sitemaps
Your XML sitemap signals to Google which pages you consider worth indexing. Submit your sitemap through Google Search Console and check the "Sitemaps" report for errors. Pages that return 404 errors or redirect to other URLs should be removed from your sitemap immediately because they waste crawl budget and send conflicting signals about your site structure.
Verify indexing status in Google Search Console
Open the "Indexing > Pages" report in Google Search Console and sort by reason. Pages marked "Crawled, currently not indexed" are high priority because Google reached them but decided not to add them to its index. Review each affected URL for thin content, low quality signals, or accidentally applied noindex tags before deciding whether to improve the page or consolidate it into a stronger one.
Step 3. Fix canonicals, redirects, and URL duplicates
Duplicate content doesn't always come from someone copying your pages. It usually comes from your own site generating multiple URLs that serve the same content: HTTP vs. HTTPS, trailing slash vs. no trailing slash, or URL parameters like ?ref=newsletter that create hundreds of near-identical pages. These duplicates split your ranking signals across multiple URLs instead of concentrating them on one, which weakens the very pages you want Google to prioritize. This step in your technical SEO audit checklist targets that problem directly.
Audit your canonical tags
Every page that could be accessed through more than one URL needs a canonical tag pointing to the preferred version. Open your crawl export, filter for pages with canonical tags, and check two things: first, that the canonical URL actually exists and returns a 200 status code, and second, that the canonical isn't pointing to a different page unintentionally. A self-referencing canonical on your homepage looks like this:
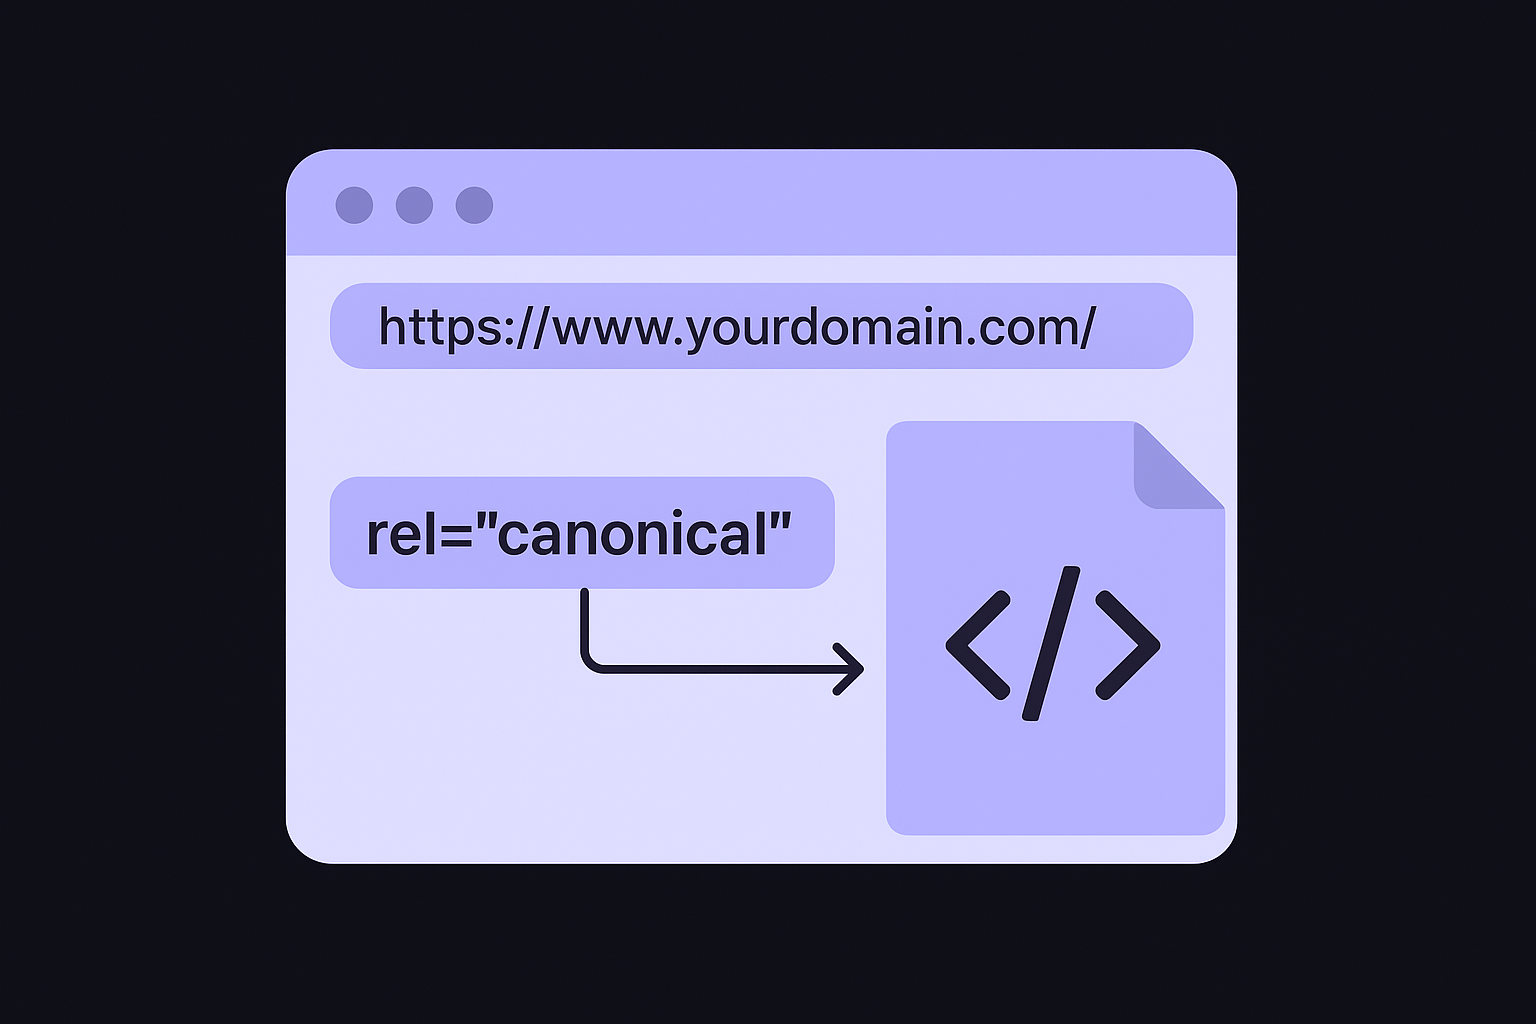
<link rel="canonical" href="https://www.yourdomain.com/" />
Pages without any canonical tag are the highest-risk items here. Add a self-referencing canonical to every page that doesn't already have one, and fix any canonical pointing to a redirected, 404, or noindex URL immediately.
A canonical tag that points to a noindex URL tells Google to credit a page it won't show in search results, effectively removing your ranking signals entirely.
Fix redirect chains and loops
A redirect chain occurs when URL A redirects to URL B, which redirects to URL C. Each hop adds latency and dilutes link equity, so any chain longer than one redirect should be collapsed into a direct path from the original URL to the final destination. In your crawl data, filter for "redirect chains" and update each one so the starting URL points directly to the final 200-status URL.
Redirect loops, where URL A redirects to URL B and URL B redirects back to URL A, block Google from crawling the page at all. Fix these by identifying the correct final destination and removing the circular rule in your server configuration or CMS redirect settings.
Resolve URL parameter duplication
Use the URL Parameters report in Google Search Console to tell Google which query parameters change page content and which ones are purely tracking parameters that don't. For tracking parameters like utm_source, configure them as "no URLs" so Google doesn't crawl every combination as a separate page. Pair this with canonical tags on any parameter-based URLs that are already indexed to consolidate their signals onto the clean canonical version.
Step 4. Audit internal linking and site architecture
Your site's internal link structure tells Google two things: which pages exist and which pages matter most. Every internal link passes crawl signals and ranking authority from the source page to the destination. When those links are missing, poorly structured, or buried deep in the navigation, Google either misses important pages or assigns them lower crawl priority than they deserve. This step of the technical SEO audit checklist focuses on mapping those connections and fixing the gaps before they quietly suppress your rankings.
Find and fix orphaned pages
An orphaned page has no internal links pointing to it from anywhere else on your site. Even if the page appears in your XML sitemap, Google treats unlinked pages as low priority and may crawl them infrequently or not at all. To find them, export your full crawl URL list from Screaming Frog and cross-reference it against the "Inlinks" column filtered to zero internal links. Any URL that comes back empty is orphaned.
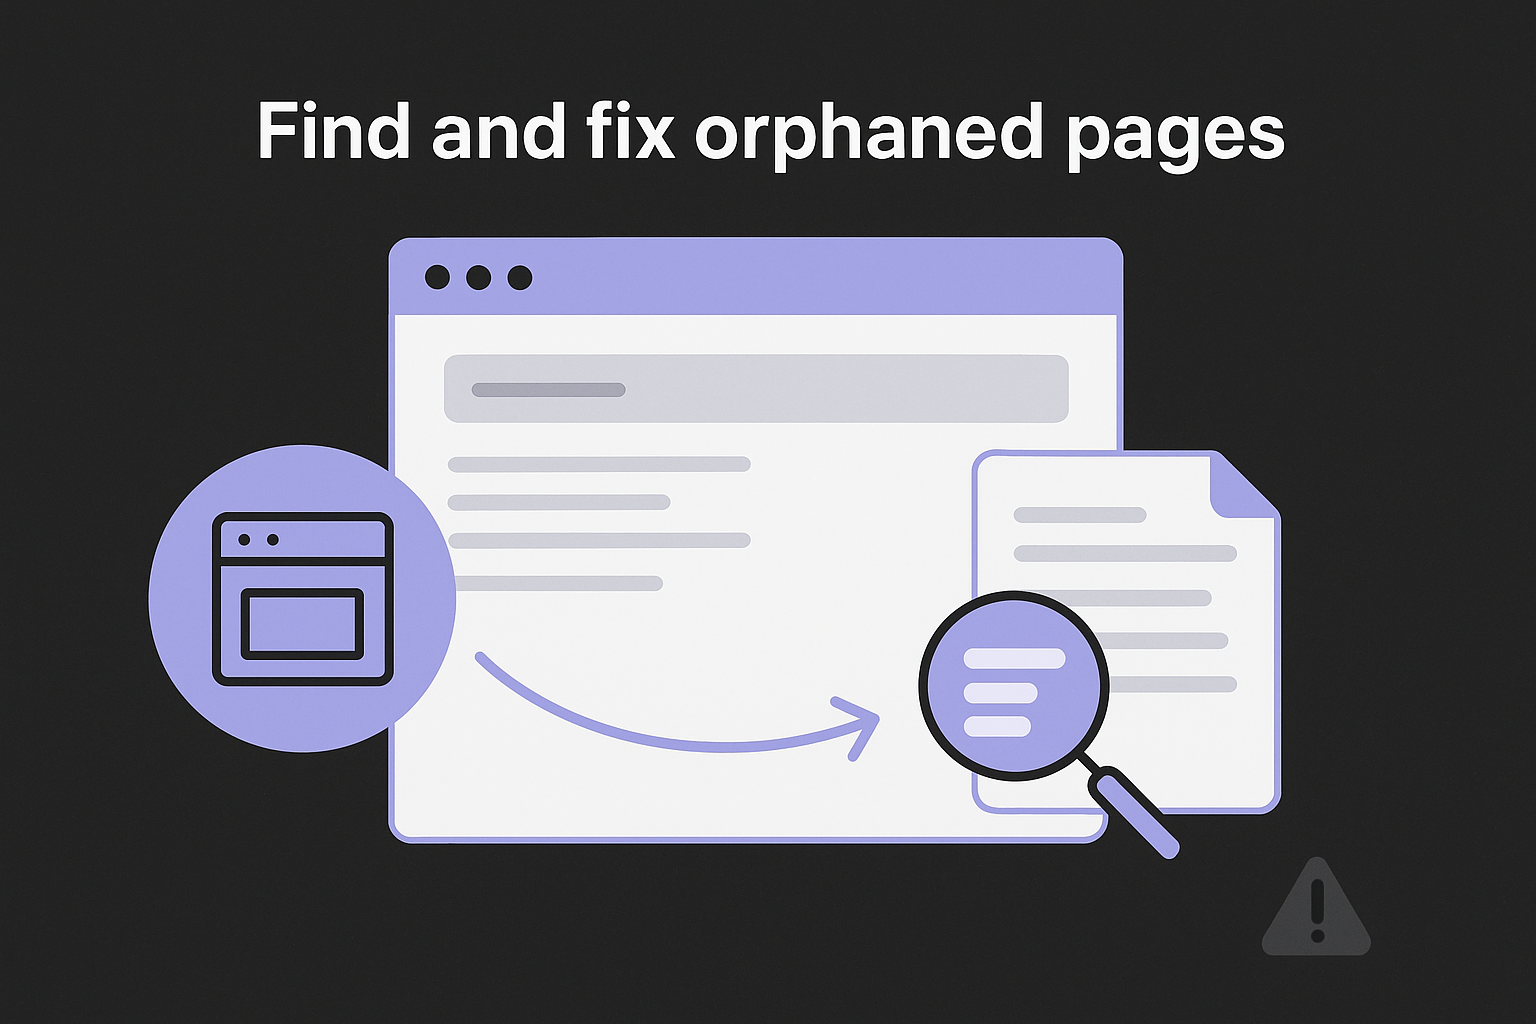
A page in your sitemap with zero internal links is essentially invisible to users and sends a weak signal to Google that the content isn't worth surfacing.
For each orphaned page you find, identify the most relevant existing page on your site and add a contextual internal link pointing to it. If no relevant page exists, that orphaned URL is a candidate for consolidation or removal rather than linking.
Reduce crawl depth and improve link distribution
Crawl depth measures how many clicks it takes to reach a page from your homepage. Pages more than three clicks deep from the homepage receive far less crawl attention than shallower pages, which means they lose ranking momentum even when high-quality external links point to the domain overall.
Pull your crawl depth report from your crawler tool and sort by depth. Use this target as your benchmark:
| Crawl depth | Target use |
|---|---|
| 1 click | Homepage, main category pages |
| 2 clicks | Subcategory pages, pillar content |
| 3 clicks | Individual posts, product pages |
| 4+ clicks | Archive pages only, no priority content |
Any high-value page sitting at depth four or deeper needs a new internal link from a shallower page to bring it closer to the surface. Add those fixes to your issue inventory with the source URL, destination URL, and suggested anchor text recorded together, so whoever implements the change has everything they need without a back-and-forth conversation.
Step 5. Check rendering, JavaScript, and blocked resources
Google renders pages in two stages: it first crawls the HTML, then comes back later to execute JavaScript. That gap means any content or links loaded by JavaScript may not get indexed at the same time as your static HTML, and in some cases may never get indexed if rendering fails. This step of your technical SEO audit checklist identifies where JavaScript is interfering with Google's ability to see your full page content and where server rules are blocking the scripts and stylesheets Google needs to render pages correctly.
Test pages with Google's URL Inspection tool
Google Search Console's URL Inspection tool shows you the rendered version of any page on your site exactly as Googlebot sees it after JavaScript execution. Open the tool, paste a URL, and compare the rendered screenshot to how the page looks in your browser. Any content that appears in your browser but disappears in the rendered screenshot is being loaded in a way Google cannot process.
If your navigation, body text, or internal links only appear after JavaScript runs, Google may never associate that content with the page, which breaks both crawl coverage and ranking signals.
For pages built heavily with React, Vue, or Angular frameworks, check whether your setup uses server-side rendering (SSR) or static site generation (SSG). Both approaches deliver pre-rendered HTML to Googlebot, which eliminates the rendering gap entirely. If your site relies entirely on client-side rendering, switching to SSR or SSG is the highest-impact fix available in this step.
Identify and unblock blocked resources
Googlebot needs access to your CSS files, JavaScript assets, and images to render pages correctly. If your server configuration, Content Security Policy header, or robots.txt blocks any of these files, Googlebot renders an incomplete version of the page. Pull the "Blocked Resources" report from Google Search Console under "Indexing" to see which assets Google could not fetch.
Your robots.txt should never block your core asset directories. A correctly configured section looks like this:
User-agent: Googlebot
Allow: /wp-content/themes/
Allow: /wp-content/plugins/
Allow: /assets/
Disallow: /wp-admin/
For each blocked resource you find, trace it back to the rule causing the block and remove it. Add every affected URL to your issue inventory with the blocking source recorded, whether that's a robots.txt directive, a CSP header, or a server-level rule, so whoever implements the fix has a precise target and doesn't have to guess.
Step 6. Review metadata and structured data
Metadata and structured data sit at the intersection of what Google reads and what users see in search results. Weak or missing title tags reduce click-through rates even when a page ranks well, and invalid schema markup means Google ignores the rich results you're trying to earn. This step of your technical SEO audit checklist covers both areas so your pages show up with the right labels and the right enhancements.
Audit title tags and meta descriptions
Your crawl export already has every title tag and meta description on the site. Pull that data into your issue inventory and flag any URL that falls into the categories below. These are the most common metadata problems and the thresholds Google uses when deciding whether to rewrite your tags in search results.
| Issue | Threshold | Fix |
|---|---|---|
| Missing title tag | Any page with no title | Write a descriptive, keyword-relevant title under 60 characters |
| Title too long | Over 600px / ~60 characters | Shorten to keep the full title visible in results |
| Duplicate title tags | Same title on two or more pages | Make each title unique to its page topic |
| Missing meta description | Any page with no description | Write a 120-155 character summary that matches search intent |
| Duplicate meta description | Same description on two or more pages | Rewrite each to reflect the specific page content |
Prioritize title tag fixes over meta descriptions because title tags carry direct ranking weight, while meta descriptions influence click-through rate but are not a ranking factor on their own. Work through your high-traffic and high-priority pages first, then batch-fix lower-priority URLs.
Validate and implement structured data
Structured data tells Google exactly what type of content your page contains, whether that's an article, product, FAQ, or review, so it can display rich results like star ratings, prices, or expanded FAQ entries in search. Use Google's Rich Results Test to validate every schema markup type you've implemented and fix any errors it flags.

Invalid structured data doesn't just fail to earn rich results, it can trigger a manual action if Google determines the markup is misleading or spam.
A correctly formatted Article schema block looks like this:
{
  "@context": "https://schema.org",
  "@type": "Article",
  "headline": "Technical SEO Audit Checklist: Step-By-Step Guide (2026)",
  "author": {
    "@type": "Person",
    "name": "Your Name"
  },
  "datePublished": "2026-01-01",
  "dateModified": "2026-06-25"
}
Add this block inside a <script type="application/ld+json"> tag in the <head> of your page. For pages that qualify for FAQ, HowTo, or Product schema, add the appropriate type and test it before publishing to confirm Google can parse it without errors.
Step 7. Improve performance, mobile UX, and security
This final step of your technical SEO audit checklist addresses the factors that affect both how Google scores your site and how real users experience it. Slow page load times, mobile layout failures, and missing HTTPS certificates all carry direct ranking consequences, so treat these as fixes rather than cosmetic improvements. Work through each area below in order before you close out the audit.
Measure and fix Core Web Vitals
Core Web Vitals are Google's performance metrics that reflect real user experience on your pages. The three signals you need to pass are Largest Contentful Paint (LCP), Cumulative Layout Shift (CLS), and Interaction to Next Paint (INP), which replaced First Input Delay in 2024. Pull your scores from the Google Search Console Core Web Vitals report and from PageSpeed Insights for page-level detail.
Failing INP on your highest-traffic pages is the single most common performance issue teams miss if they ran their last audit before 2024.
Use the thresholds below to categorize each score and decide which pages need immediate attention:
| Metric | Good | Needs Improvement | Poor |
|---|---|---|---|
| LCP | Under 2.5s | 2.5s to 4.0s | Over 4.0s |
| CLS | Under 0.1 | 0.1 to 0.25 | Over 0.25 |
| INP | Under 200ms | 200ms to 500ms | Over 500ms |
For LCP failures, the most common fix is compressing images and serving them in next-gen formats like WebP. For CLS failures, set explicit width and height attributes on all images and iframes so the browser reserves space before they load. For INP failures, reduce JavaScript execution time by deferring non-critical scripts.
Confirm mobile usability and HTTPS coverage
Google indexes the mobile version of your pages first, so mobile layout failures directly suppress rankings even if your desktop version looks fine. Open the Mobile Usability report in Google Search Console and fix every flagged issue. The most common ones are text too small to read, clickable elements placed too close together, and content wider than the screen that forces horizontal scrolling.
Check your HTTPS status by running your full URL list through your crawler and filtering for any URLs that still serve over HTTP. Every page on your site should return a 200 status over HTTPS, and your server should issue a 301 redirect from every HTTP version to its HTTPS equivalent. Confirm your SSL certificate is valid and not within 30 days of expiring by checking your hosting panel or running your domain through SSL Labs.
Next steps for the next 30 days
You now have a complete technical SEO audit checklist to work through, and the only thing left is executing it without letting momentum stall. Start your first crawl this week, build your issue inventory, and assign every High-severity fix an owner and a deadline before you move on. If you spread the seven steps across four weeks, you'll have your most critical technical issues identified and resolved within a single month, with a documented baseline to measure the improvements against.
Fixing your technical foundation is step one. Step two is making sure you have consistent, optimized content publishing to take advantage of the clean structure you just built. If that part feels like too much to manage manually, see how RankYak automates your SEO content pipeline so your site keeps growing after the audit work is done. Technical health without content is a foundation with nothing built on it.

Get Google and ChatGPT traffic on autopilot.
Start today and generate your first article within 15 minutes.

SEO revenue calculator
How much revenue is your website leaving on the table?
Take a quick quiz and see exactly how much organic revenue you're missing out on, along with personalized tips to fix it.
-
4 questions, under 1 minute
-
See traffic and revenue potential
-
No email required
Free · takes 1 minute · no signup needed
Question 1 of 4
Question 2 of 4
Question 3 of 4
Question 4 of 4
Your SEO growth potential
Extra visitors / month
after 6-12 months of consistent publishing
Revenue potential / year
at your niche's avg. conversion rate
Articles needed (12 mo)
to reach this traffic level
ROI with RankYak
at $99/mo ($1,188/year)
To hit that number, you'd need to:
- Build a topical authority strategy for your niche
- Research keywords & map out a full topical cluster
- Write, edit & publish an article every single day
- Build backlinks to the articles you publish
RankYak handles all of this automatically, every day.
* Estimates based on industry averages. Results vary by niche, competition, and domain authority. Most SEO results become visible after 3-6 months of consistent publishing.